☎ 1-800-243-0000 para el Servicio LG (Atención al Cliente) 24 horas al día, 7 días a la semana MANUAL DEL PROPIETARIO Secadora de Eléctrica y Gas / / / / / / Gracias por comprar una secadora Completamente Automática LG. Por favor lea su manual del propietario cuidadosamente, ya que le proveerá de instrucciones sobre la segura instalación, manejo y mantenimiento. Consérvelo para futuras referencias, archive el modelo y números de serie de su secadora.
☎ 1-800-243-0000 24 HOURS A DAY, 7 DAYS A WEEK FOR LG CUSTOMER SERVICE Electric and Gas Dryer / / / / / / P/No.
TABLE OF CONTENTS PART1. IMPORTANT WARRANTY AND SAFETY INSTRUCTIONS .................................................................3-5 PART2. INITIAL STEPS FOR INSTALLING YOUR DRYER .............................................................................6-11 Positioning the Dryer ...................................................................................................................................6 Procedure for Reversing the Door..........................................................
Part 1 IMPORTANT WARRANTY AND SAFETY INSTRUCTIONS SEEKING WARRANTY ASSISTANCE Warranty Service. The warranty for your dryer is printed the end of this manual. Warranty service is available by contacting your nearest LG Service Center and, for warranty period from the date of purchase, if this dryer is installed and operated according to the instructions in this manual, LG will repair or replace any of its mechanical or electrical parts if they are defective in material or workmanship.
Part 1 IMPORTANT WARRANTY AND SAFETY INSTRUCTIONS IMPORTANT SAFETY INSTRUCTIONS ! WARNING! to help reduce any risk of electric shock, fire, or other personal or property injury when using your dryer, please exercise care and follow basic safety precautions, including the following: 1) Read all instructions before using the appliance.
Part 1 ! IMPORTANT WARRANTY AND SAFETY INSTRUCTIONS WHAT TO DO IF YOU SMELL GAS: • Do not try to light a match, or cigarette, or turn on any gas or electrical appliance. ! WARNING! • Do not touch any electrical switches. Do not use any phone in your building. • Keep flammable materials and vapors, such as gasoline, away from dryer. • Clear the room, building or area of all occupants. • Place dryer at least 18 inches above the floor for a garage installation.
Part 2 INITIAL STEPS FOR INSTALLING YOUR DRYER The following instructions will help guide you through the initial steps of setting up your dryer for use. Please note that every section of this manual provides important information regarding the preparation and use of your dryer, and it is important that you review this entire manual before proceeding with any installation or use.
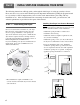
Part 2 INITIAL STEPS FOR INSTALLING YOUR DRYER Once in position, adjust the leveling legs of the dryer until it is level from left to right and from front to back. The leveling legs must remain firmly on the floor and the dryer should not rock. The maximum slope of the dryer from left to right or from front to back should not exceed 2.5 cm (1 inch). If the dryer is not level, and if the slope exceeds 2.5 cm (1 inch), a load may not tumble properly and internal sensors may malfunction.
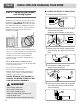
Part 2 INITIAL STEPS FOR INSTALLING YOUR DRYER STEP 3: Connecting the Exhaust and Venting System. In addition to the following warnings, please refer to manual section on Exhaust Requirements and Maintenance. IMPORTANT: To reduce the risk of fire, combustion, and gas accumulation, the dryer must be vented to the outdoors. Please follow the following instructions (and all others in this manual) very carefully. ■ ALTERNATE EXHAUST DIRECTIONS 1. Remove screw & exhaust duct. 2.
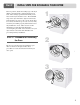
Part 2 INITIAL STEPS FOR INSTALLING YOUR DRYER STEP 4: Connection of Gas Supply (Gas dryer only). In addition to the following, please refer to manual section on Gas Requirements and Instructions. 1 2 5 3 4 1. New stainless steel flexible connector. Use this type of connector only if allowed by local codes. Use Design AGA Certified Connector. 2. 1/8" NPT Pipe Plug (for checking inlet gas pressure) 3. Equipment Shut-Off ValveInstalled within 6’ (1.8 m) of dryer 4. Iron Pipe. Shorter than 20’ (6.
Part 2 INITIAL STEPS FOR INSTALLING YOUR DRYER STEP 6: Preparation of the Dryer. STEP 8: Dryer Airflow. Prior to first use of this appliance, use an allpurpose cleaning product, or a solution of detergent and water, with a damp clothe to remove from the inside of the dryer drum/drying compartment any dust or dirt that may have accumulated inside of the dryer. Plug in your dryer after reviewing the following parts on your dryer’s Electrical Requirements.
Part 2 INITIAL STEPS FOR INSTALLING YOUR DRYER STEP 9: Additional Instructions for Installation of Your Dryer in a Manufactured or Mobile Home. The following instructions are applicable to installations of the dryer in a manufactured or mobile home. Any installation in a manufactured or mobile home must comply with the Manufactured Home Construction and Safety Standards Title 24 CFR, Part 32-80 or Standard CAN/CSA0Z240 MH and local codes and ordinances.
Part 3 ELECTRICAL REQUIREMENTS FOR ELECTRIC DRYERS Following are additional instructions regarding electrical connections and requirements for electric dryers. ! Important Warning: To help prevent fire, electric shock, serious injury or death, the wiring and grounding must conform to the latest edition of the National Electrical Code, ANSI/NFPA 70 and all applicable local regulations.
Part 3 ELECTRICAL REQUIREMENTS FOR ELECTRIC DRYERS Review the following options to determine the appropriate electrical connection for your home: 3-wire receptacle (NEMA type10-30R) Use the instructions at this section if your home has a 3-wire receptacle (NEMA type 10-30R) and you will be using a UL listed, 120/240 volt minimum, 30 amp, dryer power supply cord.
Part 3 ELECTRICAL REQUIREMENTS FOR ELECTRIC DRYERS Option 1: 3-Wire Connection with a Power Supply Cord lf your local codes or ordinances permit the connection of a frame-grounding conductor to the neutral wire, use these instructions. If your local codes or ordinances do not allow the connection of a frame-grounding conductor to the neutral wire, use the instructions under Section 3: Optional 3-wire connection. a a. b. c. d. e. d g a. b. c. d. e. f. g.
Part 3 ELECTRICAL REQUIREMENTS FOR ELECTRIC DRYERS Option 2: 4-wire connection with a Power supply cord. • lf your local codes or ordinances do not allow the use of a 3 wire connection, or you are installing your dryer in a mobile home, you must use a 4wire connection. a. b. c. d. e. f. g. 4-wire receptable (NEMA type 14-30R) 4-pront plug Ground prong Neutral Prong Spade terminals with upturned ends 3/4 in. (1.9 cm) UL approved strain relief Ring terminals a. b. c. d. e. f.
Part 3 ELECTRICAL REQUIREMENTS FOR ELECTRIC DRYERS Option 3: Optional 3-wire connection. • If your local codes or ordinances do not allow the connection of a frame-grounding conductor to the neutral wire, use the instructions under this section. 1. Remove center terminal block screw. 2. Remove appliance ground wire (green) from external ground connector screw.
Part 4 ELECTRICAL REQUIREMENTS FOR GAS DRYERS 120 Volt, 60 Hertz, with 3-Prong Grounding Plug Following are additional instructions regarding electrical connections and requirements for gas dryers. ! Important Warning: To help prevent fire, electric shock, serious injury or death, the wiring and grounding must conform to the latest edition of the National Electrical Code, ANSI/NFPA 70, or the Canadian Electrical Code, CSA C22.1, and all applicable local regulations.
Part 5 GAS REQUIREMENTS AND INSTRUCTIONS Following are important instructions and information concerning the requirements for the gas supply and service for gas dryers. ! Important Warning: The gas supply and service for a gas dryer must comply with all local codes and ordinances. In the absence of any local codes or ordinances in your area, the gas supply and service for your gas dryer must comply with the latest edition of the National Fuel Cas Code, ANSI Z223.1/NFPA 54. 1.
Part 6 EXHAUST REQUIREMENTS AND MAINTENANCE Following are important instructions and information concerning the exhaust requirements for your dryer. ! Important Warning: To reduce the risk of fire, combustion, or accumulation of combustible gases, DO NOT exhaust dryer air into an enclosed and unventilated area, such as an attic, wall, ceiling, crawl space, chimney, gas vent, or concealed space of a building. To reduce the risk of fire, DO NOT exhaust the dryer with plastic or thin foil ducting.
Part 6 EXHAUST REQUIREMENTS AND MAINTENANCE Exhaust and Dryer Maintenance ! WARNING! Disconnect the dryer’s electric power prior to any cleaning or maintenance. 1. After one year of use, the interior and complete exhaust system of the dryer should be examined and cleaned if necessary. 2. You should inspect and clean the exhaust duct at least yearly. 3.
Part 7 FEATURES AND BENEFITS Following are instructions for starting and using your new dryer. Please refer to specific sections of this manual for more detailed information. Important Warning: To reduce the risk of fire, electric shock, or injury to person, read this entire manual, including the Important Safety Instructions, before operating this dryer. ! WARNING! Fire Hazard No washer can completely remove oil. Do not dry anything that has ever had any type of oil on it (including cooking oils).
Part 7 FEATURES AND BENEFITS ■ DLE5932W / DLG5932W / DLE0332W / DLG0332W/ DLE5932S / DLG5932S ■ DLE2532W / DLG2532W STARTING YOUR DRYER 2. To use a Sensor Dry Cycle • Select an Sensor Dry Cycle. 1. Using Your Dryer 1. Clean lint screen before or after each cycle. 2. Place laundry into dryer and shut door. See Loading. 3. Turn the knob to select the drying cycle you want. The preset settings for Sensor Dry Cycles or Manual Cycles will glow.
Part 7 FEATURES AND BENEFITS Child Lock 3. To use a Manual Dry Cycle • Select a Manual Dry Cycle. • Press MORE TIME or LESS TIME until the desired drying time is displayed. Tap MORE TIME or LESS TIME and the time will change by 1 minute intervals. NOTE: The MORE TIME or LESS TIME feature can be used with Manual Dry, Time Dry, and Rack Dry Cycles. This feature allows you to lock your settings to prevent children from changing them.
Part 7 FEATURES AND BENEFITS 6. Cycle Descriptions Select the drying cycle that matches the type of load you are drying. (See Sensor Dry or Manual Preset Cycle Settings charts.) Sensor Dry Cycles allow you to match the cycle to the load you are drying. Each cycle dries certain fabrics at the recommended temperature.
Part 7 FEATURES AND BENEFITS • Time Dry Use this cycle to complete drying if items are still damp after an Sensor Dry Cycle. Time dry is also useful for drying heavyweight and bulky items, such as bedspreads and work clothes. Manual Preset Cycle Settings Manual Dry Cycles Load Type Temp. 8. Modifiers Use Modifiers to select temperatures for the Manual Cycles. Press TEMP. CONTROL until the desired temperature setting glows. Temperature modifiers cannot be used with the Sensor Dry Cycles.
Part 7 FEATURES AND BENEFITS 9. Rack Dry • Select RACK DRY and MORE TIME or LESS TIME. Reset time as needed to complete drying. Refer to the following table. The dryer rack is shipped in place in your dryer. Remove and discard any packing material before use. • Select the desired temperature setting to match the fabrics in your load by pressing TEMP. CONTROL (Air Dry-Ultra Low-Low). Items containing foam, rubber, or plastic must be dried on a clothesline or by using the Air Dry temperature setting.
Part 8 TROUBLESHOOTING GUIDE Troubleshooting Tips Save time and money! Review the charts on the following pages first and you may not need to call for service. 1.
Part 8 TROUBLESHOOTING GUIDE 4.Problem:There is Lint on my Clothes Question What to Do • Is your lint filter full? Please refer to the manual section on cleaning the lint filter, and please confirm that the lint filter is clean. It is important that the lint filter is clean before each new load of laundry.
Part 8 TROUBLESHOOTING GUIDE 7.Problem:It takes too long for my clothes to dry Question What to Do • Did you properly sort your loads of laundry? Separate heavy weight items from light weight items when creating loads. • Are you drying large loads of heavy fabrics? Heavy fabrics take longer to dry because they tend to retain more moisture. To help reduce and maintain more consistent drying times for large and heavy fabrics, separate these items into smaller loads of a consistent size.
LG DRYER LIMITED WARRANTY – USA 1-800-243-0000 1-800-243-0000 30
CONTENIDO PARTE 1 GARANTÍA E INSTRUCCIONES DE SEGURIDAD IMPORTANTES. ..................................................3-5 PARTE 2 PASOS INICIALES PARA LA INSTALACIÓN DE SU SECADORA...................................................6-11 Colocación de la Secadora............................... .........................................................................................6 Procedimiento para la Invertir Puerta.........................................................................................
Part 1 GARANTÍA E INSTRUCCIONES DE SEGURIDAD IMPORTANTES BÚSQUEDA DE ASISTENCIA SOBRE LA GARANTÍA Servicio de Garantía. La garantía de su secadora está impresa al final de este manual.
Part 1 GARANTÍA E INSTRUCCIONES DE SEGURIDAD IMPORTANTES INSTRUCCIONES DE SEGURIDAD IMPORTANTES ! ADVERTENCIA! Para ayudar a reducir el riesgo de choque eléctrico, incendio, o lesión personal o daño a la propiedad cuando use su secadora, por favor sea precavido y siga las precauciones de seguridad básicas, incluyendo las siguientes: 1) Lea todas las instrucciones antes de usar el artefacto.
Part 1 ! GARANTÍA E INSTRUCCIONES DE SEGURIDAD IMPORTANTES QUE HACER EN CASO DE OLER GAS: • No intente encender un fósforo, o cigarrillo, o encender ningún artefacto a gas o eléctrico. • No toque ningún interruptor eléctrico. No use ningún teléfono en su casa o edificio. • Evacue la habitación, edificio o el área de todos los ocupantes. • Llame inmediatamente a su proveedor de gas desde el teléfono de un vecino. Siga cuidadosamente las instrucciones de su proveedor de gas.
Part 2 PASOS INICIALES PARA LA INSTALACIÓN DE SU SECADORA Las siguientes instrucciones le servirán de guía a través de los pasos iniciales para la preparación de su secadora para el uso. Por favor note que cada sección de este manual proporciona información importante sobre la preparación y uso de su secadora, y es muy importante que lea este manual completamente antes de proceder con cualquiera instalación o con su uso.
Part 2 PASOS INICIALES PARA LA INSTALACIÓN DE SU SECADORA Una vez en posición ajuste las patas niveladoras de la secadora hasta que esté nivelada de izquierda a derecha y del frente hacia atrás. Las patas niveladoras deben permanecer firmes en el piso y la secadora no debe mecerse. La máxima inclinación de la secadora de izquierda a derecha o del frente hacia atrás no debe ser mayor de 2.5 cm (1 pulgada). Si la secadora no está nivelada, y si la inclinación excede los 2.
Part 2 PASOS INICIALES PARA LA INSTALACIÓN DE SU SECADORA PASO 3: Conexión del Sistema de Escape y Ventilación. Además de las siguientes advertencias, por favor refiérase a la sección del manual sobre Requerimientos y Mantenimientodel Escape. IMPORTANTE: Para reducir el riesgo de incendio, combustión y acumulación de gas, la secadora debe estar ventilada hacia la intemperie. Por favor siga las siguientes instrucciones (y todas las otras en este manual) muy cuidadosamente.
Part 2 PASOS INICIALES PARA LA INSTALACIÓN DE SU SECADORA PASO 4: Conexión del Suministro de Gas (Secadora a Gas solamente). Además de lo siguiente, por favor refiérase a la sección del manual sobre Requerimientos e Instrucciones del Gas. 1 2 5 3 4 1. Conector flexible nuevo de acero inoxidable. Utilice este tipo de conector sólo si es permitido por los códigos locales. Use un conector de diseño AGA Certificado. 2. Conector de tubo NPT de 1/8" (para verificar la presión de entrada de gas) 3.
Part 2 PASOS INICIALES PARA LA INSTALACIÓN DE SU SECADORA PASO 6: Preparación de la Secadora PASO 8: Flujo de Aire Antes de usar por primera ves esta secadora, utilice un producto limpiador para todo propósito, o una solución de detergente y agua, con un paño húmedo para remover de la parte interior del tambor de la secadora /compartimiento de secado cualquier polvo o sucio que se haya podido acumular dentro de la secadora.
Part 2 PASOS INICIALES PARA LA INSTALACIÓN DE SU SECADORA PASO 9: Instrucciones Adicionales para la Instalación de su Secadora en una Casa Prefabricada o Móvil. Las siguientes instrucciones se aplican a instalaciones de la secadora en casas prefabricadas o móvil. La instalación en una casa prefabricada o móvil debe cumplir con los estándares de Seguridad y Construcción de Casas Prefabricadas, Título 24 CFR, Parte 32-80 o el Estándar CAN/CSA0Z240 MH y los códigos y ordenanzas locales.
Part 3 REQUERIMIENTOS ELÉCTRICOS PARA SECADORAS ELÉCTRICAS Las siguientes son instrucciones adicionales sobre las conexiones y requerimientos eléctricos para las secadoras eléctricas. ! Advertencia Importante: Para ayudar a prevenir incendios, choque eléctrico, lesiones serias o muerte, el cableado y la conexión a tierra deben estar de acuerdo con la edición más reciente del código Eléctrico Nacional, ANSI/NFPA 70 y todas las regulaciones locales aplicables.
Part 3 REQUERIMIENTOS ELÉCTRICOS PARA SECADORAS ELÉCTRICAS Revise las siguientes opciones para determinar la conexión eléctrica adecuada para su casa: Tomacorriente de 3-alambres (Tipo NEMA 10-30R) Utilice las instrucciones en esta sección si su casa tiene un tomacorriente de 3-alambres (Tipo NEMA 10-30R) y si usará un cordón de alimentación para secadora listado por UL, de 120/240 voltios mínimo y de 30 amp. Tomacorriente de 4-alambres (Tipo NEMA 14-30R).
Part 3 REQUERIMIENTOS ELÉCTRICOS PARA SECADORAS ELÉCTRICAS Opción 1: Conexión de 3-Alambres con un Cordón de Alimentación. Si los códigos y ordenanzas locales permiten la conexión de un conductor estructura-tierra al alambre neutral, utilice estas instrucciones. Si los códigos y ordenanzas locales no permiten la conexión de un conductor estructura-tierra al alambre neutral, utilice las instrucciones bajo la Sección 3: Conexión opcional de 3-alambres. a a. b. c. d g a. b. c. d. e. f. g.
Part 3 REQUERIMIENTOS ELÉCTRICOS PARA SECADORAS ELÉCTRICAS Opción 2: Conexión de 4-alambres con un Cordón de Alimentación. • Si los códigos y ordenanzas locales no permiten el uso de una conexión de 3 alambres, o está instalando la secadora en una casa móvil, debe usar una conexión de 4-alambres. a. b. a. b. c. d. e. f. g. Tomacorriente de 4-alambres (Tipo NEMA14-30R) Enchufe de 4-clavijas Clavija a tierra Clavija neutral Terminal de espada con puntas levantadas Liberador de tensión de 3/4 pulgadas (1.
Part 3 REQUERIMIENTOS ELÉCTRICOS PARA SECADORAS ELÉCTRICAS Opción 3: Conexión Opcional de 3alambres. • Si los códigos y ordenanzas locales no permiten la conexión de un conductor estructura-tierra a un cable neutral, utilice las instrucciones bajo esta sección. 1. Remueva el tornillo central de la caja terminal. 2. Remueva el alambre a tierra del artefacto (verde) del tornillo externo del conector a tierra.
Part 4 REQUERIMIENTOS ELÉCTRICOS PARA SECADORAS A GAS 120 Voltios, 60 Hertz, con Enchufe de 3-Clavijas con Conexión a Tierra Las siguientes son instrucciones adicionales sobre las conexiones y requerimientos eléctricos para las secadoras a gas.
Part 5 REQUERIMIENTOS E INSTRUCCIONES SOBRE EL GAS Las siguientes son instrucciones e información importante concernientes a los requerimientos para el suministro y servicio del gas para las secadoras a gas. ! Advertencia Importante: El suministro y servicio del gas para las secadoras a gas debe cumplir con los códigos y ordenanzas locales.
Part 6 REQUERIMIENTOS Y MANTENIMIENTO SOBRE EL ESCAPE Las siguientes son instrucciones e información importante concernientes a los requerimientos del escape para su secadora. ! Advertencia Importante: Para reducir el riesgo de incendio, combustión, o acumulación de gases combustibles, NO dirija el escape de la secadora hacia un área cerrada y no ventilada, como un ático, pared, techo, sótano, chimenea, salidas de gas, o espacio oculto de un edificio.
Part 6 REQUERIMIENTOS Y MANTENIMIENTO SOBRE EL ESCAPE Mantenimiento del Escape y la Secadora ! ADVERTENCIA! Desconecte la energía eléctrica de la secadora antes de efectuar limpieza o mantenimiento. 1. Después de un año de uso, el interior y todo el sistema de escape de la secadora debe ser examinado y limpiado si es necesario. 2. Debe inspeccionar y limpiar el ducto de escape por lo menos una vez al año. 3.
Part 7 CARACTERÍSTICAS Y BENEFICIOS Las siguientes son las instrucciones para encender y utilizar su nueva secadora. Por favor refiérase a las secciones especificas de este manual para información más detallada. Advertencia Importante: Para reducir el riesgo de incendio, choque eléctrico, o lesiones personales lea este manual completamente, incluyendo las Instrucciones de Seguridad Importantes, antes de operar esta secadora.
Part 7 CARACTERÍSTICAS Y BENEFICIOS ■ DLE5932W / DLG5932W / DLE0332W / DLG0332W/ DLE5932S / DLG5932S ■ DLE2532W / DLG2532W ENCENDIDO DE LA SECADORA 1. Uso de la Secadora 1. Limpie la malla de pelusa antes o después de cada ciclo. 2. Coloque la ropa dentro de la secadora y cierre la puerta.Véase Cargar. 3. Gire la perilla para seleccionar el ciclo de secado que desea. Las características predeterminadas para los ciclos de SENSOR DRY(Sensor de secado) y MANUAL DRY(Secado Manual) brillarán.
Part 7 CARACTERÍSTICAS Y BENEFICIOS 3. Para Usar un Ciclo de manual dry[Secado Manual] • Seleccione un Ciclo de manual dry. • Presione MORE TIME[Más Tiempo] o LESS TIME[Menos Tiempo] hasta que el tiempo deseado de secado se muestre en pantalla. Presione MORE TIME[Más Tiempo] o LESS TIME[Menos Tiempo] y el tiempo en pantalla cambiará por intervalos de un minuto.
Part 7 CARACTERÍSTICAS Y BENEFICIOS 6. Descripción de los Ciclos. Características Predeterminadas del Ciclo de Sensor Dry[sensor de secado] Seleccione el ciclo de secado que concuerde con el tipo de carga que desea secar. Tipos de Cargas del Ciclo de Sensor Dry [sensor de secado] Temperatura Tiempo* (Minutos) Heavy duty[Pesado] Telas pesadas, Jeans. High[Alto] 54 Cotton/Towels (Algodón/Toallas) Mezclilla/Toallas. Medium High [Medio Alto] 55 Normal Pana, de trabajo. Medium[Medio] 41 Perm.
Part 7 CARACTERÍSTICAS Y BENEFICIOS • Time Dry [Tempo de Secado] Use este ciclo para secar por completo prendas que aún estén húmedas después de un Ciclo de SENSOR DRY[sensor de secado]. El TIME DRY [Tempo de Secado] es útil también para secar prendas pesadas, de telas robustas, como ropa de trabajo, Colchas. Características Predeterminadas del Ciclo Manual Seco Manualmente Carga de Ciclos Tipo TEMP.
Part 7 CARACTERÍSTICAS Y BENEFICIOS 9. Rack Dry[Secado con Parrilla] El perchero de secado viene incluido en su secadora. Retire y deseche el material envolvente antes de usarlo. Use el RACK DRY[Secado con Parrilla] para artículos que usted no quiera secar dando vueltas, así como suéteres. Cuando use el perchero de secado con calor, el aire caliente dentro de la secadora fluirá en una trayectoria concentrada que permitirá un secado uniforme y eficiente.
Part 8 GUÍA PARA LA SOLUCIÓN DE PROBLEMAS Consejos para la solución de problemas Ahorre tiempo y dinero! Primero revise las tablas en las siguientes p áginas y quizás no necesite llamar a servicio.
Part 8 28 GUÍA PARA LA SOLUCIÓN DE PROBLEMAS
Part 8 GUÍA PARA LA SOLUCIÓN DE PROBLEMAS 29
GARANTÍA LIMITADA DE LA SECADORA LG-USA 1-800-243-0000 1-800-243-0000 30