ENGLISH OWNER’S MANUAL KARAOKE DVD Micro Hi-Fi System Please read this manual carefully before operating your set and retain it for future reference. DM2630K (DM2630K, DMS2630V) DM2630K-FH_DRUSLLG_ENG.
Getting Started Safety Information 1 CAUTION Getting Started RISK OF ELECTRIC SHOCK DO NOT OPEN CAUTION: TO REDUCE THE RISK OF ELECTRIC SHOCK DO NOT REMOVE COVER (OR BACK) NO USER-SERVICEABLE PARTS INSIDE REFER SERVICING TO QUALIFIED SERVICE PERSONNEL.
Getting Started This device is equipped with a portable battery or accumulator. Disposal of your old appliance 1. When this crossed-out wheeled bin symbol is attached to a product it means the product is covered by the European Directive 2002/96/EC. 2. All electrical and electronic products should be disposed of separately from the municipal waste stream via designated collection facilities appointed by the government or the local authorities. 3.
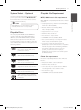
Table of Contents Table of Contents 3 System Setting 1 Getting Started 2 6 6 6 6 6 6 6 6 7 7 7 8 10 11 Safety Information Unique Features – Portable In – Full HD up-scaling Accessories Introduction – Symbols Used in this Manual – About the “&” Symbol Display – Regional Codes – System Select - Optional – Playable Discs – Playable file Requirement Remote control Front panel Rear panel 18 18 18 18 19 20 21 Adjust the setup settings – To display and exit the Setup menu – Language – Display – Audio –
Table of Contents 5 Troubleshooting 35 Troubleshooting 6 Appendix 36 37 38 39 41 41 41 Area Code List Language code List Trademarks and Licenses Specifications Maintenance – Handling the Unit – Notes on Discs 5 1 2 3 4 5 6 DM2630K-FH_DRUSLLG_ENG.
1 Getting Started Unique Features Introduction Portable In Symbols Used in this Manual Getting Started Listens to music from your portable device. (MP3, Notebook, etc) r DVD-Video, DVD±R/RW in Video mode and finalized Full HD up-scaling t Audio CDs Views Full HD picture quality with simple setup. Accessories Please check and identify the supplied accessories.
Getting Started System Select - Optional You must select the appropriate system mode for your TV system. Press and hold M PAUSE/STEP for more than five seconds to be able to select a system in the [Home Menu].
Getting Started DivX file requirement DivX file compatibility with this unit is limited as follows: 1 yy Available resolution: within 800 x 600 (W x H) pixels. Getting Started yy The file name of the DivX subtitle should be entered within 45 characters. Remote control yy If there is impossible code to express in the DivX file, it may be displayed as “ _ “ mark on the display. yy Frame rate : less than 30 fps.
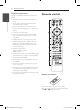
Getting Started 9 • • • • • • c • • • • • • • • • • • • e • • • • • • Z STOP : Stops playback. 0-9 numerical buttons : Selects numbered options in a menu. MARKER(SHADOW) : - Starts playback. - Selects Mono/ Stereo. CLEAR : Removes a number when setting the password. M PAUSE/STEP: Pauses playback. REPEAT ( 1 POWER : Switches the unit ON or OFF. C/V (Skip): Goes to the next or previous chapter / track / file. - Selects a play mode.
Getting Started Front panel 1 Getting Started a PORT. IN Connects to a portable player with audio outputs. PHONES Headphone jack USB Port Connects a USB device. EQ You can choose fixed sound impression. SET/DEMO - Confirms the setting. - Demonstrates each of functions. TIMER Sets an alarm clock. c Disc slot Loads a disc d MIC 1 / MIC 2 Connects microphones to each of jacks. e 1/! (Power) Switches the unit ON or OFF. f R (Open/Close) Inserts or ejects a disc. g VOL.
Getting Started 11 Rear panel 1 Getting Started >>Caution a Power cord Precautions in using the touch buttons b Cooling Fan yy Use the touch buttons with clean and dry hands. - In a humid environment, wipe out any moisture on the touch buttons before using. c Speakers connectors Connects the speaker cables. yy Do not press the touch buttons hard to make it work. - If you apply too much strength, it can damage the sensor of the touch buttons.
2 Connecting Attaching the speakers to the unit Connections to Your TV To connect the cable to the unit, press each plastic finger pad to open the connection terminals on the unit. Insert the wire and release the finger pad. Make one of the following connections, depending on the capabilities of your existing equipment. Connect the black wire to the terminals marked - (minus) and the other end to the terminals marked + (plus).
Connecting 13 Component Video Connection HDMI Out Connection Connect the OUTPUT COMPONENT VIDEO (PROGRESSIVE SCAN) jacks on the unit to the corresponding input jacks on the TV using component cables. If you have a HDMI TV or monitor, you can connect it to this unit using a HDMI cable (Type A, High Speed HDMI™ cable). Connect the HDMI OUT TO TV jack on the unit to the HDMI IN jack on a HDMI compatible TV or monitor. Set the TV’s source to HDMI (refer to TV’s Owner’s manual).
Connecting ,,Note yy If a connected HDMI device does not accept the audio output of the unit, the HDMI device’s audio sound may be distorted or may not output. 2 Connecting yy When you connect a HDMI or DVI compatible device make sure of the following: - Try switching off the HDMI/DVI device and this unit. Next, switch on the HDMI/DVI device and leave it for around 30 seconds, then switch on this unit. - The connected device’s video input is set correctly for this unit.
Connecting Resolution Setting The unit provides several output resolutions for HDMI OUT TO TV and COMPONENT VIDEO OUT jacks. You can change the resolution using [Setup] menu. 1. Press n HOME. 2. Use A/D to select the [Setup] and press b ENTER. The [Setup] menu appears. 15 Optional Equipment Connection AUDIO (PORT. IN) In Connection Connect an output of portable device (MP3 or PMP etc) to the AUDIO (PORT. IN) input connector. 2 Connecting 3.
Connecting OPTICAL In connection Antenna Connection Connect an optical output of Unit (or Digital Device etc) to the OPTICAL IN connector. Connect the supplied FM antenna for listening to the radio. Connect the FM Wire antenna to the FM antenna connector. 2 Connecting To the digital optical output jack of your component Speaker ez(Easy) setup Listen to sound from TV, DVD and Digital Device with 2 channel mode. ,,Note Be sure to fully extend the FM wire antenna.
Connecting USB Connection Compatible USB Devices Connect the USB port of USB Memory (or MP3 player, etc.) to the USB port on the front of the unit. yy MP3 Player : Flash type MP3 player 17 yy USB Flash Drive : Devices that support USB 2.0 or USB 1.1. yy The USB function of this unit does not support some USB devices. USB device requirement yy Do not extract the USB device while in operation. yy For a large capacity USB, it may take longer than a few minute to be searched.
3 18 System Setting System Setting Adjust the setup settings By using the Setup menu, you can make various adjustments to items such as picture and sound. You can also set a language for the subtitles and the Setup menu, among other things. For details on each Setup menu item, see pages 18 to 22. To display and exit the Setup menu 3 1. Press n HOME. Displays the [Home Menu]. Language Menu Language Select a language for the Setup menu and OnScreen Display.
System Setting Display Mode Audio The Display Mode setting works only when the TV Aspect mode is set to 4:3. DRC (Dynamic Range Control) [Letterbox] Displays a wide picture with bands on the upper and lower portions of the screen. [Panscan] Automatically displays the wide picture on the entire screen and cuts off the portions that do not fit. (If the disc/file is not compatible with Pan Scan, the picture is displayed at Letterbox ratio.
System Setting Semi Karaoke Lock (Parental Control) When a chapter/title/track is fully finished, this function shows the score in the screen with a fanfare sound. Initial Setting the Area Code [On] When you finished singing a score will appear on the screen. [Off] Fanfare and score do not appear on the screen. ,,Note 3 yy DVD, DVD Karaoke discs with more than 2 tracks are available discs for this function.
System Setting Password 21 Others You can enter or change password. 1. Select [Password] on the [Lock] menu and then press D. 2. Press b ENTER. 3. Input a password and press b ENTER. To change the password, press b ENTER when the [Change] option is highlighted. Input a password and press b ENTER. Enter it again and press b ENTER to verify. 4. Press n HOME to exit the menu. ,,Note If you forget your password, you can clear it using the following steps: 2.
System Setting SSR (Real Time Score) This function will be shown the Score to real time by checking interval and beat during sing a song in the karaoke mode only. [On] Score bar shows levels while checking the interval and beat. [Off] Score bar are not displayed on the screen. This function is not supported the Semi karaoke mode. 3 System Setting DM2630K-FH_DRUSLLG_ENG.
Operating 23 Using the Home Menu 1. Press n HOME. Displays the [Home Menu]. 2. Select an option by using AD. 3. Press b ENTER then selected option menu. [Music] – Displays [MUSIC] menu. [Movie] – Start video media’s playback or displays the [MOVIE] menu. [Photo] – Displays [PHOTO] menu. [Karaoke] – Start Karaoke menu. [Setup] – Displays the [Setup] menu. ,,Note Stop 2. Press n HOME. Displays the [Home Menu]. 3. Select an option by using AD.
Operating Other Operations To display the DVD Menu Displaying Disc Information on-screen When you play a DVD which contains several menu, you can select the menu you want using the Menu. You can display various information about the disc loaded on-screen. 1. Press m INFO/DISPLAY to show various playback information. The displayed items differ depending on the disc type or playing status. 2. You can select an item by pressing WS and change or select the setting by pressing AD. 4 r 1.
Operating 25 Starting play from selected time ry To start playing at any chosen time on the file or title. 1. Press m INFO/DISPLAY during playback. Changing subtitle code page y If the subtitle is not displayed properly, you can change the subtitle code page to view the subtitle file properly. 1. During playback, press m INFO/DISPLAY to display the On-Screen display. 2. Press WS to select the time clock icon and “--:--:--” appears. 2. Use WS to select the [Code Page] option. 3.
Operating Marked Playback ut The mark function enables you to store your favourite files from any disc or USB device in the unit memory. 1. Select [Music] on the [Home Menu]. Returning to the upper folder. (MP3/ WMA only) File information will be displayed according to the ID3TAG information on the appropriate music file. (MP3 only) To delete a Marker 1. Use WS to select the track that you wish to erase from the marked file. 2. Press MARKER.
Operating 27 About help menu in the [Photo] menu Menu Buttons d Slide Show d PLAY, MONO/ STEREO Operation wsad Move SWAD Moving to another file or content. b Select b ENTER Viewing a particular file. x Close x RETURN Viewing a slide show. Options while viewing a photo You can use various options during viewing a photo in full screen. 1. While viewing a photo in full screen, press m INFO/DISPLAY to display the option menu. 2. Select an option using SWAD. Returning to the [Home Menu].
Operating Radio Operations Presetting the Radio Stations Be sure that both FM aerial is connected. (Refer to the page 16.) Before tuning, make sure that you have turned down the volume. Listening to the radio 1. Select tuner (FM) function by using P RADIO&INPUT. 1. Select tuner (FM) function by using P RADIO&INPUT on the remote control or FUNC. on the unit. The last received station is tuned in. 2.
Operating 29 Sound adjustment ,,Note Setting the surround mode yy In some of surround modes, some speakers, there’s no sound or low sound. It depends on the mode of surround and the source of audio, it is not defective. This system has a number of pre-set surround sound fields. You can select a desired sound mode by using SOUND EFFECT. yy You may need to reset the surround mode, after switching the input, sometimes even after the sound track changed.
Operating Advanced operations To adjust ECHO Volume Karaoke Basic Playback Press the ECHO VOL(+/-) on the remote control to increase the echo volume or decrease it. (MIN, 1~14, MAX steps) 1. Turn on the power of TV and the unit. You can give an echo effect to the sound from the microphones. 2. Connect the microphone to the MIC jacks. 3. Insert the supplied karaoke disc into the disc slot on the unit. It will be started to play the karaoke disc. To adjust the Tone Control 4.
Operating 31 Reserving melodies Karaoke MENU Playback When you want to make a reservation of next melody, you can enjoy the reservation without waiting. 1. To move to the main menu, press DISC MENU on the remote control. The main menu appears on the screen. 1. Enter the melody number by using the numerical buttons on the remote control. The melody number appears on the TV screen. 2. Press RESERVATION on the remote control to reserve the melody number. The melody number is reserved. 3.
Operating 2. список композиций (Music list) You can select a desired song on each music list. Select one among followings when you selected РОССИЙСКИЕ ПЕСНИ / ЗАРУБЕЖНЫЕ ПЕСНИ (LOCAL SONG / POP SONG) in the previous step. Select one among followings when you selected КЛАССИЧЕСКАЯ МУЗЫКА (CLASSIC LIST) in the previous step. 4 4. Select number to sing along with the accompaniment. 5. Repeat the step 4. Change the team of red or blue team alternately. Operating 6.
Operating 33 Using Microphone VOCAL FADER 1. Connect your microphone to the MIC 1, 2 on the unit. 2. Play the music you want. You can enjoy the function as karaoke, by reducing singer vocal of music in the various sources. (MP3/ WMA/ CD/ etc.) 3. Sing along with the accompaniment. Adjust the microphone volume by pressing MIC VOL(+/-) on the remote control. To cancel it, press VOCAL FADER again. ,,Note yy When not using the microphone, set the microphone volume as low as possible or turn off the MIC.
Operating Using your player as an alarm clock 1. Turn the unit on. 2. Press TIMER. Each functions flashes. 3. Press SET/DEMO when the function you want to be woken by is showing. 4. “ON TIME” will be displayed. This is your desired time to unit turns on. Press Y/U to change the hours and minutes and press SET/ DEMO to save. 5. “OFF TIME” will be displayed. This is your desired time to unit turns off. Press Y/U to change the hours and minutes and press SET/ DEMO to save. 6.
Troubleshooting 35 Troubleshooting PROBLEM No power No picture CORRECTION Plug the power cord into the wall outlet securely. Select the appropriate video input mode on the TV so the picture from the unit appears on the TV screen. Connect the video cables securely to both the TV and unit. Select the correct input mode of the unit so you can hear the sound from the unit. There is little or no sound. Connect the audio cables into the connection terminals correctly. Replace with a new audio cable.
6 Appendix 36 Appendix Area Code List Choose an area code from this list.
Appendix 37 Language code List Use this list to input your desired language for the following initial settings: [Disc Audio], [Disc Subtitle] and [Disc Menu].
Appendix Trademarks and Licenses The terms HDMI and HDMI High-Definition Multimedia Interface, and the HDMI logo are trademarks or registered trademarks of HDMI Licensing LLC in the United States and other countries. Notes on Copyrights yy This product incorporates copyright protection technology that is protected by U.S. patents and other intellectual property rights.
Appendix 39 Specifications General Power requirements 200 - 240 V ~ 50 / 60 Hz Power consumption 45 W Dimensions (W x H x D) (285 x 130 x 292) mm Net Weight (Approx.) 3.7 kg Operating temperature 5 °C to 35 °C (41 °F to 95 °F) Operating humidity 5 % to 90 % Inputs/ Outputs VIDEO OUT 1.0 V (p-p), 75 Ω, sync negative, RCA jack x 1 COMPONENT VIDEO OUT (Y) 1.0 V (p-p), 75 Ω, sync negative, RCA jack x 1 (Pb)/(Pr) 0.
Appendix Amplifier Stereo mode 80 W + 80 W (4 Ω at 1 kHz, THD 10 %) Front Speaker Type 3 Way 4 speaker Impedance 4Ω Rated Input Power 80 W Max. Input Power 160 W Net Dimensions (W x H x D) (132 x 286 x 304) mm Net Weight 4.4 kg Design and specifications are subject to change without notice. 6 Appendix DM2630K-FH_DRUSLLG_ENG.
Appendix Maintenance Handling the Unit When shipping the unit Please save the original shipping carton and packing materials. If you need to ship the unit, for maximum protection, re-pack the unit as it was originally packed at the factory. Keeping the exterior surfaces clean yy Do not use volatile liquids such as insecticide spray near the unit. yy Wiping with strong pressure may damage the surface. yy Do not leave rubber or plastic products in contact with the unit for a long period of time.
Україна Name and address of importer: ПІІ ‘ЛГ Електронікс Україна’, Україна, 01004, м. Київ, вул. Басейна, 4 (літера А), тел.: +38 (044) 201-43-50, факс: +38 (044) 201-43-73 Российская Федерация Импортер OOO “ЛГ Электроникс Рус” Адрес импортера : 143160 Российская Федерация, Московская область, Рузский район, сельское поселение Дороховское, 86 км. Минского шоссе, д.9 Адрес производителя : ЛГ Электроникс (Хужоу) Инк., завод Хатаи, 516006, Китай, пров. ГуанДонг, г.