ENGLISH FRANÇAIS PORTUGUÊS OWNER’S MANUAL DVD MINI Hi-Fi System Please read this manual carefully before operating your set and retain it for future reference. DM5420 (DM5420, DMS5420V) DM5420-FU.AGHALLK_1718-ENG.
DM5420-FU.AGHALLK_1718-ENG.
1 Getting Started Getting Started 3 Safety Information CAUTION CAUTION: TO REDUCE THE RISK OF ELECTRIC SHOCK DO NOT REMOVE COVER (OR BACK) NO USER-SERVICEABLE PARTS INSIDE REFER SERVICING TO QUALIFIED SERVICE PERSONNEL. This lightning flash with arrowhead symbol within an equilateral triangle is intended to alert the user to the presence of uninsulated dangerous voltage within the product’s enclosure that may be of sufficient magnitude to constitute a risk of electric shock to persons.
Getting Started This device is equipped with a portable battery or accumulator. 1 Getting Started Safety way to remove the battery or the battery from the equipment: Remove the old battery or battery pack, follow the steps in reverse order than the assembly. To prevent contamination of the environment and bring on possible threat to human and animal health, the old battery or the battery put it in the appropriate container at designated collection points.
Table of Contents Table of Contents 1 Getting Started 3 7 7 7 7 7 7 7 8 8 8 8 8 9 9 9 10 11 13 Safety Information Unique Features – USB Direct Recording – AUTO DJ Accessories Introduction – Playable Discs – About the & Symbol Display – Symbol Used in this Manual – Regional Codes Playable file Requirement – MP3/WMA music file requirement – Compatible USB Devices – USB device requirement – Photo file requirement – DivX file requirement Remote control Front panel Rear panel 2 Connecting 14 14 14 15 15 1
Table of Contents 5 Appendix 33 34 35 37 37 37 37 Area Codes Language Codes Specifications Maintenance – Handling the Unit – Notes on Discs Trademarks and Licenses DM5420-FU.AGHALLK_1718-ENG.
Getting Started Unique Features Introduction USB Direct Recording Playable Discs Records music to your USB device. This unit plays DVD±R/RW and CD-R/RW that contains audio titles, DivX, MP3, WMA and/or JPEG files. Some DVD±RW/DVD±R or CD-RW/ CD-R cannot be played on this unit due to the recording quality or physical condition of the disc, or the characteristics of the recording device and authoring software. Blends the end of one song into the beginning of another for seamless playback.
Getting Started Symbol Used in this Manual DVD and finalized DVD±R/RW 1 r Getting Started DivX files y MP3/WMA files, Audio CDs u JPG files i Regional Codes This unit has a regional code printed on the rear of the unit. This unit can play only DVD discs labelled same as the rear of the unit or “ALL”. •• Most DVD discs have a globe with one or more numbers in it clearly visible on the cover. This number must match your unit’s regional code or the disc cannot play.
Getting Started USB device requirement DivX file requirement •• Devices which require additional program installation when you have connected it to a computer, are not supported. DivX file compatibility with this unit is limited as follows : 1 •• Available resolution: up to 800 x 600 (W x H) pixels. •• For a large capacity USB, it may take longer than a few minute to be searched. •• The file name of the DivX subtitle should be entered 45 characters or less.
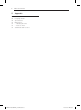
Getting Started Remote control 1 Getting Started • • • • • • a • • • • • • REPEAT : Selects a play mode. 1(POWER) : Switches the unit ON or OFF. VOL(+/-) (Volume) : Adjusts volume level. B(OPEN/CLOSE) : Opens and closes the disc tray. SOUND EFFECT9 : Selects a sound effect mode. FUNCTION : Selects the function and input source. MUTE@: Mutes the sound. D.SKIP : Chooses a desired disc.
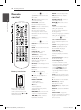
Getting Started 11 Front panel 1 Getting Started 1/! AUX PR ESE T- EQ DM5420-FU.AGHALLK_1718-ENG.
Getting Started a MIC 1,2 Connects a microphone to this jack. 1 Getting Started < Headphone jack A warning that excessive sound pressure from earphones and headphones can cause hearing loss. b DISC SKIP Chooses a desired Disc. c AUTO DJ Selects the AUTO DJ mode. d USER EQ Controls sound register. e LG EQ Selects a Natural or Local Specialization equalizer effect by LG EQ. f EQ Chooses sound impressions. g SET/CD M - Pauses or confirms the setting. - Pauses playback.
Getting Started 13 Rear panel 1 Getting Started FM Y PB a SPEAKERS terminal b Power cord c VIDEO OUT connector d ANTENNA (FM) e COMPONENT VIDEO OUT (PROGRESSIVE SCAN) connectors f AUX IN connectors (L/R) DM5420-FU.AGHALLK_1718-ENG.
Connecting 14 Connecting to speakers Antenna Connection Connect the supplied FM antenna for listening to the radio. Attaching the speakers to the unit 2 Connecting To connect the cable to the unit, press each plastic finger pad to open the connection terminals on the unit. Insert the wire and release the finger pad. Connect the black stripe of each wire to the terminals marked - (minus) and the other end to the terminals marked + (plus).
Connecting Connections to Your TV 15 Video Connection Connect the VIDEO OUT jack on the unit to the video in jack on the TV by using a video cable. Make one of the following connections, depending on the capabilities of your existing equipment. ,,Note •• Depending on your TV and other equipment you wish to connect, there are various ways you could connect the unit. Use only one of the connections described in this manual.
Connecting Component Video Connection Connect the COMPONENT VIDEO OUT (PROGRESSIVE SCAN) jacks on the unit to the corresponding input jacks on the TV by using component cables. You can hear the sound through the system’s speakers. Optional Equipment Connection AUX In Connection Connect an Output of auxiliary device to the AUX (L/R) IN Connector. 2 Connecting Y PB Y PB Red White To the audio output jacks of your component (TV, VCR, etc.
Connecting USB Connection Connect the USB port of USB Memory (or MP3 player, etc.) to the USB port on the front of the unit. 1/! AUX Adjust the Setup settings By using the Setup menu, you can make various adjustments to items such as picture and sound. You can also set a language for the subtitles and the Setup menu among other things. refer to the contents as following. PR ESET - EQ 17 When using this unit for the first time, the initial language Setup menu appears on your TV screen.
Connecting To display and exit the Setup Menu 1. Select the DVD/CD or USB function by pressing FUNCTION on the remote control or by pressing DVD/CD or USB on the unit. 2 LANGUAGE OSD Select a language for the Setup menu and then on screen display. 2. Press SETUP on the remote control. Displays the [SETUP] Menu. Disc Audio/Disc Subtitle/Disc Menu 3. Press SETUP or BACKx to exit in the [SETUP] Menu. Select the language you prefer for the audio track (disc audio), subtitles, and the disc menu.
Connecting 19 DISPLAY AUDIO TV Aspect DRC (Dynamic Range Control) Select which screen aspect to use is based on the shape of your TV screen. Make the sound clear when the volume is turned down (Dolby Digital only). Set to [On] for this effect. [4:3] Select when a 4:3 wide TV is connected. [16:9] Select [On] to mix karaoke channels into normal stereo. This function is effective for multi-channel karaoke DVDs only.
Connecting LOCK (Parental Control) Password You can enter or change password. Initial Setting of the Area Code When you use this unit for the first time, you have to set the Area Code as shown below. 1. Press SETUP on the remote control. 2. Select the [Lock] menu and then press d. 2 Connecting 3. Press d. To access the [Lock] options, you must input the password you have created. Input a password and press ENTERb. Enter it again and press ENTERb to verify.
Connecting 21 OTHERS DivX(R) Registration ABOUT DIVX VIDEO: DivX® is a digital video format created by DivX, LLC, a subsidiary of Rovi Corporation. This is an official DivX Certified® device that plays DivX video. Visit divx.com for more information and software tools to convert your files into DivX videos. 2 Connecting ABOUT DIVX VIDEO-ON-DEMAND: This DivX Certified® device must be registered in order to play purchased DivX Video-on-Demand (VOD) movies.
3 Operating 22 Operating Basic Operations To Do this Stop Press Z(STOP) on the remote control or STOP on the unit. Playback Press MONO/STEREOz on the remote control or D (PLAY) on the unit. Disc/USB Operations 1. Insert the disc by pressing B(OPEN/CLOSE) on the remote control or by pressing OPEN/ CLOSE on the unit. Connect the USB device to the USB port. 2. Select the DVD/CD or USB function by pressing FUNCTION on the remote control or by pressing DVD/CD or USB on the unit. 3 3.
Operating 23 ,,Note The display window will be changed in the following order. yy USB : REPEAT / REPEAT ALL / RANDOM / OFF yy MP3/WMA CD : REPEAT / REPEAT ALL / RANDOM / OFF yy Audio CD : REPEAT / REPEAT ALL / RANDOM / OFF Other Operations Displaying Disc Information on-screen You can display various information about the disc loaded on-screen. 1. Press DISPLAY on the remote control to show various playback information. The displayed items differ depending on the disc type or playing state. 2.
Operating To display the DVD Menu r When you play a DVD which contains several menus, you can select the menu you want by using MENU. 1. Press MENU on the remote control. The disc’s menu appears. 2. Select the menu by using w/s/a/d. 3. Press ENTERb to confirm. To display the DVD title r 3 Operating When you play a DVD which contains several titles, you can select the title you want by using the TITLE. 1. Press TITLE on the remote control. The disc’s title appears. 2.
Operating 25 Programmed Playback u You can play the contents of a disc in the order you want by arranging the order of the songs on the disc. The program is cleared when the disc is removed. 1. Select a desired music file then press PROG./MEMO. on the remote control or select "#” and then press ENTERb to add the music file to the program list. 2. To add all music file on the disc, select “^“ and then press ENTERb. 3. Select a music file from the program list then press ENTERb to start programmed playback.
Operating Using your player as an alarm clock 1. Turn the power on. 2. Press TIMER on the unit to set the alarm function. 3. Alarm sound sources blink. While each of sound sources blink, select the one you want by pressing SET/CD M. 4. “ON TIME” setting is displayed. The hour setting blinks. Press Y/U to select the hour and then press SET/CD M to save. 3 5. The minute setting blinks. Press Y/U to select the minute and then press SET/CD M to save. Operating 6. “OFF TIME” setting is displayed.
Operating 27 DEMO AUTO DJ playback In power off state, press DEMO on the unit once. The unit will power on and display the each of functions in the display window. u Turning off the sound temporarily Press MUTE@ on the remote control to mute your sound. You can mute your sound in order, for example, to answer the telephone. And “q” will appear in the display window. To cancel MUTE function, press MUTE@again or adjust volume level by pressing VOL(+/-).
Operating Using Microphone 1. Connect your microphone to the MIC 1, 2 on the unit. 2. Play the music you want. 3. Sing along with the accompaniment. Adjust the microphone volume by pressing MIC VOL(+/-) on the remote control. ,,Note •• When not using the microphone, set the microphone volume as low as possible or turn off the MIC. And then remove the microphone from the MIC 1, 2. 3 Operating •• If the microphone is set too near the speaker, a howling sound may be produced.
Operating 29 Presetting the Radio Stations You can preset 50 stations for FM. Before tuning, make sure that you have turned down the volume. 1. Press FUNCTION on the remote control repeatedly or TUNER on the unit until FM appears in the display window. 2. Select the desired frequency by using TUNING(-/+). 3. Press PROG./MEMO. on the remote control. Preset number will blink in the display window. 4. Press PRESET(w/s) on the remote control or PRESET(-/+) on the unit to select the preset number you want. 5.
Operating ,,Note •• In some of surround modes, some speakers, there’s no sound or low sound. Depending on the mode of surround and the source of audio, it is not defective. •• You may need to reset the surround mode, after switching the input, sometimes even after the sound track changed. •• You can not choose the VIRTUAL option, when the MIC is connected to the unit. Setting the USER EQ 3 You can listen to music with the desired sound effect by adjusting the BASS, MIDDLE and TREBLE. Operating 1.
Operating 31 ,,Note •• You can check the recording percentage rate for the USB record in the display window during recording. (MP3/ WMA CD/ AUDIO CD Only) •• During recording, MP3/ WMA, there is no sound. •• When you stop recording during playback, the file that has been recorded at that time will be stored. (AUDIO CD Only) •• Do not remove the USB device or turn off the unit during USB recording. If not, an incomplete file may be made and not be deleted on PC.
4 Troubleshooting 32 Troubleshooting Troubleshooting Problem Correction No Power. Plug in the power cord. No picture. •• Select the appropriate video input mode on the TV. Then the picture from the unit appears on the TV screen. •• Connect the video cables securely to the TV and unit. •• Select the correct input mode of the unit. Then you can hear the sound from the unit. There is little or no sound. •• Connect the speaker cables to the connection terminals correctly.
Appendix 33 Area Codes Choose an area code from this list.
Appendix Language Codes Use this list to input your desired language for the following initial settings: Disc Audio, Disc Subtitle, Disc Menu.
5 Appendix Appendix 35 Specifications General Power supply Refer to main label. Power consumption Refer to main label. Net Weight 5.8 kg External dimensions (W x H x D) 272 x 340 x 380 mm Operating conditions Temperature 5 °C to 35 °C (41 °F to 95 °F) Operation status : Horizontal Operating humidity 5 % to 85 % Inputs/ Outputs VIDEO OUT 1.0 V (p-p), 75 Ω, sync negative, RCA jack x 1 COMPONENT VIDEO OUT (Y) 1.0 V (p-p), 75 Ω, sync negative, RCA jack x 1, AUX. IN 0.
Appendix Speakers Type 2 Way 2 Speaker Impedance 4Ω Rated Input Power 55 W Max. Input Power 110 W Net Dimensions (WxHxD) 202 x 337 x 237 mm Net Weight(1EA) 2.57 kg •• Design and specifications are subject to change without notice. 5 Appendix DM5420-FU.AGHALLK_1718-ENG.
Appendix 37 Maintenance Handling the Unit Notes on Discs Handling Discs Never stick paper or tape on the disc. When shipping the unit Storing Discs Please save the original shipping carton and packing materials. If you need to ship the unit, for maximum protection, re-pack the unit as it was originally packed at the factory. After playing, store the disc in its case. Do not expose the disc to direct sunlight or sources of heat and never leave it in a parked car exposed to direct sunlight.
DM5420-FU.AGHALLK_1718-ENG.