
Owner's Manual


Connecting 11
Connecting
2
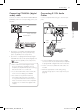
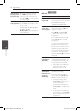
Connecting COAXIAL (digital
audio) cable
Connect one of the unit’s DIGITAL AUDIO OUTPUT
(COAXIAL) jacks to the corresponding jack on your
amplier.
OPTICAL
E
AR
CENTER
FRONT
DIO OUTPU
T
Rear of the Unit
Receiver / Amplier
Coaxial Cable
y
If your TV is not capable of handling 96 kHz
sampling frequency, set the [Sample Freq.]
option to [48 kHz] on the setup menu.
y
If your TV is not equipped with Dolby Digital
and MPEG decoder, set the [Dolby Digital] and
[MPEG] options to [PCM] on the setup menu.
y
If the audio format of the digital output
does not match the capabilities of your
amplier, the amplier will produce a strong,
distorted sound or no sound at all.
y
To see the audio format of the current disc
in the on-screen display, press AUDIO.
y
This unit does not perform internal (2
channel) decoding of a DTS sound track.
To enjoy DTS multi channel surround, you
must connect this unit to a DTS compatible
amplier via one of this unit’s digital audio
outputs.
,
Note
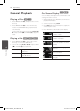
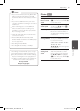
Connecting 5.1 CH Audio
Cables
Connect a amplifer with analog 5.1 channel input
jacks.
REAR
WOOFER CENTER
FRONT
5.1CH AUDIO OUTPUT
FER
ER
Receiver / Amplier
Rear of the Unit
Audio
Cable
Audio
Cable
y
5.1 channel digital surround sound via a digital
connection can only be obtained if your amplifer
is equipped with a digital multi channel decoder.
y
For this connection, additional audio cables are
needed.
y
Make the appropriate sound setting using
[Speaker Setup] option on the setup menu. (See
page 13)
DP126-P.BINDLL_0631-ENG.indd 11 2012-07-23 �� 6:01:15