DP181BP_AA3RLLW_ENG Portable DVD Player Owner’s Manual Model: DP181BP Before connecting, operating or adjusting this product, please read this instruction booklet carefully and completely. Internet Address:http://www.lg.ru »ÌÙÓχˆËÓÌ̇ˇ ÒÎÛÊ·‡ LG Electronics (095)771-76-76 P/No.
Safety Precautions CAUTION: VISIBLE AND INVISIBLE LASER RADIATION WHEN OPEN AND INTERLOCKS DEFEATED. CAUTION RISK OF ELECTRIC SHOCK DO NOT OPEN CAUTION: This product employs a Laser System. To ensure proper use of this product, please read this owner’s manual carefully and retain it for future reference. Should the unit require maintenance, contact an authorized service center.
Safety Precautions (Continued) Most appliances recommend they be placed upon a dedicated circuit; That is, a single outlet circuit which powers only that appliance and has no additional outlets or branch circuits. Check the specification page of this owner's manual to be certain. 1. When this crossed-out wheeled bin symbol is attached to a product it means the product is covered by the European Directive 2002/96/EC. 2.
Table of Contents Playing an Audio CD or MP3/WMA file . . . . . . . . . . . . . . . . . . . . . . . . 28 Programmed Playback . . . . . . . . . . . . . . . . . . . . . . . . . . . . . . . . . . . . . 29 Erasing a Track from Program List . . . . . . . . . . . . . . . . . . . . . . . . 29 Viewing a JPEG file . . . . . . . . . . . . . . . . . . . . . . . . . . . . . . . . . . . . 30-31 Slide Show . . . . . . . . . . . . . . . . . . . . . . . . . . . . . . . . . . . . . . . . . . . 30 Still Picture . . . . . . .
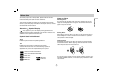
Before Use Notes on Discs Handling Discs Do not touch the playback side of the disc. Hold the disc by the edges so that fingerprints do not get on the surface. Never stick paper or tape on the disc. This manual provides information on the operation and maintenance of your DVD player. Should the unit require service, contact an authorized service location.
Before Use (Continued) Maintenance and Service Maintaining the Unit Refer to the information in this chapter before contacting a service technician. The DVD player is a high-tech, precision device. If the optical pick-up lens and disc drive parts are dirty or worn, the picture quality could be diminished. Handling the Unit Depending on the operating environment, regular inspection and maintenance are recommended after every 1,000 hours of use.
Before Use (Continued) DVD (8 cm / 12 cm disc) Video CD (VCD) (8 cm / 12 cm disc) Regional Code This unit has a regional code printed on the rear of the unit. This unit can play only DVD discs labelled same as the rear of the unit or “ALL”. Audio CD (8 cm / 12 cm disc) In addition, this unit plays DivX file, DVD±R, DVD±RW, SVCD, and CD-R or CD-RW that contains audio titles, MP3, WMA or JPEG files.
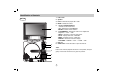
Identification of Controls 1. LCD screen Main Unit 2. Speaker 3. Power : Switches the player ON or OFF. 4. MODE : Selects the source. 1 2 5. • b B v V (left/right/up/down) : Selects an item in the menu. • b B : Adjusts the COLOR/BRIGHT. • ENTER : Confirms menu selection. 6. • COLOR/BRIGHT : Selects the mode of LCD adjustment Brightness → Color → OFF • SETUP : Accesses or removes setup menu. • TITLE : Displays title menu, if available. • MENU : Accesses menu on a DVD disc.
Identification of Controls (continued) Introduction Main Unit CHG. a b c d e f g h i f Remote sensor Receive the signal from the Remote Control for operation. a Volume Control b Earphone jack g Battery charge indicator During recharging, charge indicator is red. If recharging is complete, charge indicator changes to green colour. c AUDIO In/Out jack (OPTICAL OUT) d VIDEO In/Out jack h • PLAY ( B/X ): Starts playback/ Pauses playback temporarily. • STOP ( x ) : Stops playback.
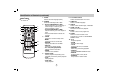
Identification of Controls (continued) Remote Control 1 7 2 3 8 9 4 5 10 6 11 12 1. AUDIO Selects an audio language (DVD). 2. POWER Switches DVD Player ON or OFF. 3. • Reverse SKIP/SEARCH ( . ) Search backward*/ go to beginning of current chapter or track or go to previous chapter or track. • Forward SKIP/SEARCH ( > ) Search forward*/ go to next chapter or track. * Press and hold button for about two seconds. 4. • SETUP Accesses or removes setup menu. • MENU Accesses menu on a DVD disc.
Identification of Controls (continued) Insert the battery (Lithium battery) Button-type battery (Lithium battery) NOTES • Replace remote control unit battery with 3V micro lithium cells such as CR. 2025 or its equivalent. • Dispose of battery safety in accordance with local laws. Do not dispose of in fire. NOTES Warning : The battery used in this device may present a fire or chemical burn hazard if mistreated. Do not recharge, disassemble, incinerate, or heat above 100 °C (212 °F).
Power Connections AC Adapter Follow steps 1 to 2 to connect. When disconnecting, reverse the order. Caution • Do not connect the power plug to a power outlet other than that indicated on the label, as this can result in a risk of fire or electric shock. • Do not connect or disconnect the power plug with wet hands. Doing so may cause electric shock. • Do not use an AC adapter other than one specified, as it can cause a fire or damage to the player. AC adapter • This AC adapter operates on 100-240V~ 1.
Power Connections (continued) This DVD player and its automotive adapter are designed for use in vehicles that have 12 volt, negative ground electrical systems. (This is standard for most vehicles.) If your vehicle has a different type of electrical system, the DC power system cannot be used. Cigarette lighter socket Follow steps 1 to 2 to connect. When disconnecting, reverse the order.
Power Connections (continued) Battery Pack Charge the battery pack before using it for the first time. NOTES • Do not detach the battery pack during playback. • Be careful not to drop the battery pack. Attaching the battery pack 1. Match the hooks of the battery pack into the holes on the bottom of the player. 2. Press and slide the battery pack until the hooks click. A Detaching the battery pack 1. Press the RELEASE knob. 2. Pull the battery pack until the hooks click.
Power Connections (continued) Player A Recharging Standby Approx. 3 hour Battery Pack Play time LCD On LCD Off Approx. Approx. 3.5 hours* 4 hours * When Brightness control is set to initial mode. CHG. AC adapter cord insert jack (DC IN 9.5V) Recharging and play times A Charge indicator Press “Display” to display the battery status on the screen. 3. During recharging, charge indicator is red. If recharging is complete, charge indicator changes to green color.
Rotating the LCD POWER A/V IN/OUT ENTER POWER POWER TITLE MENU MODE DISPLAY DISPLA SH PU OPEN LCD MODE CL OS E SETUP COLOR/BRIGHT ENTER TITLE MENU DISPLAY DISPLAY CHG. LCD MODE PU SH OPEN SETUP COLOR/BRIGHT CLO SE CHG. You can rotating LCD clockwise an angle of 180 degrees. However, if you turn it by force, it can cause serious damage. After rotating LCD completely, you can fold the LCD screen as shown above.
Playing a Disc 1. Prepare the power supply. A 3. Press OPEN to open the disc lid and insert a disc with the side you want to play label up. Close the disc lid by hand. NOTES • If the disc is placed in upside down (and it is a single-sided disc), “NO DISC” or “DISC ERROR” appears on the screen. • After playing back all of the chapters in the title, the DVD player automatically stops and returns to the menu screen. • If you are not using the LCD on this unit, select OFF to conserve power.
On-Screen Display Displaying Disc Information on-screen Initial Settings By using the Setup menu, you can make various adjustments to items such as picture and sound. You can also set a language for the subtitles and the Setup menu, among other things. For details on each Setup menu item, see pages 19 to 23. You can display various information about the disc loaded onscreen. 1. Press DISPLAY to show various playback information. The items displayed differ depending on the disc type or playing status.
Initial Settings DISPLAY Menu Language TV Aspect Select a language for the Setup menu and on-screen display. 4:3: Select when a standard 4:3 TV is connected. Disc Audio / Subtitle / Menu 16:9 Wide: Select when a 16:9 wide TV is connected. Select the language you prefer to the audio track (disc audio), subtitles, and the disc menu. Display Mode Display Mode setting works only when the TV Aspect mode is set to “4:3”. Original: Refers to the original language in which the disc was recorded.
Initial Settings (continued) AUDIO Sample Freq (Frequency) Each DVD disc has a variety of audio output options. Set the player’s AUDIO options according to the type of audio system you use. If your receiver or amplifier is NOT capable of handling 96 kHz signals, select 48 kHz. When this choice is made, this unit automatically converts any 96 kHz signals to 48 kHz so your system can decode them. If your receiver or amplifier is capable of handling 96 kHz signals, select 96 kHz.
Initial Settings (continued) LOCK (Parental Control) 3. Select a rating from 1 to 8 using the v / V buttons. Unlock If you select unlock, parental control is not active and the disc plays in full. NOTE If you set a rating for the player, all disc scenes with the same rating or lower are played. Higher rated scenes are not played unless an alternate scene is available on the disc. The alternative must have the same rating or a lower one. If no suitable alternative is found, playback stops.
Initial Settings (continued) Password Area Code You can enter or change password. Enter the code of the area whose standards were used to rate the DVD video disc, based on the list in the reference chapter. 1. Select Password on the LOCK menu then press B. 2. To make a new password: Press ENTER when the “New” option is highlighted. Enter a new password using the numbered buttons then press ENTER. Enter the password again to verify. 1. Select “Area Code” on the LOCK menu then press B. 2.
Initial Settings (continued) DivX(R) VOD The PBC, Auto Play and DivX(R) VOD settings can be changed. We provide you the DivX® VOD (Video On Demand) registration code that allows you to rent and purchase videos using the DivX® VOD service. For more information, visit www.divx.com/vod. 1. Select “DivX(R) VOD” option then press B. 2. Press ENTER while “Select” is selected and the registration code will appear. Use the registration code to purchase or rent the videos from DivX® VOD service at www.divx.
General Features DVD Moving to another CHAPTER/TRACK Use the b B v V buttons to select the title/chapter you want to view, then press ENTER to start. Press TITLE or MENU to return to the menu screen. During playback, press SKIP (. or >) to go to the next chapter/track or to return to the beginning of the current chapter/track. VCD Press SKIP . twice briefly to step back to the previous chapter/track.
General Features (Continued) Still Picture and Frame-by-Frame Playback During playback, press PAUSE/STEP to pause playback. VCD DVD Video Discs : Chapter/Title/Off Video CDs, Audio CD discs : TRACK(TRK)/All/Off DivX/MP3/WMA files : TRACK(TRK)/DIR/All/Off DivX Press PAUSE/STEP repeatedly to play Frame-by-Frame. (Remote control Only) To exit still motion mode, press PLAY. Time Search DVD VCD VCD1.1 During playback, press REPEAT repeatedly to select a desired repeat mode.
General Features (Continued) Title Menu Subtitles DVD DVD DivX If the current DVD title has a menu, the title menu appears on the screen. Otherwise, the disc menu may appears. Press SUBTITLE repeatedly during playback to see the different subtitle languages. Disc Menu NOTE DVD If there is no information or there is a code that can not read in the DivX file, “ 1 ” etc are displayed. Press MENU and the disc menu is displayed. Press MENU again to exit.
Additional features DVD DivX VCD Last Scene Memory To enter a Marker DVD ACD VCD1.1 This player memorizes last scene from the last disc that is viewed. The last scene remains in memory even if you remove the disc from the player or switch off the player. If you load a disc that has the scene memorized, the scene is automatically recalled. You can start playback from up to nine memorized points. To enter a marker, press MARKER at the desired point on the disc.
Playing an Audio CD or MP3/WMA file The DVD player can play MP3/WMA formatted recordings on CD-ROM, CD-R, or CD-RW discs. MP3 / WMA file compatibility with this player is limited as follows: • Sampling frequency: within 8 - 48 kHz (MP3), within 32 - 48kHz (WMA) MP3/ WMA/ Audio CD Once you insert an MP3/WMA files recorded media or Audio CD, a menu appears on the TV screen. Press v / V to select a track/file then press PLAY or ENTER and playback starts. You can use variable playback functions.
Programmed Playback Erasing a Track from program list 1. Insert a disc. (Audio CD, MP3 or WMA.) 2. Press CLEAR. Repeat to erase additional tracks on the list. 2. Press v / V to select the desired file. 3. Press PROG. during playback or in the stop mode. Repeat press PROG. to place additional tracks on the program list. For details on each operation item, refer to relevant page.(See pages 24-25) 1. Use v / V to select the track that you wish to erase from the program list. NOTE 4. Press DISPLAY.
Viewing a JPEG file Using this DVD Player you can view discs with JPEG files. Slide Show 1. Insert a JPEG files recorded media. The Photo menu appears on the TV screen. If you want to view a slide show, to select a file in the folder then press ENTER. Still Picture 1. Press PAUSE/STEP during slide show. The player will now go into PAUSE mode. 2. To return to the slide show, press PLAY, ENTER or press PAUSE/STEP again.
Viewing a JPEG file (continued) JPEG file compatibility with this player is limited as follows: Advanced Operations • Depending upon the size and number of JPEG files, it could take a long time for the DVD player to read the disc’s contents. If you don’t see an on-screen display after several minutes, some of the files may be too large — reduce the resolution of the JPEG files to less than 2M pixels as 2760 x 2048 pixels and burn another disc.
Playing a DVD VR format Disc This unit will play DVD-RW discs recorded using the Video Recording (VR) format. 1. Insert a disc and close the tray. The DVD-VR menu appears on the screen. 2. Press v / V to select a track then press PLAY or ENTER and playback starts. 3. Press MENU to move to the list menu. NOTES • Unfinalized DVD-R/RW discs cannot be played in this player. • Some DVD-VR disc are made with CPRM data by DVD RECORDER. Player does not support these kinds of discs and display the “CHECK DISC”.
Playing a DivX Movie file Notice for displaying the DivX subtitle 1. Insert a DivX file recorded media. The Movie menu appears on the screen. If the subtitle does not display properly during playback, press and hold SUBTITLE about 3 seconds then press v / V to select another language code until the subtitle is displayed properly. TIPS • Press B to move to the next page. • On a CD with MP3/WMA and JPEG you can switch MP3/WMA and JPEG.
Playing a DivX Movie Disc (Continued) DivX disc compatibility with this player is limited as follows: Playable DivX file “.avi”, “.mpg”, “.mpeg” • Available resolution size of the DivX file is under 720x576 (W x H) pixel. Playable Subtitle format SubRip(*.srt/*.txt) SAMI(*.smi) SubStation Alpha(*.ssa/*.txt) MicroDVD(*.sub/*.txt) SubViewer 2.0(*.sub/*.txt) TMPlayer(*.txt) Dvd Subtitle System(*.txt) VobSub (*.sub) b Sub/idx, stream based format.
Playing an USB NOTES • Do not extract the USB device in operating. • Music files (MP3/WMA), image files (JPEG) and DivX files can be played. • The total number of files in a folder should be less than 4500 files. • This unit does not support all USB devices. • This unit supports only USB Flash Memory. • This unit can support USB1.1. 2. Press MODE on the unit. The mode selection menu appears on the screen. For details on each operations item, refer to relevant page. (See pages 28-34) 3.
Setting up the Player The picture and sound of a nearby TV, VCR, or radio may be distorted during playback. If this occurs, position the player away from the TV, VCR, or radio, or turn off the unit after removing the disc. DVD Player Connections Depending on your TV and other equipment there are various ways you can connect the player. Please refer to the manuals of your TV, stereo system or other devices as necessary for additional connection information.
Setting up the Player (continued) Connect the DVD player to your optional equipment for audio output. OPTICAL R DIGITAL IN PUT Amplifier equipped with 2-channel digital stereo (PCM) or audio / video receiver equipped with a multi-channel decoder (Dolby Digital™, MPEG 2, or DTS): Connect one of the DVD Player’s DIGITAL AUDIO OUT jack to the corresponding in jack on youramplifier. Use an optional digital audio cable.
Troubleshooting Symptom No power. No picture on the LCD or TV (including video from another unit). • • • • The The The The Cause power cord is disconnected. battery is discharged. video cable is not connected securely. MODE selection is not set correctly. • LCD mode is set to OFF. • Check that Brightness control is set to “–”. • The TV is not set to receive DVD signal output. No sound. The DVD player does not start playback. No response when buttons are pressed.
Language Codes Language Abkhazian Afar Afrikaans Albanian Ameharic Arabic Armenian Assamese Aymara Azerbaijani Bashkir Basque Bengali; Bangla Bhutani Bihari Breton Bulgarian Burmese Byelorussian Cambodian Catalan Chinese Corsican Croatian Czech Danish Dutch English Esperanto Estonian Faroese Code 6566 6565 6570 8381 6577 6582 7289 6583 6588 6590 6665 6985 6678 6890 6672 6682 6671 7789 6669 7577 6765 9072 6779 7282 6783 6865 7876 6978 6979 6984 7079 Language Fiji Finnish French Frisian Galician Georgian G
Area Codes Choose an area code from this list.
Specifications Liquid Crystal Display Power supply: DC 9.5V (AC adapter terminal), DC 7.4V (Battery) Panel size: 7 inches wide (diagonal) Projection system: R.G.B. stripe Power consumption: 12W with battery Driving system: TFT active matrix Weight: 1.58 lbs (0.72 kg) (without battery pack) Resolution: 234 x 480 x 3 (effective pixel rate: more than 99.99%) External dimensions (W x H x D): 7.5 x 1.2 x 6.8 inches (191 x 30.