Portable DVD Player Owner’s Manual Model: DP9821P/ DP9821PB DP9821PG Before connecting, operating or adjusting this product, please read this instruction booklet carefully and completely.
Safety Precautions CAUTION: VISIBLE AND INVISIBLE LASER RADIATION WHEN OPEN AND INTERLOCKS DEFEATED. CAUTION RISK OF ELECTRIC SHOCK DO NOT OPEN CAUTION: The apparatus should not be exposed to water (dripping or splashing) and no objects filled with liquids, such as vases, should be placed on the apparatus. CAUTION: TO REDUCE THE RISK OF ELECTRIC SHOCK DO NOT REMOVE COVER (OR BACK) NO USER-SERVICEABLE PARTS INSIDE REFER SERVICING TO QUALIFIED SERVICE PERSONNEL.
Safety Precautions (Continued) Introduction NOTES ON COPYRIGHTS: It is forbidden by law to copy, broadcast, show, broadcast via cable, play in public, or rent copyrighted material without permission. This product features the copy protection function developed by Macrovision. Copy protection signals are recorded on some discs. When recording and playing the pictures of these discs on a VCR, picture noise will appear.
Table of Contents Introduction Playing an Audio CD and MP3/WMA Disc . . . . . . . . . . . . . . . . . . . . . . . . . . . . . . . . . 25-27 Audio CD and MP3/WMA Disc Features . . . . . . . . . . . . . . . . . . . . . . . . . . . . . . . 26-27 • Pause. . . . . . . . . . . . . . . . . . . . . . . . . . . . . . . . . . . . . . . . . . . . . . . . . . . . . . . . . . . 26 • Moving to another Track . . . . . . . . . . . . . . . . . . . . . . . . . . . . . . . . . . . . . . . . . . . 26 • Search . . . . . . . .
Before Use This manual provides information on the operation and maintenance of your DVD player. Should the unit require service, contact an authorized service location. Symbol Used in this Manual DVD DVD and finalized DVD±R/RW VCD Video CDs. CD Audio CDs. MP3 MP3 discs. WMA WMA discs. JPEG JPEG discs. DivX DivX discs The lightning flash symbol alerts you to the presence of dangerous voltage within the product enclosure that may constitute a risk of electric shock.
Before Use (Continued) Storing Discs After playing, store the disc in its case. Do not expose the disc to direct sunlight or sources of heat and never leave it in a parked car exposed to direct sunlight. VCD (Video CD) A VCD holds up to 74 minutes (650 MB disc) or 80 minutes (700 MB disc) of MPEG-1 full-motion video along with quality stereo sound. MPEG MPEG is an international standard for video and audio compression.
Before Use (Continued) Keeping the exterior surfaces clean Title (DVD video discs only) A title is generally a distinct section of a DVD disc. For example the main feature could be title 1, a documentary describing how the film was made could be title 2, and cast interviews could be title 3. Each title is assigned a reference number enabling you to locate it easily. To clean the player, use a soft, dry cloth.
Before Use (Continued) Types of Playable Discs DVD (8 cm / 12 cm disc) NOTES • Depending on the conditions of the recording equipment or the CD-R/RW (or DVD±R/±RW) disc itself, some CD-R/RW (or DVD±R/±RW) discs cannot be played on the unit. Video CD (VCD) (8 cm / 12 cm disc) • Do not attach any seal or label to either side (the labeled side or the recorded side) of a disc. Audio CD (8 cm / 12 cm disc) • Do not use irregularly shaped CDs (e.g., heart-shaped or octagonal). It may result in malfunctions.
Identification of Controls 1. LCD screen 2. Speaker 3. COLOR control buttons : – ; black and white, + ; color 4. BRIGHT control buttons : – ; dark, + ; light 5. POWER Switches the player ON and OFF. 1 2 3 4 5 6 7 6. A/V IN/OUT Selects the TV’s source. 7. • b B v V (left/right/up/down) Selects an item in the menu. • ENTER Confirms menu selection. 8. • TITLE Displays title menu, if available. • LCD MODE NORMAL → FULL → ZOOM → OFF • MENU Accesses menu on a DVD disc. • DISPLAY Accesses On-Screen display.
Identification of Controls (continued) Main Unit 1 2 3 4 5 6 7 8 1. Remote sensor 9 10 11 12 7. STOP Stops playback. 2. Charge indicator During recharging, charge indicator is red. If recharging is complete, charge indicator changes to green color. 8. Volume Control 9. Earphone jack 3. Reverse Skip/Search Go to previous chapter / track or to the beginning. Press and hold for two seconds for fast reverse search. 10. AUDIO In/Out jack (OPTICAL OUT) 11. VIDEO In/Out jack 12. DC IN 9.
Identification of Controls (continued) 1 10 POWER AUDIO SUBTITLE A-B 11 2 3 SLOW SKIP/SEARCH PLAY PAUSE STOP 4 5 6 ZOOM MENU 7 8 DISPLAY MARKER SEARCH ENTER SETUP TITLE RETURN REPEAT 1 2 3 PROG 4 5 6 0 7 8 9 CLEAR 9 12 13 14 15 16 17 18 19 20 21 1. AUDIO Selects an audio language (DVD). 2. POWER Switches DVD Player ON and OFF. 3. • Reverse SKIP/SEARCH ( S ) Search backward*/ go to beginning of current chapter or track or go to previous chapter or track.
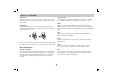
Identification of Controls (continued) Insert the battery (Lithium battery) Button-type battery (Lithium battery) 1. Pinch the battery holder clip together then pull the tab to remove the battery holder. 2. Insert the battery with the + facing in the same direction as the + on the battery holder. 3. Replace the battery holder with battery into the remote control unit making sure that it is fully inserted. • Replace remote control unit battery with 3V micro lithium cells such as CR. 2025 or its equivalent.
Power Connections Follow steps 1 to 3 to connect. When disconnecting, reverse the order. Caution • Do not connect the power plug to a power outlet other than that indicated on the label, as this can result in a risk of fire or electric shock. • Do not connect or disconnect the power plug with wet hands. Doing so may cause electric shock. • Do not use an AC adapter other than one specified, as it can cause a fire or damage to the player. AC adapter • This AC adapter operates on 100-240V~ 1.5A 50-60Hz.
Power Connections (continued) Automotive Adapter This DVD player and its automotive adapter are designed for use in vehicles that have 12 volt, negative ground electrical systems. (This is standard for most vehicles.) If your vehicle has a different type of electrical system, the DC power system cannot be used. 2 1 Cigarette lighter socket Follow steps 1 to 2 to connect. When disconnecting, reverse the order. Caution Automotive adapter • This automotive adapter operates on DC 12V. • MODEL NO.
Power Connections (continued) • Charge the battery pack before using it for the first time. A Detaching the battery pack To separate the battery pack, pull the switch which is locate beside the battery pack then slide down the battery pack at the same time. A Attaching the battery pack 1. Match the hooks of the battery pack into the holes on the bottom of the player. 2. Combine the battery pack to push toward up until you can hear the click sound.
Power Connections (continued) A Charging the battery pack 1. Attach the battery pack to the player. 2. Connect the AC power adapter to the player and the plug into an AC outlet. Player A Recharging and play times Recharging without player Approx. 3.5 hour Battery Pack Play time LCD On LCD Off Approx. Approx. 3 hours* 4 hours * When Brightness control is set to initial mode. AC adapter cord insert jack (DC IN 9.5V) A Charge indicator Press “Display” to display the battery status on the screen. 3.
Playing a Disc 1. Prepare the power supply. A 3. Press OPEN to open the disc lid and insert a disc with the side you want to play label up. Close the disc lid by hand. NOTES • If you are not using the LCD on this unit, select OFF to conserve power. • The LCD is turned off if you close the unit. • Horizontal lines may appear in the picture when the mode is switched to ZOOM, but this is not an indication of a malfunction.
On-Screen Display You can display the general playback status on the screen. Some items can be changed using the menu. To use the on-screen display: Example: On-Screen Display during playing DVD Video 1. Press DISPLAY during playback. Items 2. Press v / V to select an item. The selected item is highlighted. Title Number 3. Press b / B to change the setting. You can also use the number buttons if appropriate (e.g. inputting the title number). For some functions, press ENTER to execute the setting.
On-Screen Display (continued) Items Track Number (or PBC mode) Time search Audio Channel Example: On-Screen Display during playing divx movie disc Items Selection Method 1/3 0:20:09 Selection Method Track Number b / B, Numbers ENTER 1/3 Time search Numbers ENTER 0:20:09 Audio language and Digital Audio Output mode b / B or AUDIO Subtitle language 19 1 MP3 ABC ENG b / B, Numbers ENTER Numbers, ENTER b / B or AUDIO b / B or SUBTITLE Advanced Operations Example: On-Screen Display during p
General Features Moving to another CHAPTER/TRACK DVD DVD Use the b B v V buttons to select the title/chapter you want to view, then press ENTER to start. Press TITLE or MENU to return to the menu screen. VCD DivX When a title on a disc has more than one chapter or a disc has more than one track, you can move to another chapter/track as follows: VCD • Press SKIP/SEARCH . or > briefly during playback to select the next chapter/track or to return to the beginning of the current chapter/track.
General Features (continued) Still Picture and Frame-by-Frame Playback VCD Repeat A-B DivX VCD 2. Press A-B again at your chosen end point. “A B” appears briefly on the screen and the repeat sequence begins. DivX 3. Press A-B again to cancel. 1. Press SLOW t or T during playback. The player will enter SLOW mode. Repeat 2. Use the SLOW t or T to select the required speed: t 1/16, t 1/8, t 1/4 or t 1/2 (backward), or T 1/16, T 1/8, T 1/4 or T 1/2 (forward). VCD VCD1.
General Features (continued) Marker Search DVD VCD 7. Press ENTER to recall a marker. Press CLEAR to clear a marker. Play resumes from the point corresponding to the selected marker, or the selected marker is cleared. DivX Storing a MARKER in the DVD memory is similar to marking your page in a book. It allows you to quickly return to any point on the disc. Storing a marker in the memory 1. Press MARKER/SEARCH during play. The MARKER SEARCH menu appears on the screen.
General Features (continued) DVD VCD Special DVD Features DivX Checking the contents of DVD discs: Menus DVDs may offer menus that allow you to access special features. To use the disc menu, press MENU. Input the corresponding number or use the b B v V buttons to highlight your selection. Then press ENTER. Use zoom to enlarge the video image. 1. Press ZOOM during playback or still playback to activate the Zoom function. The square frame appears briefly in the right bottom of the picture. 2.
General Features (continued) Camera Angle Last Scene Memory DVD If the disc contains scenes recorded at different camera angles, you can change to a different camera angle during playback. CD VCD1.1 This player memorizes last scene from the last disc that is viewed. The last scene remains in memory even if you remove the disc from the player or switch off the player. If you load a disc that has the scene memorized, the scene is automatically recalled. 1. Press DISPLAY during playback. 2.
Playing an Audio CD or MP3/WMA Disc ID3 TAG • When playing a file containing information such as track titles, you can see the information by pressing DISPLAY. [ Title, Artist, Album, Year, Comment ] Audio CD Once you insert an audio CD a menu appears on the screen. Press v / V to select a track then press PLAY or ENTER and playback starts. • If there is no information, “NO ID3 TAG” appears on the display.
Playing an Audio CD or MP3/WMA Disc (continued) Audio CD and MP3 / WMA Disc Features Pause CD MP3 Repeat Track/All/Off 2. Press REPEAT to select a desired repeat mode. 2. To return to playback, press PLAY, ENTER or press PAUSE again. MP3 • Track: repeats the current track • All: repeats all the tracks on a disc. • Off(No display): does not play repeatedly. WMA 1. Press SKIP/SEARCH (. or >) briefly during playback to go to the next track or to return to the beginning of the current track.
Playing an Audio CD or MP3/WMA Disc (continued) Customers should note that permission is required in order to download MP3 / WMA files and music from the Internet. Our company has no right to grant such permission. Permission should always be sought from the copyright owner. • Sampling frequency: within 8 - 48 kHz (MP3), within 32 - 48kHz (WMA) • Bit rate: within 8 - 320kbps (MP3), 32 - 192kbps (WMA) • The player cannot read an MP3/WMA file that has a file extension other than “.mp3” / “.wma”.
Programmed Playback The program function enables you to store your favorite tracks from any disc in the player memory. A program can contain 30 tracks. VIDEO CD List 1. Insert a disc. Audio CD or MP3/WMA Discs: AUDIO CD or MUSIC menu appears. Track3 Track4 Track1 E Video CD Menu NOTE Press PROG. again, then the Edit mode. E AUDIO CD 3. Select a track on the “List”, then press ENTER to place the selected track on the “Program” list. Repeat to place additional tracks on the list.
Programmed Playback (continued) Repeat Programmed Tracks Advanced Operations 1. Press REPEAT when playing a disc. The repeat icon appears. 2. Press REPEAT to select a desired repeat mode. • Track: repeats the current track • All: repeats all the tracks on programmed list. • Off(No display): does not play repeatedly. NOTE If you press > once during Repeat Track playback, the repeat playback cancels. Erasing a Track from Program List 1.
Viewing a JPEG Disc TIPS Using this DVD Player you can view discs with JPEG files. • Press MENU to move to the next page. 1. Insert a disc and close the tray. The PHOTO menu appears on the screen. • There are three Slide Speed options : >>> (Fast), >> (Normal) and > (Slow). Use v V b B to highlight the Speed. Then, use b / B to select the option you want to use then press ENTER. PHOTO List Preview JPEG Folder 1 • On a disc with MP3/WMA and JPEG you can switch MP3/WMA and JPEG.
Viewing a JPEG Disc (continued) JPEG disc compatibility with this player is limited as follows: JPEG • Depending upon the size and number of JPEG files, it could take a long time for the DVD player to read the disc’s contents. If you don’t see an on-screen display after several minutes, some of the files may be too large — reduce the resolution of the JPEG files to less than 2M pixels as 2760 x 2048 pixels and burn another disc. Press SKIP/SEARCH (.
Playing a DVD VR format Disc This unit will play DVD-R/RW discs recorded using the DVD-Video format that have been finalized using a DVD-recorder. NOTES • Unfinalized DVD-R/RW discs cannot be played in this player. • Some DVD-VR disc are made with CPRM data by DVD RECORDER. Player does not support these kinds of discs and display the “CHECK DISC”. • This unit will play DVD-RW discs recorded using the Video Recording (VR) format.
Playing a DivX Movie Disc DivX disc compatibility with this player is limited as follows: 1. Insert a disc and close the tray. The MOVIE menu appears on the screen. • Available resolution size of the DivX file is under 720x576 (W x H) pixel. • The file name of the DivX subtitle is limited to 56 characters. • If there is impossible code to express in the DivX file, it may be displayed as " _ " mark on the display.
Initial Settings By using the Setup menu, you can make various adjustments to items such as picture and sound. You can also set a language for the subtitles and the Setup menu, among other things. For details on each Setup menu item, see pages 34 to 39. LANGUAGE LANGUAGE To display and exit the Menu: Press SETUP to display the menu. A second press of SETUP will take you back to initial screen.
Initial Settings (continued) AUDIO DISPLAY TV Aspect 16 : 9 Wide Display Mode Widescreen Progressive Scan Off AUDIO Move TV Aspect Each DVD disc has a variety of audio output options. Set the player’s AUDIO options according to the type of audio system you use. Dolby Digital Bitstream DTS Bitstream MPEG PCM Sample Freq. 48 kHz DRC On Vocal On Select DVD Move Select 4:3: Select when a standard 4:3 TV is connected.
Initial Settings (continued) Sample Freq. (Frequency) OTHERS DVD The PBC, Auto Play, B.L.E. and DivX(R) VOD settings can be changed. If your receiver or amplifier is NOT capable of handling 96 kHz signals, select 48 kHz. When this choice is made, this unit automatically converts any 96 kHz signals to 48 kHz so your system can decode them. OTHERS PBC If your receiver or amplifier is capable of handling 96 kHz signals, select 96 kHz.
Initial Settings (continued) You can display the DivX DRM (Digital Rights Management) Registration code for your unit only. • Display the number which you can watch the file. The Registration code is used for VOD (Video-On-Demand) service agent. You can purchase or rent an encrypt movie file. • The rental has been expired. • Display the authorization error. 37 Initial Settings NOTES If you rent the DivX VOD file, it has several options of viewing limits as shown below.
Initial Settings (continued) LOCK (Parental Control) Input a 4-digit code and press ENTER. Enter it again and press ENTER to verify. If you make a mistake before pressing ENTER, press CLEAR. LOCK Rating Unlock Password New Area Code US SE 3. Select a rating from 1 to 8 using the v / V buttons. Rating 1-8: Rating one (1) has the most restrictions and rating eight (8) is the least restrictive. Move Rating Unlock If you select unlock, parental control is not active and the disc plays in full.
Initial Settings (continued) Password (Security Code) You can enter or change password. DVD Enter the code of the area whose standards were used to rate the DVD video disc, based on the list in the reference chapter. 1. Select Password on the LOCK menu then press B. 1. Select “Area Code” on the LOCK menu then press B. 2. Follow step 2 as shown left (Rating). “Change” or “New” is highlighted. 2. Follow step 2 as shown left (Rating). 3. Enter the new 4-digit code, then press ENTER.
Setting up the Player The picture and sound of a nearby TV, VCR, or radio may be distorted during playback. If this occurs, position the player away from the TV, VCR, or radio, or turn off the unit after removing the disc. DVD Player Connections Depending on your TV and other equipment there are various ways you can connect the player. Please refer to the manuals of your TV, stereo system or other devices as necessary for additional connection information.
Setting up the Player (continued) Amplifier equipped with 2-channel analog stereo or Dolby Pro Logic ll / Pro Logic: Connect the AUDIO OUT jacks on the DVD player to the audio left and right IN jacks on your amplifier, receiver, or stereo system, using the audio cables. Connect the DVD player to your optional equipment for audio output.
Troubleshooting Symptom No power. No picture on the LCD or TV (including video from another unit). No sound. The DVD player does not start playback. No response when buttons are pressed. The remote control does not work properly. • • • • Cause The power cord is disconnected. The battery is discharged. The video cable is not connected securely. The A/V IN/OUT switch is not set correctly. • • • • Correction Plug the power cord into the wall outlet securely. Recharge the battery.
Language Codes Language Abkhazian Afar Afrikaans Albanian Ameharic Arabic Armenian Assamese Aymara Azerbaijani Bashkir Basque Bengali; Bangla Bhutani Bihari Breton Bulgarian Burmese Byelorussian Cambodian Catalan Chinese Corsican Croatian Czech Danish Dutch English Esperanto Estonian Faroese Code 6566 6565 6570 8381 6577 6582 7289 6583 6588 6590 6665 6985 6678 6890 6672 6682 6671 7789 6669 7577 6765 9072 6779 7282 6783 6865 7876 6978 6979 6984 7079 Language Fiji Finnish French Frisian Galician Georgian G
Area Codes Choose an area code from this list.
Specifications Liquid Crystal Display Power supply: DC 9.5V (AC adapter terminal), DC 7.4V (Battery) Panel size: 7 inches wide (diagonal) Projection system: Y/C stripe Power consumption: 15W with battery Driving system: TFT active matrix Weight: 1.46 lbs (0.66 kg) (without battery pack) External dimensions (W x H x D): 7.5 x 1.1 x 6.3 inches (190 x 28 x 159.5 mm) Resolution: 234 x 480 x 3 (effective pixel rate: more than 99.