
Owner's Manual

36
Timer
Recording
This recorder
can
be
programmed
to
record
up
to
16
programs
within
a
period
of
1
month.
For
unattended
recording,
the
timer
needs
to
know
the
channels
to
be
recorded,
the
starting
and
ending
time.
Note:
If
you
use
a
completely
blank
disc
for
timer
recording,
you
must
format
the
disc
before
starting
timer
recording.
(Refer
to
"Initialize"
on
page
22.)
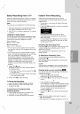
1.
Press
HOME
and
select
[TV]
option.
2.
Press
v
/
V
to
select
[Timer
Record]
option
then
press
ENTER.
The
[Timer
Record]
list
will
appear.
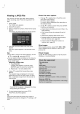
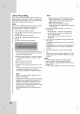
3.
Press
v
/
V
to
select
[New]
option
then
press
ENTER.
The
[Timer
Record]
menu
will
appear.
[PR]
Choose
a
memorized
program
number,
or
one
of
the
external
inputs
from
which
to
record.
(You
cannot
select
DV
input.)
[Date]
Choose
a
date
up
to
1
month
in
advance
or
desired
repeat
(Monday
~
Friday,
or
Every
Sun~Sat).
[Start
Time]
Set
the
start
time.
[End
Time]
Set
the
end
time.
[Mode]
Choose
a
record
mode
(XP,
SP,
LP,
EP,
or
AT).
AT
(Auto)
mode
determines
how
much
disc
time
is
available
and
switches
record
mode,
if
necessary,
to
complete
recording
the
program.
Note
:
When
you
set
the
VPS/PDC
option
to
On,
AT
mode
is
not
available.
[VPS/PDC]
The
VPS/PDC
system
automatically
adjusts
the
recording
time
so
that
even
if
a
program
is
not
running
to
schedule,
you
won't
miss
it.
For
VPS/PDC
to
work
properly,
you
must
input
the
correct
announced
time
and
date
of
the
program
you
want
to
record.
Note
that
VPS/PDC
may
not
work
with
every
station.
Notes:
Stations
that
use
VPS/PDC
typically
include
VPS/PDC
information
in
the
teletext
TV
guide
pages.
Please
refer
to
these
pages
when
setting
a
timer
recording.
When
using
VPS/PDC,
there
may
be
instances
where
the
beginning
of
the
program
is
not
recorded.
4.
Enter
the
necessary
information
for
your
timer
recording(s).
b
/
B
(left/right)
--
move
the
cursor
left/right
v
/
V
(up/down)
--
change
the
setting
at
the
current
cursor
position
Press
RETURN
(O)
to
return
to
the
[Timer
Record]
list.
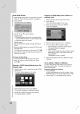
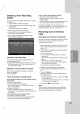
5.
Press
ENTER,
the
program
will
be
memorized
by
the
recorder.
To
check
the
programming,
the
[Timer
Record]
list
will
appear.
[Check]
field's
[Rec.
OK]
on
the
[Timer
Record]
list
indicates
that
the
timer
recording
is
programmed
correctly.
6.
Press
RETURN
(O)
to
exit
the
[Timer
Record]
list.
7.
Make
sure
that
you
load
a
recordable
disc
for
DVD
recording
and
press
POWER
to
switch
your
unit
to
Standby.
Notes:
The
timer
indicator
lights
in
the
display
window
when
the
recorder
is in
standby
with
the
timer
active.
(Nothing
is
displayed
while
the
[Power
Save
Mode]
is
ON.)
You
must
press
POWER
to
stop
the
timer
recording.