DR289-P2_HA3RMLB / DR299H-P2_HA3RMLD / DR289K-P2_HA3RMLS DVD RECORDER OWNER’S MANUAL MODEL: DR788 / DR799 DRK789 Before connecting, operating or adjusting this product, please read this instruction booklet carefully and completely. Internet Address:http://www.lg.
CAUTION RISK OF ELECTRIC SHOCK DO NOT OPEN CAUTION: The apparatus should not be exposed to water (dripping or splashing) and no objects filled with liquids, such as vases, should be placed on the apparatus. CAUTION concerning the Power Cord CAUTION: TO REDUCE THE RISK OF ELECTRIC SHOCK DO NOT REMOVE COVER (OR BACK) NO USER-SERVICEABLE PARTS INSIDE REFER SERVICING TO QUALIFIED SERVICE PERSONNEL.
Introduction . . . . . . . . . . . . . . . . . . . . . . . . . . . . .4-8 About the Symbol Display . . Symbol Used in this Manual . . . Notes on Discs . . . . . . . . . . . . . Recordable and Playable Discs Playable Discs . . . . . . . . . . . . . Regional Code . . . . . . . . . . . . . Front Panel . . . . . . . . . . . . . . . . Remote Control . . . . . . . . . . . . Remote Control Operation . . . . . . . . . . . . . . . . . . . . . . . . . . . . . . . . . . . . . . . . . . . . . . . . . . . . . . .
Introduction Notes on Discs To ensure proper use of this product, please read this owner’s manual carefully and retain for future reference. Handling Discs Do not touch the playback side of the disc. Hold the disc by the edges so that fingerprints do not get on the surface. Never stick paper or tape on the disc. This manual provides information on the operation and maintenance of your recorder. Should the unit require service, contact an authorized service location.
Introduction Recordable and Playable Discs DVD-RW (Digital Video Disc - ReWritable): DVD-RW discs can be formatted for VR mode recording or Video mode recording. These Discs can be recorded on repeatedly. Recordings can be erased, then you can record again on the same Disc.
Playable Discs DVD (8 cm / 12 cm disc) Discs such as movies that can be purchased or rented Video CD (VCD) (8 cm / 12 cm disc) VIDEO CDs or CD-Rs/CD-RWs in VIDEO CD/Super VIDEO CD format Audio CD (8 cm / 12 cm disc) Music CDs or CD-Rs/CD-RWs in music CD format that can be purchased CD-R/CD-RW (8 cm / 12 cm disc) CD-R/CD-RW discs that contain audio titles, DivX, MP3, WMA, or JPEG files.
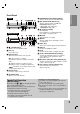
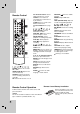
DR799 a b c kl d ef g hi j b c f PROGRESSIVE SCAN (DR788, DRK789) Switches the progressive mode ON or OFF. f RES. (RESOLUTION) (DR799 only) Sets the output resolution for HDMI and COMPONENT OUTPUT jacks. - HDMI: 1080i, 720p, 576p, 576i - COMPONENT: 576p, 576i g N / X (PLAY / PAUSE) Starts playback. Pause playback or recording temporarily, press again to exit pause mode. m DR788/DRK789 a Introduction Front Panel d efi g h x (STOP) Stops playback or recording. i z (REC) Starts recording.
Remote Control a b c d a POWER: Switches the recorder ON or OFF. OPEN/CLOSE (Z): Opens and closes the disc tray. AV/INPUT: Changes the input to use for recording (Tuner, AV1-3, or DV IN). PIP: Selects PIP function on or off. 0-9 numerical buttons: Selects numbered options in a menu. TV/DVD: To view channels selected by the recorder tuner or by the TV tuner. CLEAR: Removes a mark on the Marker Search menu. TV Control Buttons: See page 47.
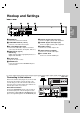
Hookup and Settings Rear Panel f b g h i j c d e Hookup and Settings a k a ANTENNA IN Connect the aerial to this terminal. g OPTICAL (Digital audio output jack) Connect to digital (optical) audio equipment. b COMPONENT OUTPUT (Y PB PR) Connect to a TV with Y PB PR inputs. h COAXIAL (Digital audio output jack) Connect to digital (coaxial) audio equipment. c AV 2 DECODER SCART JACK Connect the audio/video output of an external source (Pay-TV decoder, Set Top Box, VCR, etc.).
SCART connection Connections to Your TV Make one of the following connections, depending on the capabilities of your existing equipment. When using the COMPONENT OUTPUT jacks, set the Video Output Format option in the setup menu to YPbPr. When using the SCART jack, set the Video Output Format option in the setup menu to RGB. Tips Depending on your TV and other equipment you wish to connect, there are various ways you could connect the recorder. Use only one of the connections described below.
HDMI connection (DR799 only) HDMI compatible TV HDMI If you have an HDMI TV or monitor, you can connect it to this recorder using a HDMI cable. 1. Connect the HDMI OUTPUT jack on the recorder to the HDMI INPUT jack on an HDMI compatible TV or monitor (H). H Hookup and Settings 2. Set the TV’s source to HDMI (refer to TV’s Owner’s manual). Notes: If your TV is NOT capable of handling 96 kHz sampling frequency, set the [Sampling Freq.] option to [48 kHz] on the setup menu (See page 19).
Connecting to an Amplifier Rear of the recorder Connecting to an amplifier equipped with two channel analog stereo or Dolby Pro Logic ll/ Pro Logic Connect the Left and Right AUDIO OUTPUT jacks on the recorder to the audio left and right in jacks on your amplifier, receiver, or stereo system, using the audio cables (A).
Accessory Audio/Video (A/V) Connections TV VCR, Cable Box, or Satellite Tuner, etc. Connecting a PAY-TV/Canal Plus Decoder Hookup and Settings You can watch or record PAY-TV/Canal Plus programmes if you connect a decoder (not supplied) to the recorder. Disconnect the recorder’s mains lead from the mains when connecting the decoder.
Connecting to the AV IN 3 Jacks Using an USB Memory Stick Connect the input jacks (AV IN 3) on the recorder to the audio/video out jacks on your accessory component, using audio/video cables. This unit can play the MP3 / WMA / JPEG files contained in the USB Memory Stick. Jack panel of Accessory Component (VCR, Camcorder, etc.) Inserting/Removing the USB Memory Stick AUDIO OUTPUT R L VIDEO OUTPUT Inserting the USB Memory Stick Insert straight-in until it fits into place.
Auto Set Up Using the Home Menu After the POWER is pressed for the first time to turn on the unit or resetting the unit, the Initial Setup Wizard function sets the language, clock and tuner channels automatically. From the Home Menu screen you can access all the Media for playback and recording of the recorder. 2. Use b / B buttons to select a main option you want. Sub options appears. Hookup and Settings 1. Select a language for the Setup menu and onscreen display.
Initial Settings General Settings In this menu system, there are several ways to customize the settings provided. Most menus consist of three levels to set up the options, but some require greater depth for the variety of settings. Auto Programming General Operation 1. Press HOME and select [Setup] option. This recorder is equipped with a frequency synthesized tuner capable of receiving up to 88 TV channels.
You can edit a channel manually (add, delete, name, move, etc.). 1. Select [Program Edit] option then press B. 2. Press ENTER while [Edit] is selected. The Program List menu appears. 3. Use v / V to select a PR number then press ENTER. [PR] indicates the selected programme position. [Seek] Searches for a channel automatically. Searching stops when the recorder tunes in a channel. [Ch.] Changes the channel number. [MFT] Fine tunes the channel to obtain a clearer picture. 2.
General Settings (Continued) Power Save Mode TV Aspect You can set up the unit into an economic power save mode. Nothing is displayed in the display window when the unit is turned off. Selects the aspect ratio of the connected TV (4:3 standard or wide). [4:3 Letter Box] Select this when connecting to a 4:3 screen TV. Displays a wide picture with bands on the upper and lower portions of the screen. [4:3 Pan Scan] Select this when connecting to a 4:3 screen TV.
Language Settings Audio Settings Hookup and Settings Each DVD disc has a variety of audio output options. Set the recorder’s Audio Output according to the type of audio system you use. Display Menu Select a language for the Setup menu and on-screen display. Disc Menu/Audio/Subtitle [Original] Refers to the original language in which the disc was recorded.
Lock (Parental Control) Settings Set Password 1. Select [Set Password] option then press B. 2. Follow step 2 as shown “Rating”. To change the password, select the [Change], press ENTER and input the new 4-digit code. Input it again to verify. To delete the password, select [Delete] then press ENTER. If you forget your 4-digit code If you forget your password, to clear the current password, follow the procedure below. Rating Blocks playback of rated DVDs based on their content. Not all discs are rated. 1.
Recording Settings Disc Settings Initialize Hookup and Settings Disc Record Mode If you load a completely blank disc, the recorder will initialize the disc. DVD-R: The recorder initialize the disc to Video mode. The recording mode will always be Video mode. DVD-RW/DVD+RW/DVD+R (DL)/DVD-RAM: The Initialize menu will appears. Select [OK] then press ENTER. DVD-RW disc is initialized to Video mode. Also, you can reformat the DVD-RW/DVD+RW/ DVD-RAM from the Setup menu as below.
Finalize Disc Protect Finalizing ‘fixes’ the recordings in place so that the disc can be played on a regular DVD player or computer equipped with a suitable DVD-ROM drive. Finalizing a Video mode disc creates a menu screen for navigating the disc. This is accessed by pressing MENU/LIST or TITLE. When recording in DVD-RAM / DVD+RW / +R disc or VR mode formatted DVD-RW disc, set to [ON] to prevent accidental recording, editing or deleting of the disc loaded.
This manual gives basic instructions for operating the recorder. Some DVDs require specific operation or allow only limited operation during playback. When this occurs, the symbol appears on the TV screen, indicating that the operation is not permitted by the recorder or is not available on the disc. Displaying Information While Watching TV During viewing the TV, press DISPLAY to display/remove the information displayed on-screen.
Playback General Playback Features 1. Load your chosen disc in the tray, with the playback side down. 2. Starts playback using HOME menu (see page 15). 3. To stop the playback, press STOP (x). The unit records the stopped point, depending on the disc. “Xx” appears on the screen briefly. Press PLAY (N) to resume playback (from the scene point). If you press STOP (x) again or unload the disc (“x” appears on the screen.), the unit will clear the stopped point. 4. Press OPEN/CLOSE (Z) to remove the disc.
General Playback Features (Continued) Buttons Operations PLAY MODE For repeat playback During playback, press PLAY MODE repeatedly to select a desired repeat mode. DVD, Video mode DVD-R/RW, DVD+R/RW (Chapter/Title/Off) VR mode DVD-RW or DVD-RAM (Chapter/Title/All/Off) Video CD, Audio CD (Track/All/Off) MP3/WMA (Track/Folder/Off) Notes: On a Video CD with PBC, you must set PBC to [OFF] in the Setup menu to use the Repeat function. See page 22.
If a menu screen is displayed DVD VCD Marker Search The menu screen may be displayed first after loading a DVD or Video CD which contains a menu. DVD ALL VCD To enter a Marker DVD Use the b / B / v / V buttons to select the title/chapter you want to view, then press ENTER to start playback. Press TITLE or MENU/LIST to return to the menu screen. You can start playback from up to six memorized points. To enter a marker, press MARKER at the desired point on the disc.
3D Surround DVD ALL VCD DivX PIP (Picture in Picture) DVD ALL VCD This unit can produce a 3D Surround effect, which simulates multi-channel audio playback from two conventional stereo speakers, instead of the five or more speakers normally required to listen to multichannel audio from a home theater system. This function enables you to view the stored stations in sub picture during playback. 1. Press DISPLAY twice during playback. The OnScreen Display appears on the TV screen. 2.
Playing a DivX Movie File Movie List menu options The recorder can play DivX files. Before playing DivX files, read “DivX file requirement” on right. 1. Press v / V to select a folder/file on the [Movie List] menu then press ENTER. [Movie List] menu options appear. 1. Press HOME. 2. Select [Movie] option. 3. Select a media that contains DivX file(s) then press ENTER. The [Movie List] menu appears on the TV screen. 2. Press v / V / b / B to select an option, and press ENTER.
Playing an Audio CD or MP3/WMA file Audio CD and Music List menu options The recorder can play audio CDs and MP3/WMA files. Before playing MP3/WMA files, read “MP3/WMA audio file requirement” on right. 1. Press v / V to select a folder/file on the [Music List] menu then press ENTER. The menu options appear. The menu options displayed differ depending on the selected media. 1. Press HOME. The HOME menu appears. 2. Press v / V / b / B to select an option, and press ENTER. 2. Select [Music] option.
Viewing a JPEG File Photo List menu options The recorder can play JPEG files. Before playing JPEG recordings, read “Photo file requirement” on right. 1. Press v / V to select a file on the [Photo List] menu then press ENTER. The menu options appear. The menu options displayed differ depending on the selected media. 1. Press HOME. The HOME menu appears. 2. Select [Photo] option. 3. Select a media that contains JPEG file then press ENTER. The [Photo List] menu appears on the TV screen. 2.
View Slide Shows 1. Select [Slide Show] option on the [Photo List] menu (Refer to “Photo List menu options” on page 30). 2. Press ENTER. The Slide Show menu appears. [Selected] Views slide show only selected files. Use the MARKER button to select multiple files. [All] Views slide show all files. Playback 3. Use b / B / v / V to set the options. [Object] option: [Speed] option: Sets the Slide Show speed to [Slow], [Normal], or [Fast]. 4.
Recording About DVD recording Notes: This recorder cannot make recordings on CD-R or CD-RW discs. Our company takes no responsibility for recording failure due to power outages, defective discs, or damage to the Recorder. Fingerprints and small scratches on a disc can affect playback and/or recording performance. Please take proper care of your discs.
Some video material is copy-once protected: If you want to record copy-once protected material to DVD, you must use a VR mode DVD-RW disc compatible with CPRM Ver. 1.1. You can identify copy-once protected material during playback by displaying disc information on-screen. NTSC format signals from the analog or the DV inputs is not recorded correctly with this recorder. Video signals in SECAM format (from the built-in TV tuner or from the analog inputs) are recorded in PAL format.
Basic Recording from a TV Instant Timer Recording Follow the instructions below to record a TV program. Recording starts immediately and continues until the disc is full or you stop the recording. Instant Timer Recording allows you to make a recording easily of a preset length without using the program timer. Note: You must load a recordable disc for DVD recording. 1. Follow steps 1-2 as shown left (Basic Recording from a TV). 2. Press REC (z) repeatedly to select the recording time length. 1.
This recorder can be programmed to record up to 16 programs within a period of 1 month. For unattended recording, the timer needs to know the channels to be recorded, the starting and ending time. Note: If you use a completely blank disc for timer recording, you must format the disc before starting timer recording. (Refer to “Initialize” on page 21.) 1. Press HOME and select [TV] option. 2. Press v / V to select [Timer Record] option then press ENTER. The [Timer Record List] will appear. 3.
You cannot enter a timer program when: A recording is already underway. The time you’re trying to set has already passed. There are already 16 timer programs set. Checking Timer Recording Details Programming can be checked whenever the recorder is turned on. 1. Press HOME and select [TV] option. If two or more timer programs overlap: 2. Press v / V to select [Timer Record] option then press ENTER. The [Timer Record List] will appear. Use v / V to select a timer recording.
Recording from DV Input 1. Make sure your digital camcorder is connected to the front panel DV IN jack. See page 14. Before DV dubbing 2. Press AV/INPUT repeatedly to select the DV input. DV appears in the display window and on the TV screen. Recording from a Digital Camcorder You can record from a digital camcorder connected to the DV IN jack on the front panel of this recorder. Using the recorder’s remote, you can control both the camcorder and this recorder.
Editing 12 3 4 5 6 Title List and Chapter List Menu Overview Using the Title List menu you can edit video content. The editing features available in the Title List menu depend on whether you are editing video on DVD, and whether you’re editing Original content, or a Playlist. There are two ways to edit VR mode DVD-RW discs. You can directly edit the Original content of the disc, or you can create and edit a Playlist.
Titles, Chapters and Parts Titles in the disc’s original content contain one or more chapters. When you insert a disc’s title into the Playlist, all the chapters within that title also appear. In other words, chapters in the Playlist behave exactly as chapters on a DVD-Video disc do. Parts are sections of Original or Playlist titles. From the Original and Playlist menu you can add or delete parts. Adding a chapter or title to the Playlist creates a new title made up of a section (ie.
Making a New Playlist -RWVR RAM Use this function to add an Original title or chapter to the Playlist. When you do this, the whole title or chapter are put into the Playlist (you can delete bits you don’t need later — see Deleting an Original or Playlist title/chapter on page 41). The title appears in the Playlist complete with the chapter markers that appear in the Original. However, if you add more chapter markers to the Original later, these are not automatically copied over into the Playlist title.
Deleting an Original or Playlist Title/Chapter When you erase a title or chapter from the Playlist menu, you only remove it from the Playlist; the title/chapter remains in the Original menu. If you choose to delete a title or chapter from the Original (title/chapter) menu, the title or chapter is actually deleted from the disc and the remaining time available for recording increases. Titles/chapters deleted from the Original are also removed from the Playlist.
Naming a Title You can name the titles. The names can be up to 32 characters long. 1. Choose the title you want to name on the Title List menu, then press ENTER. The menu options appears on the left side of the menu. 2. Use v/V to select [Title Name] option then press ENTER. Keyboard menu appears. Time Search -RWVR -RWVideo RAM +RW -R +R You can select start point of the title. 1. Use b / B / v / V to choose a title on the Title List menu then press ENTER.
Divide One Titles Into Two +RW Use this command to split a title up into two new titles. 1. On the Title List menu, select a title you want to divide then press ENTER. The menu options appears on the left side of the screen. 2. Select [Divide] option. Combining Two Chapters Into One -RWVR +RW +R RAM Use this function to combine two adjacent chapters into one. 1.
Moving a Playlist Chapter -RWVR RAM Use this function to re-arrange the playing order of Playlist chapters on the Title List-Playlist menu. Note: This function is not available if there is only one chapter. 1. Select a chapter on the Chapter List-Playlist menu. 2. Press ENTER. The menu options appears on the left side of the menu. 3. Use v / V to select [Move] option from Playlist options then press ENTER. 4. Use b / B / v / V to choose the place you want to move the chapter to then press ENTER.
Reference 2. Press TITLE in play or stop mode. Title List menu will appear as shown below. Tip You can remove the Title List menu by pressing STOP (x). Additional Information Overwriting Recording +RW To overwrite a new video recording on a previously recorded title, follow these steps. This feature is not available for DVD+Rs, that always record at the end of the Disc. 1. Select input source you want to record (TV channel, AV1-3). 2. Press MENU/LIST to display the Title List menu. 3.
Language Codes Use this list to input your desired language for the following initial settings: Disc Audio, Disc Subtitle, Disc Menu.
Controlling Your TV with the Supplied Remote Control You can control the sound level, input source, and power switch of your LG TV with the supplied remote. You can control your TV using the buttons below. Controlling other TVs with the remote You can control the sound level, input source, and power switch of non-LG TVs as well. If your TV is listed in the table below, set the appropriate manufacturer code. 1.
Troubleshooting Check the following guide for the possible cause of a problem before contacting service. Cause Symptom The power cord is disconnected. Plug the power cord into the wall outlet securely. No picture. TV/DVD mode for the recorder is set to TV. Press TV/DVD on the remote control repeatedly to choose DVD mode. TV indicator disappears in the display window. The TV is not set to receive recorder signal output.
Cause Cannot play a disc recorded using this recorder on another player. Cannot record or did not record successfully. Timer recording is not possible. Stereo Audio Record and/or Playback is not present. The remote control does not work properly. The disc was recorded in Video mode. Finalize the disc. (page 22) Some players will not play even a finalized disc recorded in Video mode. No solution.
Specifications General Power requirements Power consumption Dimensions (approx.) Net Weight (approx.) Operating temperature Operating humidity Television system Recording format AC 200-240V, 50/60 Hz 18W 430 X 54 X 275 mm (w x h x d) without foot 2.
DR289-P2_HA3RMLB / DR299H-P2_HA3RMLD / DR289K-P2_HA3RMLS DVD-êÖäéêÑÖê êìäéÇéÑëíÇé èéãúáéÇÄíÖãü åéÑÖãú: DR788 / DR799 DRK789 è‰ ÔÓ‰Íβ˜ÂÌËÂÏ, ˝ÍÒÔÎÛ‡Ú‡ˆËÂÈ Ë Ì‡ÒÚÓÈÍÓÈ ‰‡ÌÌÓ„Ó ËÁ‰ÂÎËfl Ú˘‡ÚÂθÌÓ Ë ÔÓÎÌÓÒÚ¸˛ ËÁÛ˜ËÚ ˝ÚÓ ÛÍÓ‚Ó‰ÒÚ‚Ó. ëÓÍ ÒÎÛÊ·˚ ÔË·Ó‡ 7 ÎÂÚ ÒÓ ‰Ìfl ÔÂe‰a˜Ë ÚÓ‚apa ÔÓÚpe·uÚeβ. Internet Address:http://www.lg.
ÇçàåÄçàÖ éèÄëçéëíú èéêÄÜÖçàü ùãÖäíêàóÖëäàå íéäéå çÖ éíäêõÇÄíú ÇçàåÄçàÖ: óíéÅõ ìåÖçúòàíú éèÄëçéëíú èéêÄÜÖçàü ùãÖäíêàóÖëäàå íéäéå, çÖ ëçàåÄâíÖ äêõòäì (àãà áÄÑçûû èÄçÖãú) ÑÄççéÉé àáÑÖãàü. Ççìíêà çÖí óÄëíÖâ, éÅëãìÜàÇÄÖåõï èéãúáéÇÄíÖãÖå. Ñãü êÖåéçíÄ à éÅëãìÜàÇÄçàü éÅêÄíàíÖëú ä äÇÄãàîàñàêéÇÄççõå ëèÖñàÄãàëíÄå.
ǂ‰ÂÌË . . . . . . . . . . . . . . . . . . . . . . . . . . . . . . . . . . .4-8 éÚÓ·‡ÊÂÌË ̇ ˝Í‡Ì ÒËÏ‚Ó· . . . . . . . . . . . .4 é·ÓÁ̇˜ÂÌËfl, ËÒÔÓθÁÛÂÏ˚ ‚ ‰‡ÌÌÓÏ ÛÍÓ‚Ó‰ÒÚ‚Â . . . . . . . . . . . . . . . . . . . . . . . . .4 èËϘ‡ÌËfl ÔÓ ‰ËÒÍ‡Ï . . . . . . . . . . . . . . . . . . . . . .4 á‡ÔËÒ˚‚‡ÂÏ˚Â Ë ‚ÓÒÔÓËÁ‚Ó‰ËÏ˚ ‰ËÒÍË . . . . . . .5 ÇÓÒÔÓËÁ‚Ó‰ËÏ˚ ‰ËÒÍË . . . . . . . . . . . . . . . . . . . . .6 ê„ËÓ̇θÌ˚È ÍÓ‰ . . . . . . . . . . . . . . . . . . . . . . . . . .6 è‰Ìflfl Ô‡ÌÂθ . . . .
ǂ‰ÂÌË èËϘ‡ÌËfl ÔÓ ‰ËÒÍ‡Ï óÚÓ·˚ Ó·ÂÒÔ˜ËÚ¸ ̇‰ÎÂʇ˘Â ËÒÔÓθÁÓ‚‡ÌË ‰‡ÌÌÓ„Ó ËÁ‰ÂÎËfl, ÔÓʇÎÛÈÒÚ‡, ‚ÌËχÚÂθÌÓ ÓÁ̇ÍÓϸÚÂÒ¸ Ò ‰‡ÌÌ˚Ï ÛÍÓ‚Ó‰ÒÚ‚ÓÏ ÔÓθÁÓ‚‡ÚÂÎfl Ë ÒÓı‡ÌËÚÂ Â„Ó ‰Îfl ËÒÔÓθÁÓ‚‡ÌËfl ‚ ·Û‰Û˘ÂÏ. ùÚÓ ÛÍÓ‚Ó‰ÒÚ‚Ó ÒÓ‰ÂÊËÚ ËÌÙÓχˆË˛ ÔÓ ˝ÍÒÔÎÛ‡Ú‡ˆËË Ë ÚÂıÓ·ÒÎÛÊË‚‡Ì˲ ÂÍӉ‡. ÖÒÎË ÛÒÚÓÈÒÚ‚Ó ÌÛʉ‡ÂÚÒfl ‚ ÚÂıÓ·ÒÎÛÊË‚‡ÌËË, Ò‚flÊËÚÂÒ¸ Ò ‰ËÎÂÒÍËÏ Ò‚ËÒÌ˚Ï ˆÂÌÚÓÏ. é·‡˘ÂÌËÂ Ò ‰ËÒ͇ÏË ç ÔË͇҇ÈÚÂÒ¸ Í ‡·Ó˜ÂÈ ÒÚÓÓÌ ‰ËÒ͇. óÚÓ·˚ ̇ ÔÓ‚ÂıÌÓÒÚË Ì ÔÓfl‚ËÎËÒ¸ ÓÚÔ˜‡ÚÍË Ô‡Î¸ˆÂ‚, ·ÂËÚ ‰ËÒÍ Á‡ ͇fl.
ǂ‰ÂÌË á‡ÔËÒ˚‚‡ÂÏ˚Â Ë ‚ÓÒÔÓËÁ‚Ó‰ËÏ˚ ‰ËÒÍË DVD-RW (ÔÂÂÁ‡ÔËÒ˚‚‡ÂÏ˚È DVD-‰ËÒÍ): ÑËÒÍË DVD-RW ÏÓ„ÛÚ ·˚Ú¸ ÓÚÙÓχÚËÓ‚‡Ì˚ ‰Îfl Á‡ÔËÒË ‚ ÂÊËÏ VR ËÎË Video. ùÚË ‰ËÒÍË ÏÓ„ÛÚ Á‡ÔËÒ˚‚‡Ú¸Òfl ÔÓ‚ÚÓÌÓ. á‡ÔËÒË ÏÓ„ÛÚ ·˚Ú¸ ÒÚÂÚ˚, ÔÓÒΠ˜Â„Ó ÚÓÚ Ê ‰ËÒÍ ÏÓÊÌÓ ÒÌÓ‚‡ Á‡ÔËÒ‡Ú¸.
ÇÓÒÔÓËÁ‚Ó‰ËÏ˚ ‰ËÒÍË DVD-‰ËÒÍË (8- Ë 12-Ò‡ÌÚËÏÂÚÓ‚˚ ‰ËÒÍË) ÑËÒÍË, ̇ÔËÏÂ Ò ÙËθχÏË, ÍÓÚÓ˚ ÏÓ„ÛÚ ·˚Ú¸ ÍÛÔÎÂÌ˚ ËÎË ‚ÁflÚ˚ ̇ÔÓ͇Ú. ÇˉÂÓ ÍÓÏÔ‡ÍÚ-‰ËÒÍ (VCD) (8- Ë 12-Ò‡ÌÚËÏÂÚÓ‚˚ ‰ËÒÍË) ÇˉÂÓ ÍÓÏÔ‡ÍÚ-‰ËÒÍË ËÎË ‰ËÒÍË CD-R/CD-RW ‚ ÙÓχÚ VIDEO CD/Super VIDEO CD. ÄÛ‰ËÓ ÍÓÏÔ‡ÍÚ-‰ËÒÍË (8- Ë 12-Ò‡ÌÚËÏÂÚÓ‚˚ ‰ËÒÍË) åÛÁ˚͇θÌ˚ ÍÓÏÔ‡ÍÚ-‰ËÒÍË ËÎË ‰ËÒÍË CD-R/CD-RW ‚ ÙÓχÚ ÏÛÁ˚͇θÌÓ„Ó ÍÓÏÔ‡ÍÚ-‰ËÒ͇, ÍÓÚÓ˚ ÏÓ„ÛÚ ·˚Ú¸ ÍÛÔÎÂÌ˚.
DR799 a b c kl d ef g hi j b m c f PROGRESSIVE SCAN (ÔÓ„ÂÒÒ˂̇fl ‡Á‚ÂÚ͇) (DR788, DRK789) ÇÍβ˜ÂÌËÂ Ë ‚˚Íβ˜ÂÌË ÔÓ„ÂÒÒË‚ÌÓÈ ‡Á‚ÂÚÍË. f RES. (RESOLUTION) (ÚÓθÍÓ ‰Îfl DR799) ìÒÚ‡ÌÓ‚ËÚ ‡Á¯ÂÌË ‰Îfl ‚ˉÂÓ‚˚ıÓ‰Ó‚ HDMI Ë COMPONENTOUTPUT. - HDMI: 1080i, 720p, 576p, 576i - COMPONENT: 576p, 576i DR788/DRK789 a ǂ‰ÂÌË è‰Ìflfl Ô‡ÌÂθ d efi g g N / X (PLAY / PAUSE) (‚ÓÒÔÓËÁ‚‰ÂÌËÂ/Ô‡ÛÁ‡) 燘‡ÎÓ ‚ÓÒÔÓËÁ‚‰ÂÌËfl. ÇÂÏÂÌ̇fl ÔËÓÒÚ‡Ìӂ͇ ‚ÓÒÔÓËÁ‚‰ÂÌËfl ËÎË Á‡ÔËÒË.
ÑËÒڇ̈ËÓÌÌÓ„Ó ÛÔ‡‚ÎÂÌËfl a b c d a POWER (èËÚ‡ÌËÂ): ÇÍβ˜ÂÌËÂ Ë ‚˚Íβ˜ÂÌË ÂÍӉ‡. OPEN/CLOSE (Z): éÚÍ˚Ú¸ ËÎË Á‡Í˚Ú¸ ÎÓÚÓÍ ‰Îfl ‰ËÒ͇. AV/INPUT: àÁÏÂÌÂÌË ‚ıÓ‰‡, ËÒÔÓθÁÛÂÏÓ„Ó ‰Îfl Á‡ÔËÒË (Ú˛ÌÂ, AV1-3 ËÎË ‚ıÓ‰ DV). PIP: ÇÍβ˜ÂÌËÂ Ë ‚˚Íβ˜ÂÌË ÙÛÌ͈ËË PIP. äÌÓÔÍË Ò ˆËÙ‡ÏË 0-9: Ç˚·Ó ÌÛÏÂÓ‚‡ÌÌ˚ı ˝ÎÂÏÂÌÚÓ‚ ÏÂÌ˛. TV/DVD: èÓÒÏÓÚ Í‡Ì‡ÎÓ‚, ‚˚·‡ÌÌ˚ı Ú˛ÌÂÓÏ ÂÍӉ‡ ËÎË Ú˛ÌÂÓÏ ÚÂ΂ËÁÓ‡. CLEAR: 쉇ÎÂÌË ÓÚÏÂÚÍË ‚ ÏÂÌ˛ Marker Search. äÌÓÔÍË ÛÔ‡‚ÎÂÌËfl ÚÂ΂ËÁÓÓÏ: ëÏ. ÒÚ. 47.
èÓ‰Íβ˜ÂÌËÂ Ë Ì‡ÒÚÓÈ͇ ᇉÌflfl Ô‡ÌÂθ f b g h i j c d e èÓ‰Íβ˜ÂÌËÂ Ë Ì‡ÒÚÓÈ͇ a k a ÄÌÚÂÌÌ˚È ‚ıÓ‰ 벉‡ ÔÓ‰Íβ˜‡ÂÚÒfl ‡ÌÚÂÌ̇. b ê‡Á˙ÂÏ COMPONENT OUTPUT (Y PB PR) èÓ‰Íβ˜ÂÌËÂ Í ÚÂ΂ËÁÓÛ Ò ‚ıÓ‰‡ÏË Y PB PR. c ê‡Á˙ÂÏ ÚËÔ‡ SCART AV 2 DECODER èÓ‰Íβ˜ËÚ ‡Û‰ËÓ- ‚ˉÂÓ‚˚ıÓ‰ ‚̯ÌÂ„Ó ËÒÚÓ˜ÌË͇ (‰ÂÍӉ‡ Ô·ÚÌÓ„Ó ÚÂ΂ˉÂÌËfl, ‰ÂÍӉ‡ ͇̇ÎÓ‚ ͇·ÂθÌÓ„Ó ÚÂ΂ˉÂÌËfl, ‚ˉÂÓχ„ÌËÚÓÙÓ̇ Ë Ú. ‰.).
èÓ‰Íβ˜ÂÌË SCART èÓ‰Íβ˜ÂÌËÂ Í ÚÂ΂ËÁÓÛ Ç Á‡‚ËÒËÏÓÒÚË ÓÚ ‚ÓÁÏÓÊÌÓÒÚÂÈ ‚‡¯Â„Ó Ó·ÓÛ‰Ó‚‡ÌËfl ‚˚ÔÓÎÌËÚ ӉÌÓ ËÁ ÒÎÂ‰Û˛˘Ëı ÒÓ‰ËÌÂÌËÈ. èË ËÒÔÓθÁÓ‚‡ÌËË ‚˚ıÓ‰ÌÓ„Ó Ò˄̇· Ò „ÌÂÁ‰ COMPONENT OUTPUT Á‡‰‡ÈÚ ÙÓÏ‡Ú ‚˚ıÓ‰ÌÓ„Ó ‚ˉÂÓÒ˄̇· YPbPr ÔÓ ÏÂÌ˛ ̇ÒÚÓÈÍË. èË ËÒÔÓθÁÓ‚‡ÌËË ‚˚ıÓ‰ÌÓ„Ó Ò˄̇· Ò ‡Á˙Âχ SCART Á‡‰‡ÈÚ ÙÓÏ‡Ú ‚˚ıÓ‰ÌÓ„Ó ‚ˉÂÓÒ˄̇· RGB ÔÓ ÏÂÌ˛ ̇ÒÚÓÈÍË.
íÂ΂ËÁÓ, ÒÓ‚ÏÂÒÚËÏ˚È HDMI compatible TVÒ HDMI èÓ‰Íβ˜ÂÌË ÔÓ HDMI-ËÌÚÂÙÂÈÒÛ (ÚÓθÍÓ ‰Îfl DR799) HDMI ÖÒÎË Û Ç‡Ò HDMI-ÚÂ΂ËÁÓ ËÎË HDMI-ÏÓÌËÚÓ, Â„Ó ÏÓÊÌÓ ÔÓ‰ÒÓ‰ËÌËÚ¸ Í ‰‡ÌÌÓÏÛ ÂÍÓ‰ÂÛ Ò ÔÓÏÓ˘¸˛ HDMI-͇·ÂÎfl. H èËϘ‡ÌËfl : ÖÒÎË ‚‡¯ ÚÂ΂ËÁÓ çÖ ÔÓ‰‰ÂÊË‚‡ÂÚ Ò˄̇Î˚ Ò ˜‡ÒÚÓÚÓÈ ‰ËÒÍÂÚËÁ‡ˆËË 96 ÍɈ, ‚˚·ÂËÚ ‰Îfl ÓÔˆËË [TaÍÚo‚afl óacÚ.] ‚ ÏÂÌ˛ ̇ÒÚÓÂÍ ÛÒÚ‡ÌÓ‚ÍÛ [48 kHz] (ëÏ. ÒÚ. 19).
èÓ‰Íβ˜ÂÌËÂ Í ÛÒËÎËÚÂβ ᇉÌflfl Ô‡ÌÂθ Rear ofÂÍӉ‡ the recorder èÓ‰Íβ˜ÂÌËÂ Í ÛÒËÎËÚÂβ, Ëϲ˘ÂÏÛ ‰‚Ûı͇̇θÌ˚È ‡Ì‡ÎÓ„Ó‚˚È ÒÚÂÂÓ‚ıÓ‰ ËÎË Dolby Pro Logic ll/Pro Logic èÓ‰Íβ˜ËÚ „ÌÂÁ‰‡ ÎÂ‚Ó„Ó Ë Ô‡‚Ó„Ó ‡Û‰ËÓ‚˚ıÓ‰Ó‚ AUDIO OUTPUT pÂÍӉ‡ Í ‚ıÓ‰Ì˚Ï „ÌÂÁ‰‡Ï ÎÂ‚Ó„Ó Ë Ô‡‚Ó„Ó ‡Û‰ËÓ͇̇ÎÓ‚ ‚‡¯Â„Ó ÛÒËÎËÚÂÎfl, ÂÒ˂‡ ËÎË ÒÚÂÂÓÒËÒÚÂÏ˚ Ò ÔÓÏÓ˘¸˛ ‡Û‰ËÓ͇·ÂÎÂÈ (Ä).
íÂ΂ËÁÓ TV ÇÒÔÓÏÓ„‡ÚÂθÌ˚ ‡Û‰ËÓ- ‚ˉÂÓÒÓ‰ËÌÂÌËfl ÇˉÂÓχ„ÌËÚÓÙÓÌ, ·ÎÓÍ ÔËÂχ VCR, Cable Box, or ͇·ÂθÌÓ„Ó ÚÂ΂ˉÂÌËfl, Satellite Ú˛Ì Tuner, Ëetc. ÒÔÛÚÌËÍÓ‚˚È Ú. ‰. èÓ‰ÒÓ‰ËÌÂÌË ‰ÂÍӉ‡ Ô·ÚÌÓ„Ó ÚÂ΂ˉÂÌËfl / ‰ÓÔÓÎÌËÚÂθÌ˚ı ͇̇ÎÓ‚ èÓ‰Íβ˜ÂÌËÂ Ë Ì‡ÒÚÓÈ͇ Ç˚ ÏÓÊÂÚ ÔÓÒχÚË‚‡Ú¸ Ë Á‡ÔËÒ˚‚‡Ú¸ ÔÓ„‡ÏÏ˚ Ô·ÚÌÓ„Ó ÚÂ΂ˉÂÌËfl / ‰ÓÔÓÎÌËÚÂθÌ˚ı ͇̇ÎÓ‚, ÂÒÎË ÔÓ‰ÒÓ‰ËÌËÚ ‰ÂÍӉ (Ì ‚ıÓ‰ËÚ ‚ ÍÓÏÔÎÂÍÚ) Í ÂÍÓ‰ÂÛ. è‰ ÔÓ‰ÒÓ‰ËÌÂÌËÂÏ ‰ÂÍӉ‡ ÓÚÒÓ‰ËÌËÚ ÒÂÚ‚ÓÈ ¯ÌÛ ÂÍӉ‡ ÓÚ ÒÂÚË.
èÓ‰Íβ˜ÂÌËÂ Í „ÌÂÁ‰‡Ï AV IN 3 ëÓ‰ËÌËÚ ‡Û‰ËÓ- Ë ‚ˉÂÓ͇·ÂÎflÏË ‚ıÓ‰Ì˚ „ÌÂÁ‰‡ (AV IN 3) ÂÍӉ‡ Ò ‚˚ıÓ‰Ì˚ÏË „ÌÂÁ‰‡ÏË ‡Û‰ËÓ -Ë ‚ˉÂÓÒ˄̇· ‰ÓÔÓÎÌËÚÂθÌÓÈ ‡ÔÔ‡‡ÚÛ˚. è‡ÌÂθ ‰ÓÔÓÎÌËÚÂθÌÓ„Ó ÛÒÚÓÈÒÚ‚‡ Jack panel of Accessory Component (‚ˉÂÓχ„ÌËÚÓÙÓ̇, ‚ˉÂÓ͇ÏÂ˚ Ë Ú. ‰.). (VCR, Camcorder, etc.) AUDIO OUTPUT èËÏÂÌÂÌË ͇Ú˚ Ô‡ÏflÚË USB чÌÌ˚È ÔË·Ó ÔÓÁ‚ÓÎflÂÚ ‚ÓÒÔÓËÁ‚Ó‰ËÚ¸ Ù‡ÈÎ˚ ÙÓχÚÓ‚ MP3/WMA/JPEG, Á‡ÔËÒ‡ÌÌ˚ ̇ ͇Ú ԇÏflÚË USB.
àÒÔÓθÁÓ‚‡ÌË ÏÂÌ˛ Home èÓÒΠÔÂ‚Ó„Ó Ì‡Ê‡ÚËfl ÍÌÓÔÍË POWER ‰Îfl ‚Íβ˜ÂÌËfl Ë‰Ë Ò·ÓÒ‡ Ô‡‡ÏÂÚÓ‚ ÂÍӉ‡ ÙÛÌ͈ËÂÈ ËÒıÓ‰ÌÓÈ Ì‡ÒÚÓÈÍË ‡‚ÚÓχÚ˘ÂÒÍË Á‡‰‡ÂÚÒfl flÁ˚Í ËÌÚÂÙÂÈÒ‡, ÛÒڇ̇‚ÎË‚‡˛ÚÒfl ÔÓ͇Á‡ÌËfl ‚ÂÏÂÌË Ë Í‡Ì‡Î˚ Ú˛Ì‡. ë ˝Í‡Ì‡ ÏÂÌ˛ Home ‚˚ ÏÓÊÂÚ ÔÓÎÛ˜ËÚ¸ ‰ÓÒÚÛÔ ÍÓ ‚ÒÂÏ ÌÓÒËÚÂÎflÏ ËÌÙÓχˆËË ‰Îfl ‚ÓÒÔÓËÁ‚‰ÂÌËfl ËÎË Á‡ÔËÒË Ò ÔÓÏÓ˘¸˛ ÂÍӉ‡. 1. Ç˚·ÂËÚ flÁ˚Í, ̇ ÍÓÚÓÓÏ ·Û‰ÛÚ ‚˚‚Ó‰ËÚ¸Òfl ÒÓÓ·˘ÂÌËfl ÏÂÌ˛ ̇ÒÚÓÈÍË Ë ÒÓÓ·˘ÂÌËfl ‰ËÒÔÎÂfl.
燘‡Î¸Ì˚ ÛÒÚ‡ÌÓ‚ÍË é·˘Ë ̇ÒÚÓÈÍË Ç ÒËÒÚÂÏ ÏÂÌ˛ ‰‡ÌÌÓ„Ó ÛÒÚÓÈÒÚ‚‡ ÂÒÚ¸ ÌÂÒÍÓθÍÓ ÒÔÓÒÓ·Ó‚ ‚˚·Ó‡ ÌÛÊÌ˚ı ̇ÒÚÓÂÍ. ÅÓθ¯ËÌÒÚ‚Ó ÏÂÌ˛ ËÏÂÂÚ ÚË ÛÓ‚Ìfl ‰Îfl ̇ÒÚÓÈÍË ÓÔˆËÈ, Ӊ̇ÍÓ ÌÂÍÓÚÓ˚ ËÏÂ˛Ú ·Óθ¯Û˛ „ÎÛ·ËÌÛ ‰Îfl ‡Á΢Ì˚ı ÛÒÚ‡ÌÓ‚ÓÍ. Ä‚ÚÓ-ÔÓËÒÍ PR 鷢ˠÛ͇Á‡ÌËfl ÔÓ ËÒÔÓθÁÓ‚‡Ì˲ ÏÂÌ˛ 1. ç‡ÊÏËÚ HOME Ë ‚˚·ÂËÚ ÓÔˆË˛ [ìÒÚ‡Ìӂ͇]. чÌÌ˚È ÂÍӉ ËÏÂÂÚ Ú˛ÌÂ Ò ÒËÌÚÂÁ‡ÚÓÓÏ ˜‡ÒÚÓÚ˚, ÍÓÚÓ˚È ÏÓÊÂÚ ÔËÌËχڸ ‰Ó 88 ÚÂ΂ËÁËÓÌÌ˚ı ͇̇ÎÓ‚.
åÓÊÌÓ ‚Û˜ÌÛ˛ ‰‡ÍÚËÓ‚‡Ú¸ ͇̇Î˚ (‰Ó·‡‚ÎflÚ¸, Û‰‡ÎflÚ¸, ÔÂÂËÏÂÌÓ‚˚‚‡Ú¸, ÔÂÂÌÓÒËÚ¸ Ë Ú. Ô.) 1. Ç˚·ÂËÚ ÓÔˆË˛ [êۘ̇fl ̇ÒÚ. PR] Ë Ì‡ÊÏËÚ ÍÌÓÔÍÛ B. 2. ç‡ÊÏËÚ ÍÌÓÔÍÛ ENTER, ÍÓ„‰‡ ‚˚·‡Ì‡ ÓÔˆËfl [P‰‡Í.]. èÓfl‚ÎflÂÚÒfl ÏÂÌ˛ Program List (ëÔËÒÓÍ ÔÓ„‡ÏÏ). 3. àÒÔÓθÁÛfl ÍÌÓÔÍË v / V ‚˚·ÂËÚ ÌÓÏ ÔÓ„‡ÏÏ˚ (PR) Ë Ì‡ÊÏËÚ ÍÌÓÔÍÛ ENTER. [PR] Û͇Á˚‚‡ÂÚ ÛÒÚ‡ÌÓ‚ÎÂÌÌÛ˛ ÔÓÁËˆË˛ ÔÓ„‡ÏÏ˚. [èÓËÒÍ] Ä‚ÚÓχÚ˘ÂÒÍËÈ ÔÓËÒÍ Í‡Ì‡ÎÓ‚. èÓËÒÍ ÓÒڇ̇‚ÎË‚‡ÂÚÒfl, ÍÓ„‰‡ ÂÍӉ ̇Òڇ˂‡ÂÚÒfl ̇ ͇ÍÓÈ-ÌË·Û‰¸ ͇̇Î.
鷢ˠÛÒÚ‡ÌÓ‚ÍË (ÔÓ‰ÓÎÊÂÌËÂ) áÍoÌoÏ. ˝Ìcp„ËË îÓÏ‡Ú ˝Í‡Ìa Ç˚ ÏÓÊÂÚ ÔÂÂÍβ˜ËÚ¸ ÛÒÚÓÈÒÚ‚Ó ‚ ˝ÍÓÌÓÏ˘Ì˚È ˝Ì„Óҷ„‡˛˘ËÈ ÂÊËÏ. äÓ„‰‡ ÔË·Ó ÓÚÍβ˜ÂÌ, ‚ ÓÍÌ ‰ËÒÔÎÂfl ÌË˜Â„Ó Ì ÓÚÓ·‡Ê‡ÂÚÒfl. Ç˚·Ó ÙÓχڇ ËÁÓ·‡ÊÂÌËfl ÔÓ‰Íβ˜ÂÌÌÓ„Ó ÚÂ΂ËÁÓ‡ (Òڇ̉‡ÚÌ˚È 4:3 ËÎË ¯ËÓÍӽ͇ÌÌ˚È). «4:3 ÉopËÁoÌÚ.» (Òڇ̉‡ÚÌ˚È ÙÓÏ‡Ú ËÁÓ·‡ÊÂÌËfl, Ú‡Í Ì‡Á˚‚‡ÂÏ˚È «ÔÓ˜ÚÓ‚˚È fl˘ËÍ»). Ç˚·Ë‡ÈÚ ˝ÚÓÚ ‚‡Ë‡ÌÚ, ÔÓ‰Íβ˜‡flÒ¸ Í ÚÂ΂ËÁÓÛ Ò ÙÓχÚÓÏ ˝Í‡Ì‡ 4:3.
ìÒÚ‡Ìӂ͇ flÁ˚͇ ç‡ÒÚÓÈ͇ ‡Û‰ËÓ èÓ‰Íβ˜ÂÌËÂ Ë Ì‡ÒÚÓÈ͇ ä‡Ê‰˚È DVD-‰ËÒÍ ËÏÂÂÚ ÌÂÒÍÓθÍÓ ÓÔˆËÈ ‡Û‰ËÓ‚˚ıÓ‰‡. ìÒÚ‡ÌÓ‚ËÚ ‡Û‰ËÓ‚˚ıÓ‰ ‚ ÒÓÓÚ‚ÂÚÒÚ‚ËË Ò ÚËÔÓÏ ËÒÔÓθÁÛÂÏÓÈ ‚‡ÏË ‡Û‰ËÓÒËÒÚÂÏ˚. åÂÌ˛ ‰ËcÔÎefl Ç˚·ÂËÚ flÁ˚Í ÏÂÌ˛ Setup (ìÒÚ‡Ìӂ͇) Ë ˝Í‡ÌÌÓ„Ó ÏÂÌ˛. Dolby Digital / DTS / MPEG [ÅËÚÒÚËÏ]: Ç˚·ÂËÚ “Bitstream” (Ñ‚Ó˘Ì˚È ÔÓÚÓÍ) ÔË ÔÓ‰ÒÓ‰ËÌÂÌËË Í „ÌÂÁ‰Û ÂÍӉ‡ DIGITAL AUDIO OUT (ˆËÙÓ‚ÓÈ ‡Û‰ËÓ‚˚ıÓ‰) Í ÛÒËÎËÚÂβ ËÎË ‰Û„ÓÏÛ Ó·ÓÛ‰Ó‚‡Ì˲ Ò ‰ÂÍÓ‰ÂÓÏ Dolby Digital, DTS ËÎË MPEG.
ç‡ÒÚÓÈ͇ ·ÎÓÍËÓ‚ÍË (Ó‰ËÚÂθÒÍÓ„Ó ÍÓÌÚÓÎfl) ìÒÚ‡Ìӂ͇ Ô‡ÓÎfl 1. Ç˚·‡Ú¸ ÓÔˆË˛ [ìÒÚ‡Ìӂ͇ Ô‡ÓÎfl] Ë Ì‡ÊÏËÚ ÍÌÓÔÍÛ B. 2. Ç˚ÔÓÎÌËÚ ¯‡„ 2 ‡Á‰Â· “ÑÓÒÚÛÔ“. óÚÓ·˚ ËÁÏÂÌËÚ¸ Ô‡Óθ, ‚˚·ÂËÚ ÓÔˆË˛ [àÁÏÂÌËÚ¸], ̇ÊÏËÚ ENTER Ë ‚‚‰ËÚ ÌÓ‚˚È ˜ÂÚ˚ÂıÁ̇˜Ì˚È ÍÓ‰. Ç‚ÂÒÚË ÍÓ‰ ¢ ‡Á ‰Îfl ÔÓ‰Ú‚ÂʉÂÌËfl. óÚÓ·˚ ËÁÏÂÌËÚ¸ Ô‡Óθ, ‚˚·ÂËÚ [쉇ÎËÚ¸] Ë Ì‡ÊÏËÚ ÍÌÓÔÍÛ ENTER. ÖÒÎË Ç˚ Á‡·˚ÎË 4-Á̇˜Ì˚È ÍÓ‰ ÑÓÒÚÛÔ ÅÎÓÍËÛÂÚ ‚ÓÒÔÓËÁ‚‰ÂÌË ‰ËÒÍÓ‚ DVD ‚ Á‡‚ËÒËÏÓÒÚË ÓÚ ÂÈÚËÌ„‡ ÒÓ‰ÂÊËÏÓ„Ó. ç ‚Ò ‰ËÒÍË Í·ÒÒËÙˈËÓ‚‡Ì˚. 1.
ç‡ÒÚÓÈÍË Á‡ÔËÒË ç‡ÒÚÓÈÍË ‰ËÒ͇ ÙÓχÚ. åÓÊÌÓ ÛÒڇ̇‚ÎË‚‡Ú¸ ͇˜ÂÒÚ‚Ó ËÁÓ·‡ÊÂÌËfl ‰Îfl Á‡ÔËÒË: XP (High Quality, ‚˚ÒÓÍÓ ͇˜ÂÒÚ‚Ó), SP (Standard Quality, Òڇ̉‡ÚÌÓ ͇˜ÂÒÚ‚Ó), LP (Low Quality, ÌËÁÍÓ ͇˜ÂÒÚ‚Ó), EP (Extend Quality, ‡Ò¯ËÂÌÌÓ ͇˜ÂÒÚ‚Ó). MLP (χÍÒËχθ̇fl ‰ÎËÚÂθÌÓÒÚ¸ ‚ÓÒÔÓËÁ‚‰ÂÌËfl) èÓ‰Íβ˜ÂÌËÂ Ë Ì‡ÒÚÓÈ͇ PÂÊËχ aan. ‰ËÒ͇ Ç˚ ÏÓÊÂÚ Á‡„ÛÁËÚ¸ Òӂ¯ÂÌÌÓ ÔÛÒÚÛ˛ ·Ó΂‡ÌÍÛ, Ë ÂÍӉ ‚˚ÔÓÎÌËÚ ËÌˈˇÎËÁ‡ˆË˛ ‰ËÒ͇. DVD-R: êÂÍӉ ËÌˈˇÎËÁËÛÂÚ ‰ËÒÍ ‚ ÂÊËÏ Video.
îË̇ÎËÁ‡ˆËfl ᇢËÚ‡ ‰ËÒ͇ îË̇ÎËÁ‡ˆËfl (Á‡Í˚ÚËÂ) «ÙËÍÒËÛÂÚ» Á‡ÔËÒË Ì‡ ‰ËÒÍÂ, Ú‡Í ˜ÚÓ ÓÌ ÏÓÊÂÚ ‚ÓÒÔÓËÁ‚Ó‰ËÚ¸Òfl ̇ Ó·˚˜ÌÓÏ DVDÔΠËÎË ÍÓÏÔ¸˛ÚÂÂ Ò ÔË‚Ó‰ÓÏ DVD-ROM. èË ÙË̇ÎËÁ‡ˆËË ‰ËÒ͇, Á‡ÔËÒ‡ÌÌÓ„Ó ‚ ÂÊËÏ Video, ÒÓÁ‰‡ÂÚÒfl ÏÂÌ˛ ‰Îfl ̇‚Ë„‡ˆËË ÔÓ ‰ËÒÍÛ. ÑÓÒÚÛÔ Í ÌÂÏÛ ÓÒÛ˘ÂÒÚ‚ÎflÂÚÒfl Ò ÔÓÏÓ˘¸˛ ÍÌÓÔÓÍ MENU/LIST (ÏÂÌ˛/ÒÔËÒÓÍ) ËÎË TITLE („·‚‡).
Ç ‰‡ÌÌÓÏ ÛÍÓ‚Ó‰ÒÚ‚Â Ô˂‰ÂÌ˚ Ó·˘Ë ԇ‚Ë· ˝ÍÒÔÎÛ‡Ú‡ˆËË ÂÍӉ‡. çÂÍÓÚÓ˚ DVD-‰ËÒÍË ÚÂ·Û˛Ú ‚˚ÔÓÎÌÂÌËfl ÒÔˆˇθÌ˚ı ÓÔ‡ˆËÈ ËÎË ‰ÓÔÛÒ͇˛Ú ÚÓθÍÓ Ó„‡Ì˘ÂÌÌ˚ ÓÔ‡ˆËË ÔË ‚ÓÒÔÓËÁ‚‰ÂÌËË. ëËÏ‚ÓÎ , ÓÚÓ·‡Ê‡ÂÏ˚È Ì‡ ˝Í‡Ì ÚÂ΂ËÁÓ‡, Û͇Á˚‚‡ÂÚ, ˜ÚÓ ‰‡Ì̇fl ÓÔ‡ˆËfl Ì ‚˚ÔÓÎÌflÂÚÒfl ÂÍÓ‰ÂÓÏ ËÎË Ì ‰ÓÒÚÛÔ̇ ‰Îfl ‰‡ÌÌÓ„Ó ‰ËÒ͇. éÚÓ·‡ÊÂÌË ËÌÙÓχˆËË ÔË ÔÓÒÏÓÚ ÚÂ΂ËÁÓ‡ óÚÓ·˚ ‚˚‚ÂÒÚË Ì‡ ˝Í‡Ì ËÎË Û‰‡ÎËÚ¸ Ò ˝Í‡Ì‡ ËÌÙÓχˆËÓÌÌ˚ ÒÓÓ·˘ÂÌËfl, ̇ÊÏËÚ ÍÌÓÔÍÛ DISPLAY ‚Ó ‚ÂÏfl ÔÓÒÏÓÚ‡ ÔÓ„‡ÏÏ˚.
ÇÓÒÔÓËÁ‚‰ÂÌË 鷢Ë ÙÛÌ͈ËË ‚ÓÒÔÓËÁ‚‰ÂÌËfl 1. èÓÏÂÒÚËÚ ‚˚·‡ÌÌ˚È ‰ËÒÍ ‚ ÎÓÚÓÍ ÒÚÓÓÌÓÈ ‚ÓÒÔÓËÁ‚‰ÂÌËfl ‚ÌËÁ. 2. 燘ÌËÚ ‚ÓÒÔÓËÁ‚‰ÂÌËÂ Ò ÔÓÏÓ˘¸˛ ÏÂÌ˛ HOME (ÒÏ. ÒÚ‡ÌËˆÛ 15). 3. óÚÓ·˚ ÓÒÚ‡ÌÓ‚ËÚ¸ ‚ÓÒÔÓËÁ‚‰ÂÌËÂ, ̇ÊÏËÚ STOP (x). ìÒÚÓÈÒÚ‚Ó Á‡ÔËÒ˚‚‡ÂÚ ÚÓ˜ÍÛ ÓÒÚ‡ÌÓ‚‡ ‚ Á‡‚ËÒËÏÓÒÚË ÓÚ ‰ËÒ͇. ç‡ ˝Í‡Ì ̇ ÍÓÓÚÍÓ ‚ÂÏfl ÔÓfl‚ÎflÂÚÒfl “Xx”. óÚÓ·˚ ‚ÓÁÓ·ÌÓ‚ËÚ¸ ‚ÓÒÔÓËÁ‚‰ÂÌË (Ò ÚÓ˜ÍË ÒˆÂÌ˚), ̇ÊÏËÚ PLAY (N).
鷢ˠÙÛÌ͈ËË ‚ÓÒÔÓËÁ‚‰ÂÌËfl (ÔÓ‰ÓÎÊÂÌËÂ) ÑËÒÍË éÔ‡ˆËË PLAY MODE ÑÎfl ÔÓ‚ÚÓÌÓ„Ó ‚ÓÒÔÓËÁ‚‰ÂÌËfl DVD ALL VCD ÇÓ ‚ÂÏfl ‚ÓÒÔÓËÁ‚‰ÂÌËfl ̇ÊÏËÚ ÌÂÒÍÓθÍÓ ‡Á PLAY MP3 WMA MODE, ˜ÚÓ·˚ ‚˚·‡Ú¸ Ú·ÛÂÏ˚È ÂÊËÏ ÔÓ‚ÚÓ‡. DVD, ‚ˉÂÓÂÊËÏ DVD-R/RW, DVD+R/RW („·‚‡/̇Á‚‡ÌËÂ/‚˚ÍÎ) ÂÊËÏ VR (‚ˉÂÓÁ‡ÔËÒ¸) DVD-RW ËÎË DVD-RAM („·‚‡/̇Á‚‡ÌËÂ/‚˚ÍÎ) ÇˉÂÓ‰ËÒÍ, ‡Û‰ËÓ‰ËÒÍ (Track/All/Off (ÚÂÍ/‚ÒÂ/‚˚ÍÎ.)) MP3/WMA (Track/Folder/Off (ÚÂÍ/Ô‡Ô͇/‚˚ÍÎ.
èË ÔÓfl‚ÎÂÌËË ˝Í‡Ì‡ ÏÂÌ˛ DVD VCD ë‡ÁÛ ÔÓÒΠÁ‡„ÛÁÍË DVD-‰ËÒ͇ ËÎË Video CD-‰ËÒ͇ ÏÓÊÂÚ ·˚Ú¸ ‚˚‚‰ÂÌ ˝Í‡Ì ÏÂÌ˛ Ò ÏÂÌ˛ ‰ËÒ͇. DVD àÒÔÓθÁÛÈÚ ÍÌÓÔÍË b / B / v / V, ˜ÚÓ·˚ ‚˚·‡Ú¸ „·‚Û/‡Á‰ÂÎ ‰Îfl ÔÓÒÏÓÚ‡, ‡ Á‡ÚÂÏ Ì‡ÊÏËÚ ENTER ‰Îfl Á‡ÔÛÒ͇ ‚ÓÒÔÓËÁ‚‰ÂÌËfl. ÑÎfl ‚ÓÁ‚‡Ú‡ ‚ ˝Í‡ÌÌÓ ÏÂÌ˛ ̇ÊÏËÚ TITLE ËÎË MENU/LIST. VCD àÒÔÓθÁÛÈÚ ÍÌÓÔÍË Ò ˆËÙ‡ÏË, ˜ÚÓ·˚ ‚˚·‡Ú¸ ÚÂÍ ‰Îfl ÔÓÒÏÓÚ‡. ç‡ÊÏËÚ RETURN (O) ‰Îfl ‚ÓÁ‚‡Ú‡ ‚ ˝Í‡Ì ÏÂÌ˛.
êÂÊËÏ Ó·˙ÂÏÌÓ„Ó Á‚Û˜‡ÌËfl DVD ALL VCD DivX чÌÌÓ ÛÒÚÓÈÒÚ‚Ó ÏÓÊÂÚ ÒÓÁ‰‡‚‡Ú¸ ˝ÙÙÂÍÚ Ó·˙ÂÏÌÓ„Ó Á‚Û˜‡ÌËfl (3D Surround), ËÏËÚËÛ˛˘ËÈ ÏÌÓ„Ó͇̇θÌÓ ‚ÓÒÔÓËÁ‚‰ÂÌË Á‚Û͇ Ò ÔÓÏÓ˘¸˛ ‰‚Ûı Ó·˚˜Ì˚ı ÒÚÂÂÓÙÓÌ˘ÂÒÍËı „ÓÏÍÓ„Ó‚ÓËÚÂÎÂÈ (‚ÏÂÒÚÓ Ó·˚˜ÌÓ ÌÂÓ·ıÓ‰ËÏ˚ı ‰Îfl ÏÌÓ„Ó͇̇θÌÓÈ ‡Û‰ËÓÒËÒÚÂÏ˚ ‰Óχ¯ÌÂ„Ó ÍËÌÓÚ‡ڇ ÔflÚË ËÎË ·ÓΠ„ÓÏÍÓ„Ó‚ÓËÚÂÎÂÈ).
ÇÓÒÔÓËÁ‚‰ÂÌË هÈÎÓ‚ DivX Ò ÙËθχÏË êÂÍӉ ÏÓÊÂÚ ‚ÓÒÔÓËÁ‚Ó‰ËÚ¸ Ù‡ÈÎ˚ DivX. è‰ ̇˜‡ÎÓÏ ‚ÓÒÔÓËÁ‚‰ÂÌËfl Ù‡ÈÎÓ‚ DivX ËÁÛ˜ËÚ ‡Á‰ÂÎ «í·ӂ‡ÌËfl Í Ù‡ÈÎ‡Ï DivX» ÒÔ‡‚‡. 1. ç‡ÊÏËÚ ÍÌÓÔÍÛ HOME. 2. Ç˚·ÂËÚ ÓÔˆË˛ [äËÌÓ]. 3. Ç˚·ÂËÚ ÌÓÒËÚÂθ ËÌÙÓχˆËË, ÒÓ‰Âʇ˘ËÈ Ù‡ÈÎ(˚) DivX, ‡ Á‡ÚÂÏ Ì‡ÊÏËÚ ENTER. ç‡ ˝Í‡Ì ÚÂ΂ËÁÓ‡ ÔÓfl‚ËÚÒfl ÏÂÌ˛ [ëÔËÒÓÍ ÙËθÏÓ‚]. éÔˆËË ÏÂÌ˛ ëÔËÒÓÍ ÙËθÏÓ‚ 1. ç‡ÊËχfl ÍÌÓÔÍË v / V, ‚˚·ÂËÚ ԇÔÍÛ/Ù‡ÈÎ ËÁ ÏÂÌ˛ [ëÔËÒÓÍ ÙËθÏÓ‚], ÔÓÒΠ˜Â„Ó Ì‡ÊÏËÚ ÍÌÓÔÍÛ ENTER.
êÂÍӉ ÏÓÊÂÚ ‚ÓÒÔÓËÁ‚Ó‰ËÚ¸ ‡Û‰ËÓ‰ËÒÍË Ë Ù‡ÈÎ˚ ‚ ÙÓχÚ MP3/WMA. è‰ ‚ÓÒÔÓËÁ‚‰ÂÌËÂÏ Ù‡ÈÎÓ‚ ‚ ÙÓχÚ MP3/WMA ËÁÛ˜ËÚ ‡Á‰ÂÎ «í·ӂ‡ÌËfl Í ‡Û‰ËÓÙ‡ÈÎ‡Ï MP3/WMA» ÒÔ‡‚‡. 1. ç‡ÊÏËÚ ÍÌÓÔÍÛ HOME. èÓfl‚ËÚÒfl „·‚ÌÓ ÏÂÌ˛. éÔˆËË ÏÂÌ˛ “ëÔËÒÓÍ ÙÓÚÓ„‡ÙËÈ” 1. ë ÔÓÏÓ˘¸˛ ÍÌÓÔÓÍ v / V ‚˚·ÂËÚ هÈÎ ‚ ÏÂÌ˛ [ëÔËÒÓÍ ÙÓÚÓ„‡ÙËÈ], ‡ Á‡ÚÂÏ Ì‡ÊÏËÚ ENTER. èÓfl‚flÚÒfl ÓÔˆËË ÏÂÌ˛. éÚÓ·‡Ê‡ÂÏ˚ ÓÔˆËË ÏÂÌ˛ Á‡‚ËÒflÚ ÓÚ ‚˚·‡ÌÌÓ„Ó ÌÓÒËÚÂÎfl ËÌÙÓχˆËË. 2. ç‡ÊËχfl ÍÌÓÔÍË v / V / b / B, ‚˚·ÂËÚ ÓÔˆË˛ Ë Ì‡ÊÏËÚ ÍÌÓÔÍÛ ENTER.
èÓÒÏÓÚ Ù‡ÈÎÓ‚ JPEG éÔˆËË ÏÂÌ˛ “ëÔËÒÓÍ ÙÓÚÓ„‡ÙËÈ” êÂÍӉ ÔÓÁ‚ÓÎflÂÚ ÔÓÒχÚË‚‡Ú¸ Ù‡ÈÎ˚ ‚ ÙÓχÚ JPEG. è‰ ‚ÓÒÔÓËÁ‚‰ÂÌËÂÏ Á‡ÔËÒÂÈ ‚ ÙÓχÚ JPEG ËÁÛ˜ËÚ ‡Á‰ÂÎ «í·ӂ‡ÌËfl Í Ù‡ÈÎ‡Ï ËÁÓ·‡ÊÂÌËÈ» ÒÔ‡‚‡. 1. ë ÔÓÏÓ˘¸˛ ÍÌÓÔÓÍ v / V ‚˚·ÂËÚ هÈÎ ‚ ÏÂÌ˛ [ëÔËÒÓÍ ÙÓÚÓ„‡ÙËÈ], ‡ Á‡ÚÂÏ Ì‡ÊÏËÚ ENTER. èÓfl‚flÚÒfl ÓÔˆËË ÏÂÌ˛. éÚÓ·‡Ê‡ÂÏ˚ ÓÔˆËË ÏÂÌ˛ Á‡‚ËÒflÚ ÓÚ ‚˚·‡ÌÌÓ„Ó ÌÓÒËÚÂÎfl ËÌÙÓχˆËË. 1. ç‡ÊÏËÚ ÍÌÓÔÍÛ çéåÖ. èÓfl‚ËÚÒfl „·‚ÌÓ ÏÂÌ˛. 2. Ç˚·ÂËÚ ÓÔˆË˛ [ÙÓÚÓ]. 3.
èÓÒÏÓÚ Ò·ȉӂ 1. Ç˚·ÂËÚ ÓÔˆË˛ [ë·ȉ - ¯ÓÛ] ËÁ ÏÂÌ˛ [ëÔËÒÓÍ ÙÓÚÓ„‡ÙËÈ] (ëÏ. “éÔˆËË ÏÂÌ˛ ëÔËÒÓÍ ÙÓÚÓ„‡ÙËÈ” ̇ ÒÚ‡Ìˈ 30). 2. ç‡ÊÏËÚ ENTER. èÓfl‚ËÚÒfl ÏÂÌ˛ ë·ȉ-¯ÓÛ. 3. ë ÔÓÏÓ˘¸˛ ÍÌÓÔÓÍ b / B / v / V ‚˚·ÂËÚ ÓÔˆËË. ÇÓÒÔÓËÁ‚‰ÂÌË éÔˆËfl [é·˙ÂÍÚ]: éÔˆËfl [Ç˚·‡ÌÓ]: ÔÓ͇Á Ò·ȉӂ ÚÓθÍÓ ‰Îfl ‚˚·‡ÌÌ˚ı Ù‡ÈÎÓ‚. ÑÎfl ‚˚·Ó‡ ÌÂÒÍÓθÍËı Ù‡ÈÎÓ‚ ËÒÔÓθÁÛÈÚ ÍÌÓÔÍÛ MARKER (χÍÂ). éÔˆËfl [ÇÒÂ]: ÔÓ͇Á Ò·ȉӂ ‰Îfl ‚ÒÂı Ù‡ÈÎÓ‚.
á‡ÔËÒ¸ á‡ÔËÒ¸ ̇ DVD èËϘ‡ÌËfl: чÌÌ˚È ÂÍӉ Ì ÏÓÊÂÚ Á‡ÔËÒ˚‚‡Ú¸ ̇ ‰ËÒÍË CD-R Ë CD-RW. 燯‡ ÍÓÏÔ‡ÌËfl Ì ÌÂÒÂÚ ÓÚ‚ÂÚÒÚ‚ÂÌÌÓÒÚË Á‡ Ò·ÓÈ Á‡ÔËÒË ËÁ-Á‡ ÓÚÍβ˜ÂÌËfl ˝ÎÂÍÚÓÔËÚ‡ÌËfl, ‰ËÒÍÓ‚ Ò ‰ÂÙÂÍÚ‡ÏË ËÎË ÔÓ‚ÂʉÂÌËfl ÂÍӉ‡. éÚÔ˜‡ÚÍË Ô‡Î¸ˆÂ‚ Ë Ì·Óθ¯Ë ˆ‡‡ÔËÌ˚ ̇ ‰ËÒÍ ÏÓ„ÛÚ ‚ÎËflÚ¸ ̇ ͇˜ÂÒÚ‚Ó ‚ÓÒÔÓËÁ‚‰ÂÌËfl Ë/ËÎË Á‡ÔËÒË. èÓʇÎÛÈÒÚ‡, Ó·‡˘‡ÈÚÂÒ¸ Ò ‚‡¯ËÏË ‰ËÒ͇ÏË ‡ÍÍÛ‡ÚÌÓ.
ᇢËÚ‡ ‡‚ÚÓÒÍËı Ô‡‚ çÂÍÓÚÓ˚È ‚ˉÂÓχÚ¡ΠËÏÂÂÚ Á‡˘ËÚÛ ÓÚ ÍÓÔËÓ‚‡ÌËfl. ÖÒÎË ‚˚ ıÓÚËÚ Á‡ÔËÒ‡Ú¸ χÚÂË‡Î Ò Á‡˘ËÚÓÈ ÓÚ ÍÓÔËÓ‚‡ÌËfl ̇ DVD, ÒΉÛÂÚ ËÒÔÓθÁÓ‚‡Ú¸ ‰ËÒÍ DVD-RW ‚ ÂÊËÏ VR, ÒÓ‚ÏÂÒÚËÏ˚È Ò CPRM ‚ÂÒËË 1.1. á‡ÔËÒ˚‚‡˛˘Â ӷÓÛ‰Ó‚‡ÌË ‰ÓÎÊÌÓ ËÒÔÓθÁÓ‚‡Ú¸Òfl ÚÓθÍÓ ‰Îfl Á‡ÍÓÌÌÓ„Ó ÍÓÔËÓ‚‡ÌËfl. å˚ ÂÍÓÏẨÛÂÏ ‚‡Ï Ú˘‡ÚÂθÌÓ ËÁÛ˜ËÚ¸, ˜ÚÓ fl‚ÎflÂÚÒfl Á‡ÍÓÌÌ˚Ï ÍÓÔËÓ‚‡ÌËÂÏ ‚ ÒÚ‡ÌÂ, „‰Â ‚˚ ÒӷˇÂÚÂÒ¸ ҉·ڸ ÍÓÔ˲.
éÒÌÓ‚Ì˚ ÓÔ‡ˆËË Á‡ÔËÒË Ò íÇ çÂωÎÂÌ̇fl Á‡ÔËÒ¸ ÔÓ Ú‡ÈÏÂÛ ÑÎfl Á‡ÔËÒË ÚÂ΂ËÁËÓÌÌ˚ı ÔÓ„‡ÏÏ ÒΉÛÈÚ Ô˂‰ÂÌÌ˚Ï ÌËÊ ËÌÒÚÛ͈ËflÏ. á‡ÔËÒ¸ ̇˜Ë̇ÂÚÒfl Ò‡ÁÛ Ë ÔÓ‰ÓÎʇÂÚÒfl ÎË·Ó ‰Ó Á‡ÔÓÎÌÂÌËfl ‰ËÒ͇, ÎË·Ó ÔÓ͇ Ì ·Û‰ÂÚ ÓÒÚ‡ÌÓ‚ÎÂ̇. èËϘ‡ÌËÂ: óÚÓ·˚ Á‡ÔËÒ‡Ú¸ DVD-‰ËÒÍ, ÌÂÓ·ıÓ‰ËÏÓ Á‡„ÛÁËÚ¸ Á‡ÔËÒ˚‚‡ÂÏ˚È ‰ËÒÍ. 1. ìÒÚ‡ÌÓ‚ËÚ ÌÛÊÌ˚È ÂÊËÏ Á‡ÔËÒË, ÔÓÒΉӂ‡ÚÂθÌÓ Ì‡ÊËχfl ÍÌÓÔÍÛ REC MODE (ÂÊËÏ Á‡ÔËÒË). (XP, SP, LP, EP ËÎË MLP) 2. ë ÔÓÏÓ˘¸˛ ÍÌÓÔÓÍ PR/CH (+/-) ‚˚·ÂËÚ ÚÂ΂ËÁËÓÌÌ˚È Í‡Ì‡Î ‰Îfl Á‡ÔËÒË.
á‡ÔËÒ¸ ÔÓ Ú‡ÈÏÂÛ Ñ‡ÌÌ˚È ÂÍӉ ÏÓÊÌÓ Á‡ÔÓ„‡ÏÏËÓ‚‡Ú¸ ̇ Á‡ÔËÒ¸ ‰Ó 16 ÔÓ„‡ÏÏ ‚ Ú˜ÂÌË 1 ÏÂÒflˆ‡. ÑÎfl ‡‚ÚÓχÚ˘ÂÒÍÓÈ Á‡ÔËÒË ÌÂÓ·ıÓ‰ËÏÓ ÛÒÚ‡ÌÓ‚ËÚ¸ ‰Îfl Ú‡Èχ Á‡ÔËÒ˚‚‡ÂÏ˚ ͇̇Î˚, ‚ÂÏfl ̇˜‡Î‡ Ë ‚ÂÏfl Á‡‚¯ÂÌËfl. èËϘ‡ÌËÂ: èË ËÒÔÓθÁÓ‚‡ÌËË ÌÂÙÓχÚËÓ‚‡ÌÌÓ„Ó ‰ËÒ͇ ‰Îfl Á‡ÔËÒË ÔÓ Ú‡ÈÏÂÛ, ‰Ó ̇˜‡Î‡ Á‡ÔËÒË ‰ËÒÍ ÌÂÓ·ıÓ‰ËÏÓ ÓÚÙÓχÚËÓ‚‡Ú¸. (ëÏ. ‡Á‰ÂÎ «ÙÓχÚ.» ̇ ÒÚ. 21). 1. ç‡ÊÏËÚ HOME Ë ‚˚·ÂËÚ ÓÔˆË˛ [TV]. 2. ë ÔÓÏÓ˘¸˛ ÍÌÓÔÓÍ v / V ‚˚·ÂËÚ ÓÔˆË˛ [Á‡Ô Ú‡ÈÏÛ] Ë Ì‡ÊÏËÚ ENTER.
èÓ‚Â͇ Ô‡‡ÏÂÚÓ‚ Á‡ÔËÒË ÔÓ Ú‡ÈÏÂÛ á‡ÔÓ„‡ÏÏËÓ‚‡ÌÌ˚ ԇ‡ÏÂÚ˚ ÏÓ„ÛÚ ·˚Ú¸ ÔÓ‚ÂÂÌ˚ ‚ β·Ó ‚ÂÏfl, ÍÓ„‰‡ ÂÍӉ ‚Íβ˜ÂÌ. 1. ç‡ÊÏËÚ HOME Ë ‚˚·ÂËÚ ÓÔˆË˛ [TV]. 2. ë ÔÓÏÓ˘¸˛ ÍÌÓÔÓÍ v / V ‚˚·ÂËÚ ÓÔˆË˛ [Á‡Ô Ú‡ÈÏÛ] Ë Ì‡ÊÏËÚ ENTER. èÓfl‚ËÚÒfl ÒÔËÒÓÍ [CÔËÒÓÍ á‡ÔËÒeÈ] . ë ÔÓÏÓ˘¸˛ ÍÌÓÔÓÍ v / V ‚˚·ÂËÚ Á‡ÔËÒ¸ ‰Îfl Ú‡Èχ. ç‡ÊÏËÚ ENTER ‰Îfl ÔÂÂıÓ‰‡ ‚ ÂÊËÏ Â‰‡ÍÚËÓ‚‡ÌËfl ‚˚·‡ÌÌÓÈ ÔÓ„‡ÏÏ˚. èÓfl‚ËÚÒfl ÏÂÌ˛ [Á‡Ô Ú‡ÈÏÛ].
è‰ DV-‰Û·ÎËÓ‚‡ÌËÂÏ ä ‰‡ÌÌÓÏÛ ÂÍÓ‰ÂÛ ÏÓÊÌÓ ÔÓ‰ÒÓ‰ËÌËÚ¸ ‚ˉÂÓ͇ÏÂÛ Ò DV-‚ıÓ‰ÓÏ Ò ÔÓÏÓ˘¸˛ Ó‰ÌÓ„Ó DV-͇·ÂÎfl ‰Îfl ‚ıÓ‰‡ Ë ‚˚ıÓ‰‡ ‡Û‰ËÓÒ˄̇ÎÓ‚, ‚ˉÂÓÒ˄̇ÎÓ‚, Ò˄̇ÎÓ‚ ‰‡ÌÌ˚ı Ë ÛÔ‡‚Îfl˛˘Ëı Ò˄̇ÎÓ‚. чÌÌ˚È ÂÍӉ ÒÓ‚ÏÂÒÚËÏ ÚÓθÍÓ Ò ‚ˉÂÓ͇χÏË DV-ÙÓχڇ (DVC-SD, DV25). ñËÙÓ‚˚ ÒÔÛÚÌËÍÓ‚˚ ڲÌÂ˚ Ë ˆËÙÓ‚˚ ‚ˉÂÓÂÍÓ‰Â˚ VHS Ì ÔÓ‰ıÓ‰flÚ. ä ‰‡ÌÌÓÏÛ ÂÍÓ‰ÂÛ Ì‚ÓÁÏÓÊÌÓ ÔÓ‰ÒÓ‰ËÌËÚ¸ ·Óθ¯Â Ó‰ÌÓÈ DV-‚ˉÂÓ͇ÏÂ˚.
ꉇÍÚËÓ‚‡ÌË 12 3 4 5 6 åÂÌ˛ ÒÔËÒ͇ „·‚ Ë ÒÔËÒ͇ p‡Á‰ÂÎÓ‚ àÒÔÓθÁÛfl ÏÂÌ˛ ëÓ‰ÂʇÌËÂ, ÏÓÊÌÓ Â‰‡ÍÚËÓ‚‡Ú¸ ‚ˉÂÓÒÓ‰ÂʇÌËÂ. ç‡·Ó ÙÛÌ͈ËÈ Â‰‡ÍÚËÓ‚‡ÌËfl ‚ ÏÂÌ˛ ëÓ‰ÂʇÌË Á‡‚ËÒËÚ ÓÚ ÚÓ„Ó, ‰‡ÍÚËÛÂÚ Ç˚ ‚ˉÂÓ Ì‡ DVD-‰ËÒÍÂ, ‡ Ú‡ÍÊ ‰‡ÍÚËÛÂÚ ÎË Ç˚ ÓË„Ë̇θÌÓ ÒÓ‰ÂʇÌË ÎË·Ó ÒÔËÒÓÍ ‚ÓÒÔÓËÁ‚‰ÂÌËfl. ëÛ˘ÂÒÚ‚ÛÂÚ ‰‚‡ ÒÔÓÒÓ·‡ ‰‡ÍÚËÓ‚‡ÌËfl ÒÓ‰ÂÊËÏÓ„Ó DVD-RW-‰ËÒÍÓ‚ ‚ ÂÊËÏ VR. Ç˚ ÏÓÊÂÚ ‰‡ÍÚËÓ‚‡Ú¸ ÎË·Ó ËÒıÓ‰ÌÓ ÒÓ‰ÂÊËÏÓ ‰ËÒ͇, ÎË·Ó ÒÓÁ‰‡Ú¸ Ë Â‰‡ÍÚËÓ‚‡Ú¸ ÒÔËÒÓÍ ‰Îfl ‚ÓÒÔÓËÁ‚‰ÂÌËfl.
êÂÊËÏ˚ VR: ‰‡ÍÚËÓ‚‡ÌË ËÒıÓ‰ÌÓ„Ó ÒÓ‰ÂÊËÏÓ„Ó ‰ËÒ͇ Ë ÒÔËÒ͇ ‰Îfl ‚ÓÒÔÓËÁ‚‰ÂÌËfl ÑÓ·‡‚ÎÂÌËË Ï‡ÍÂÓ‚ ‡Á‰ÂÎÓ‚ -RWVR RAM +RW +R ÇÒÚ‡‚Ë‚ ÓÚÏÂÚÍË ‡Á‰ÂÎÓ‚ ̇ ÌÛÊÌ˚ ÔÓÁˈËË, ÏÓÊÌÓ Ú‡ÍËÏ Ó·‡ÁÓÏ ÒÓÁ‰‡Ú¸ ‡Á‰ÂÎ˚. àÒıÓ‰Ì˚ „·‚˚ ̇ ‰ËÒÍ ‚Íβ˜‡˛Ú ‚ Ò·fl Ó‰ËÌ ËÎË ÌÂÒÍÓθÍÓ ‡Á‰ÂÎÓ‚. èË ÔÓÏ¢ÂÌËË „·‚˚ Á‡ÔËÒË ‚ ÒÔËÒÓÍ ‰Îfl ‚ÓÒÔÓËÁ‚‰ÂÌËfl ÚÛ‰‡ Ú‡ÍÊ ·Û‰ÛÚ ÔÓÏ¢ÂÌ˚ ‚Ò ‡Á‰ÂÎ˚ ‰Îfl ˝ÚÓÈ „·‚˚. ÑÛ„ËÏË ÒÎÓ‚‡ÏË, ‡Á‰ÂÎ˚ ‚ ÒÔËÒÍ ‰Îfl ‚ÓÒÔÓËÁ‚‰ÂÌËfl ÔÓÎÌÓÒÚ¸˛ ÔÓ‰Ó·Ì˚ ‡Á‰ÂÎ‡Ï Ì‡ ‰ËÒÍ DVD-Video.
ëÓÁ‰‡ÌË ÌÓ‚Ó„Ó ÒÔËÒ͇ ‰Îfl ‚ÓÒÔÓËÁ‚‰ÂÌËfl -RWVR RAM ÇÓÒÔÓθÁÛÈÚÂÒ¸ ˝ÚÓÈ ÙÛÌ͈ËÂÈ ‰Îfl ‚Íβ˜ÂÌËfl ÓË„Ë̇θÌÓ„Ó Ì‡Á‚‡ÌËfl ËÎË „·‚˚ ‚ ÒÔËÒÓÍ ‚ÓÒÔÓËÁ‚‰ÂÌËfl (ÏÓÊÌÓ Ú‡ÍÊ ۉ‡ÎËÚ¸ ÔÓÁˈËË, ÍÓÚÓ˚ ‚ ‰‡Î¸ÌÂȯÂÏ Ì ÔÓÚÂ·Û˛ÚÒfl - ÒÏ. ‡Á‰ÂÎ Û‰‡ÎÂÌËfl ÓË„Ë̇· ËÎË Ì‡Á‚‡ÌËfl („·‚˚) ËÁ ÒÔËÒ͇ ‚ÓÒÔÓËÁ‚‰ÂÌËfl ̇ ÒÚ‡Ìˈ 41. É·‚‡ ÔÓfl‚ÎflÂÚÒfl ‚ ÒÔËÒÍ ‰Îfl ‚ÓÒÔÓËÁ‚‰ÂÌËfl ‚ÏÂÒÚÂ Ò Ï‡Í‡ÏË ‡Á‰ÂÎÓ‚, ÓÚÓ·‡Ê‡ÂÏ˚ÏË ‚ ÒÔËÒÍ هÈÎÓ‚ ̇ ‰ËÒÍÂ.
쉇ÎÂÌË „·‚˚/‡Á‰Â· ËÁ ÒÔËÒ͇ ËÒıÓ‰ÌÓ„Ó ÒÓ‰ÂÊËÏÓ„Ó ‰ËÒ͇ ËÎË ÒÔËÒ͇ ‰Îfl ‚ÓÒÔÓËÁ‚‰ÂÌËfl ÖÒÎË „·‚‡ ËÎË ‡Á‰ÂÎ Û‰‡Îfl˛ÚÒfl ËÁ ÒÔËÒ͇ ‰Îfl ÇÓÒÔÓËÁ‚‰ÂÌËfl (Playlist), ÓÌË ·Û‰ÛÚ Û‰‡ÎÂÌ˚ ÚÓθÍÓ ËÁ ‰‡ÌÌÓ„Ó ÒÔËÒ͇; ‚ ÏÂÌ˛ ÒÓ‰ÂÊËÏÓ„Ó ‰ËÒ͇ (éË„Ë̇Î) „·‚‡/‡Á‰ÂÎ ÓÒÚ‡ÌÛÚÒfl. èË Û‰‡ÎÂÌËË „·‚˚ ËÎË ‡Á‰Â· ËÁ ÒÔËÒ͇ ÒÓ‰ÂÊËÏÓ„Ó ‰ËÒ͇ (‰Îfl „·‚˚/‡Á‰Â·) „·‚‡ ËÎË ‡Á‰ÂÎ ·Û‰ÛÚ ‰ÂÈÒÚ‚ËÚÂθÌÓ Û‰‡ÎÂÌ˚ Ò ‰ËÒ͇, ÔË ˝ÚÓÏ ÓÒÚ‡‚¯ÂÂÒfl ‚ÂÏfl, ‰ÓÒÚÛÔÌÓ ‰Îfl Á‡ÔËÒË, ‚ÓÁ‡ÒÚÂÚ.
ëÓÁ‰‡ÌË „·‚˚ àÏÂÂÚÒfl ‚ÓÁÏÓÊÌÓÒÚ¸ ÔËÒ‚ÓÂÌËfl Ò‚ÓÂ„Ó Ì‡Á‚‡ÌËfl. å‡ÍÒËχθ̇fl ‰ÎË̇ ̇Á‚‡ÌËfl ‡‚ÌflÂÚÒfl 32 Á͇̇Ï. 1. Ç ÏÂÌ˛ ëÔËÒÓÍ É·‚ ‚˚·ÂËÚ „·‚Û, ‰Îfl ÍÓÚÓÓÈ ‚˚ Ê·ÂÚ ÒÓÁ‰‡Ú¸ ̇Á‚‡ÌËÂ, Ë Ì‡ÊÏËÚ ENTER. Ç Î‚ÓÈ ˜‡ÒÚË ˝Í‡Ì‡ ·Û‰ÛÚ ÓÚÓ·‡ÊÂÌ˚ ÓÔˆËË. 2. ë ÔÓÏÓ˘¸˛ ÍÌÓÔÓÍ v/V ‚˚·ÂËÚ ÓÔˆË˛ «Title Name» (ÔËÒ‚ÓËÚ¸ ̇ËÏÂÌÓ‚‡ÌËÂ), ÔÓÒΠ˜Â„Ó Ì‡ÊÏËÚ Í·‚Ë¯Û ENTER. èÓfl‚ÎflÂÚÒfl ÏÂÌ˛ Ò Í·‚ˇÚÛÓÈ. èÓËÒÍ ÔÓ ‚ÂÏÂÌË RAM +RW -R -RWVR -RWVideo +R Ç˚ ÏÓÊÂÚ ‚˚·‡Ú¸ ̇˜‡Î¸ÌÛ˛ ÚÓ˜ÍÛ „·‚˚. 1.
ÑÂÎÂÌË ӉÌÓ„Ó Ì‡Á‚‡ÌËfl ̇ ‰‚‡ +RW ë ÔÓÏÓ˘¸˛ ˝ÚÓÈ ÍÓχ̉˚ ÏÓÊÌÓ ‡Á‰ÂÎflÚ¸ Ó‰ÌÛ „·‚Û Ì‡ ‰‚ ÌÓ‚˚Â. 1. Ç ÏÂÌ˛ ëÔËÒÓÍ É·‚ ‚˚·ÂËÚ „·‚Û, ÍÓÚÓÛ˛ Ú·ÛÂÚÒfl ‡Á‰ÂÎËÚ¸, Ë Ì‡ÊÏËÚ ENTER. Ç Î‚ÓÈ ˜‡ÒÚË ˝Í‡Ì‡ ÔÓfl‚flÚÒfl ÓÔˆËË ÏÂÌ˛. 2. Ç˚·ÂËÚ ÓÔˆË˛ [ê‡Á‰eÎËÚ¸]. é·˙‰ËÌÂÌË ‰‚Ûı ‡Á‰ÂÎÓ‚ ‚ Ó‰ËÌ -RWVR +RW +R RAM ùÚ‡ ÙÛÌ͈Ëfl ËÒÔÓθÁÛÂÚÒfl ‰Îfl ÒÓ‚Ï¢ÂÌËfl ‰‚Ûı ÒÓÒ‰ÌËı „·‚ ‚ Ó‰ÌÛ. 1. Ç ÏÂÌ˛ ëÔËÒÓÍ ê‡Á‰ÂÎÓ‚ ‚˚·ÂËÚ ‚ÚÓÓÈ ËÁ ‰‚Ûı ‡Á‰ÂÎÓ‚, ÍÓÚÓ˚ ‚˚ Ê·ÂÚ ӷ˙‰ËÌËÚ¸, Ë Ì‡ÊÏËÚ ENTER.
èÂÂÏ¢ÂÌË ‡Á‰Â· ‚ ÒÔËÒÍ ‰Îfl ‚ÓÒÔÓËÁ‚‰ÂÌËfl -RWVR RAM ùÚ‡ ÙÛÌ͈Ëfl ËÒÔÓθÁÛÂÚÒfl ‰Îfl ËÁÏÂÌÂÌËfl ÔÓfl‰Í‡ ‚ÓÒÔÓËÁ‚‰ÂÌËfl ‡Á‰ÂÎÓ‚ ‚ ÒÔËÒÍ ‰Îfl ‚ÓÒÔÓËÁ‚‰ÂÌËfl ÏÂÌ˛ “ëÔËÒÓÍ É·‚ - Playlist”. èËϘ‡ÌËÂ: чÌ̇fl ÙÛÌ͈Ëfl Ì ‰ÓÒÚÛÔ̇ ÔË Ì‡Î˘ËË ÚÓθÍÓ Ó‰ÌÓ„Ó ‡Á‰Â·. 1. Ç ÏÂÌ˛ “ëÔËÒÓÍ É·‚ - Playlist” ‚˚·ÂËÚ Ú·ÛÂÏ˚È ‡Á‰ÂÎ. ëÓ‚ÂÚ èË ‚˚·Ó ÒÍ˚ÚÓ„Ó ‡Á‰Â· ËÎË ÒÍ˚ÚÓÈ „·‚˚ ËÁ ÏÂÌ˛ Title List (ëÔËÒÓÍ „·‚) ËÎË Chapter List (ëÔËÒÓÍ ‡Á‰ÂÎÓ‚) ˝ÚÓÚ ‡Á‰ÂÎ ËÎË ˝ÚÛ „·‚Û ÏÓÊÌÓ ÔÓ͇Á‡Ú¸, ‚˚·‡‚ ÓÔˆË˛ [èÓ͇Á].
ëÔ‡‚͇ ÑÓÔÓÎÌËÚÂθ̇fl ËÌÙÓχˆËfl èÂÂÁ‡ÔËÒ¸ +RW 2. ç‡ÊÏËÚ TITLE ‚ ÂÊËÏ ‚ÓÒÔÓËÁ‚‰ÂÌËfl ËÎË ÓÒÚ‡ÌÓ‚ÍË. èÓfl‚ÎflÂÚÒfl ÔÓ͇Á‡ÌÌÓ ÌËÊ ÏÂÌ˛ Title List (ëÓ‰ÂʇÌËÂ). ëÓ‚ÂÚ åÂÌ˛ Title List (ëÓ‰ÂʇÌËÂ) ÏÓÊÌÓ Û·‡Ú¸, ̇ʇ‚ ÍÌÓÔÍÛ STOP (x). ÑÎfl Á‡ÔËÒË ÌÓ‚Ó„Ó ‚ˉÂÓÚÂ͇ ÔÓ‚Âı ÒÛ˘ÂÒÚ‚Û˛˘ÂÈ „·‚˚ ‚˚ÔÓÎÌËÚ Û͇Á‡ÌÌ˚ ÌËÊ ¯‡„Ë. ùÚ‡ ÙÛÌ͈Ëfl ̉ÓÒÚÛÔ̇ ‰Îfl ‰ËÒÍÓ‚ DVD+R, ‰Îfl ÍÓÚÓ˚ı ÌÓ‚˚ Á‡ÔËÒË ‚Ò„‰‡ Á‡ÔËÒ˚‚‡˛ÚÒfl ‚ ÍÓ̈ ÒÛ˘ÂÒÚ‚Û˛˘ÂÈ Á‡ÔËÒË ‰ËÒ͇. 1.
äÓ‰˚ flÁ˚ÍÓ‚ àÒÔÓθÁÛÈÚ ˝ÚÓÚ ÒÔËÒÓÍ ‰Îfl Á‡‰‡ÌËfl ÌÛÊÌÓ„Ó flÁ˚͇ ‰Îfl Û͇Á‡ÌÌ˚ı ÌËÊ ̇˜‡Î¸Ì˚Ï Ì‡ÒÚÓÂÍ: Disc Audio (á‚ÛÍ ‰ËÒ͇), Disc Subtitle (ëÛ·ÚËÚ˚), Disc Menu (åÂÌ˛ ‰ËÒ͇).
àÒÔÓθÁÓ‚‡ÌË ÔÛθڇ ‰ËÒڇ̈ËÓÌÌÓ„Ó ÛÔ‡‚ÎÂÌËfl ÂÍӉ‡ ‰Îfl ÛÔ‡‚ÎÂÌËfl ÚÂ΂ËÁÓÓÏ ë ÔÓÏÓ˘¸˛ ‚ıÓ‰fl˘Â„Ó ‚ ÍÓÏÔÎÂÍÚ ÔÓÒÚ‡‚ÍË ‚‡¯Â„Ó ÂÍӉ‡ ÔÛθڇ ‰ËÒڇ̈ËÓÌÌÓ„Ó ÛÔ‡‚ÎÂÌËfl ÏÓÊÌÓ Â„ÛÎËÓ‚‡Ú¸ ÛÓ‚Â̸ Á‚Û͇, ‚˚·Ë‡Ú¸ ËÒÚÓ˜ÌËÍ ‚ıÓ‰ÌÓ„Ó Ò˄̇· Ë ÛÔ‡‚ÎflÚ¸ ÔËÚ‡ÌËÂÏ ‚‡¯Â„Ó ÚÂ΂ËÁÓ‡ LG. ÑÎfl ÛÔ‡‚ÎÂÌËfl ÚÂ΂ËÁÓÓÏ ËÒÔÓθÁÛÈÚ ÔÓ͇Á‡ÌÌ˚ ÌËÊ ÍÌÓÔÍË.
èÓËÒÍ Ë ÛÒÚ‡ÌÂÌË ÌÂËÒÔ‡‚ÌÓÒÚÂÈ è‰ Ó·‡˘ÂÌËÂÏ ‚ ÂÏÓÌÚÌÛ˛ χÒÚÂÒÍÛ˛ ËÁÛ˜ËÚ Ô˂‰ÂÌÌ˚ ÌËÊ Û͇Á‡ÌËfl ÔÓ ÔÓËÒÍÛ Ë ÛÒÚ‡ÌÂÌ˲ ‚ÓÁÏÓÊÌ˚ı ÌÂËÒÔ‡‚ÌÓÒÚÂÈ. èËÁÌ‡Í ÌÂËÒÔ‡‚ÌÓÒÚË ç ‚Íβ˜‡ÂÚÒfl ÔËÚ‡ÌËÂ. éÚÒÛÚÒÚ‚ÛÂÚ ËÁÓ·‡ÊÂÌËÂ. íÂ΂ËÁÓ Ì ÛÒÚ‡ÌÓ‚ÎÂÌ ‚ ÂÊËÏ ÔËÂχ Ò˄̇· Ò ‚˚ıÓ‰‡ ÂÍӉ‡. èÎÓıÓ ÔÓ‰Íβ˜ÂÌ ‚ˉÂÓ͇·Âθ. Ç˚Íβ˜ÂÌÓ ÔËÚ‡ÌË ÔÓ‰Íβ˜ÂÌÌÓ„Ó ÚÂ΂ËÁÓ‡. ÄÔÔ‡‡ÚÛ‡, ÔÓ‰Íβ˜ÂÌ̇fl Ò ÔÓÏÓ˘¸˛ ͇·ÂÎfl ‡Û‰ËÓÒ˄̇·, Ì ̇ÒÚÓÂ̇ ̇ ÔËÂÏ ‚˚ıÓ‰ÌÓ„Ó Ò˄̇· ÂÍӉ‡.
ç‚ÓÁÏÓÊ̇ Á‡ÔËÒ¸ ËÎË Á‡ÔËÒ¸ ‚˚ÔÓÎÌflÂÚÒfl ÌÂÛ‰‡˜ÌÓ. ç‚ÓÁÏÓÊ̇ Á‡ÔËÒ¸ ÔÓ Ú‡ÈÏÂÛ. ç Á‡ÔËÒ˚‚‡ÂÚÒfl Ë/ËÎË Ì ‚ÓÒÔÓËÁ‚Ó‰ËÚÒfl ÒÚÂÂÓÁ‚ÛÍ. èÛÎ¸Ú ‰ËÒڇ̈ËÓÌÌÓ„Ó ÛÔ‡‚ÎÂÌËfl Ì ‡·ÓÚ‡ÂÚ, Í‡Í Ú·ÛÂÚÒfl. è˘Ë̇ ÑËÒÍ Á‡ÔËÒ‡Ì ‚ ÂÊËÏ Video. çÂÍÓÚÓ˚ ÏÓ‰ÂÎË ÔΠӂ Ì ÏÓ„ÛÚ ÔÓË„˚‚‡Ú¸ ‰‡Ê Á‡Í˚Ú˚ ‰ËÒÍË, Á‡ÔËÒ‡ÌÌ˚ ‚ ÂÊËÏ Video. ÑËÒÍ Á‡ÔËÒ‡Ì ‚ ÂÊËÏ VR. åÂ˚ ÔÓ ËÒÔ‡‚ÎÂÌ˲ îË̇ÎËÁËÛÈÚ ‰ËÒÍ (ÒÚ. 22). çÂÚ Â¯ÂÌËfl.
íÂıÌ˘ÂÒÍË ı‡‡ÍÚÂËÒÚËÍË é·˘Ë ı‡‡ÍÚÂËÒÚËÍË ç‡ÔflÊÂÌË ÔËÚ‡ÌËfl èÓÚ·ÎflÂχfl ÏÓ˘ÌÓÒÚ¸ ɇ·‡ËÚÌ˚ ‡ÁÏÂ˚ (ÔË·Î.) å‡ÒÒ‡ ÌÂÚÚÓ (ÔË·Î.) ÑˇԇÁÓÌ ÚÂÏÔ‡ÚÛ ÔË ˝ÍÒÔÎÛ‡Ú‡ˆËË Ç·ÊÌÓÒÚ¸ ÔË ˝ÍÒÔÎÛ‡Ú‡ˆËË ëËÒÚÂχ ÚÂ΂ˉÂÌËfl îÓÏ‡Ú Á‡ÔËÒË 200-240 Ç, ÔÂÂÏ. ÚÓ͇, 50/60 Ɉ 18 ÇÚ 430 X 54 X 275 ÏÏ (ò ı Ç ı Ñ ) ·ÂÁ ÓÒÌÓ‚‡ÌËfl 2.