DV270-PZ.NA4MLLB_5753 DVD PLAYER OWNER’S MANUAL MODEL : DV270 Before connecting, operating or adjusting this product, please read this instruction booklet carefully and completely.
CAUTION RISK OF ELECTRIC SHOCK DO NOT OPEN CAUTION: The apparatus should not be exposed to water (dripping or splashing) and no objects filled with liquids, such as vases, should be placed on the apparatus. CAUTION concerning the Power Cord CAUTION: TO REDUCE THE RISK OF ELECTRIC SHOCK DO NOT REMOVE COVER (OR BACK) NO USER-SERVICEABLE PARTS INSIDE REFER SERVICING TO QUALIFIED SERVICE PERSONNEL.
Contents . . . . . . . . . . . . . . . . . . . . . . . . . . . . . . . . . . . . . . . . . . . . . . . . .4 .4 .4 .4 .4 .4 .5 .5 .6 .7 .7 .7 Installation and Setup . . . . . . . . .8-12 Setting up the Player . . . . . . . . . . . . . . . . . . . .8 DVD Player Connections . . . . . . . . . . . . . . . . .8 Video and Audio Connections to Your TV . . .8 Audio Connection to Optional Equipment . . .9 Displaying Disc Information on-screen . . . .10 Initial Settings . . . . . . . . . . . . . . . . . . . . .
Introduction To ensure proper use of this product, please read this owner’s manual carefully and retain it for future reference. Notes on Discs Handling Discs This manual provides information on the operation and maintenance of your DVD player. Should the unit require service, contact an authorized service location. About the Do not touch the playback side of the disc. Hold the disc by the edges so that fingerprints do not get on the surface. Never stick paper or tape on the disc.
In addition, this unit plays DVD±R/RW and CD-R/RW, Dual disc that contains audio titles, MP3, WMA, and/or JPEG files. Notes: • Depending on the conditions of the recording equipment or the CD-R/RW (or DVD±R/RW) disc itself, some CD-R/RW (or DVD±R/RW) discs may not be played on the unit. • Do not use irregularly shaped CDs (e.g., heartshaped or octagonal) since they may result in malfunctions.
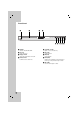
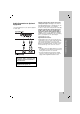
Front Panel a b c d e f a POWER Switches the unit ON or OFF. e Z (OPEN / CLOSE) Opens or closes the disc tray. b Disc Tray Insert a disc here. f N (PLAY) Starts playback. c Display window Shows the current status of the unit. g x (STOP) Stops playback. d Remote Sensor Point the remote control here. h . (SKIP) Returns to the beginning of current chapter or track or go to the previous chapter or track. i > (SKIP) Go to the next chapter or track.
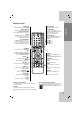
Remote Control 0-9 numerical buttons Selects numbered items in a menu. CLEAR Removes a track number on the Program List or a mark on the Marker Search menu. TV Control Buttons POWER: Turns the TV on or off. AV: Selects the TV’s source. PR/CH +/–: Selects TV’s channel. VOL +/–: Adjusts TV’s volume. Introduction OPEN/CLOSE (Z) Opens and closes the disc tray. SCAN (m / M) Search backward or forward. SKIP (. / >) Go to the next chapter or track.
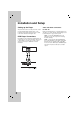
Installation and Setup Setting up the Player The picture and sound of a nearby TV, VCR, or radio may be distorted during playback. If this occurs, position the player away from the TV, VCR, or radio, or turn off the unit after removing the disc. DVD Player Connections Depending on your TV and other equipment there are various ways you can connect the player. Please refer to the manuals of your TV, stereo system or other devices as necessary for additional connection information.
Connect the DVD player to your optional equipment for audio output. Amplifier equipped with 2-channel analog stereo or Dolby Pro Logic ll / Pro Logic: Connect the left and right AUDIO OUT jacks on the DVD player to the audio left and right IN jacks on your amplifier, receiver, or stereo system, using the audio cables (A).
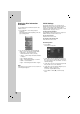
Displaying Disc Information on-screen You can display various information about the disc loaded on-screen. 1. Press DISPLAY to show various playback information. The displayed items differ depending on the disc type or playing status. Initial Settings By using the Setup menu, you can make various adjustments to items such as picture and sound. You can also set a language for the subtitles and the Setup menu, among other things. For details on each Setup menu item, see pages 11 to 12.
LANGUAGE AUDIO Introduction Each DVD disc has a variety of audio output options. Set the player’s AUDIO options according to the type of audio system you use. Menu Language Select a language for the Setup menu and on-screen display. Select the language you prefer to the audio track (disc audio), subtitles, and the disc menu. Original – Refers to the original language in which the disc was recorded.
LOCK (Parental Control) Area Code Enter the code of the area whose standards were used to rate the DVD video disc, based on the list on page 18. 1. Select “Area Code” on the LOCK menu then press B. 2. Follow the step 2 as shown previous page (Rating). 3. Select the first character using v / V buttons. Rating 4. Press B and select the second character using v / V buttons. Blocks playback of rated DVDs based on their content. Not all discs are rated. 5. Press ENTER to confirm your Area code selection.
Operation Discs Operations OPEN/CLOSE (Z) Opens or closes the disc tray. ALL PAUSE/STEP (X) During playback, press PAUSE/STEP (X) to pause playback. ALL Press PAUSE/STEP (X) repeatedly to play Frame-by-Frame. DVD During playback, press SKIP (. or >) to go to the next chapter/track or to return to the beginning of the current chapter/track. ALL VCD Installation and Setup Buttons SKIP (. / >) Introduction General features Press SKIP (.
Notes on general features: Last Scene Memory • On a Video CD with PBC, you must set PBC to Off on the setup menu to use the repeat, random or last scene function (See “PBC” on page 12). This player memorizes last scene from the last disc that is viewed. The last scene remains in memory even if you remove the disc from the player or switch off the player. If you load a disc that has the scene memorized, the scene is automatically recalled.
This unit can play Audio CDs or MP3/WMA files. MP3 / WMA/ Audio CD Once you insert an MP3/WMA files recorded media or Audio CD, a menu appears on the TV screen. Press v / V to select a track/file and then press PLAY (N) or ENTER and playback starts. You can use variable playback functions. Refer to page 13-14. Programmed Playback The program function enables you to store your favorite tracks from any disc in the player memory. A program can contain 30 tracks.
Moving to another File Viewing a JPEG file This unit can play JPEG files. 1. Insert a JPEG files recording media. The PHOTO menu appears on the TV screen. Press SKIP (. or >) or cursor (b or B) once during viewing a picture to advance to the next or previous file. Zoom During watching pictures, press ZOOM to enlarge the video image (3 steps). You can move through the zoomed picture using b / B / v / V buttons. Rotating the picture 2. Press v / V to select a folder and then press ENTER.
Reference 1. While holding down TV POWER button, press the number buttons to select the manufacturer code for your TV (see the table below). 2. Release TV POWER button. Code numbers of controllable TVs If more than one code number is listed, try entering them one at a time until you find the one that works with your TV.
Language Codes Use this list to input your desired language for the following initial settings: Disc Audio, Disc Subtitle, Disc Menu.
Troubleshooting Symptom Possible Cause Correction No power. • The power cord is disconnected. • Plug the power cord into the wall outlet securely. The power is on, but the DVD player does not work. • No disc is inserted. • Insert a disc. (Check the disc indicator in the display window is lit.) No picture. • The TV is not set to receive DVD signal output. • Select the appropriate video input mode on the TV. • The video cable is not connected securely. • Connect the video cable securely.
P/NO : MFL36465753