OWNER’S MANUAL DVD Player Please read this manual carefully before operating your set and retain it for future reference.
Getting Started 3 Safety Information CAUTION CAUTION: TO REDUCE THE RISK OF ELECTRIC SHOCK DO NOT REMOVE COVER (OR BACK) NO USER-SERVICEABLE PARTS INSIDE REFER SERVICING TO QUALIFIED SERVICE PERSONNEL. This lightning flash with arrowhead symbol within an equilateral triangle is intended to alert the user to the presence of uninsulated dangerous voltage within the product’s enclosure that may be of sufficient magnitude to constitute a risk of electric shock to persons.
Getting Started This device is equipped with a portable battery or accumulator. 1 Getting Started Safety way to remove the battery or the battery from the equipment: Remove the old battery or battery pack, follow the steps in reverse order than the assembly. To prevent contamination of the environment and bring on possible threat to human and animal health, the old battery or the battery put it in the appropriate container at designated collection points.
Table of Contents 5 Table of Contents 1 1 Getting Started 4 Operating 3 6 6 6 6 6 7 7 8 9 9 Safety Information Introduction – About the “7” Symbol Display – Symbols Used in this Manual – Supplied Accessories – Playable Discs – File compatibility – Regional Code Remote control Front panel Rear panel 14 14 14 14 15 15 15 16 17 General Playback – Playing a Disc – Playing a file – On-Screen display – General operation Advanced Playback – Movie – Music – Photo 5 Troubleshooting 2 Connecting 18 Tr
Getting Started Introduction Playable Discs DVD-VIDEO (8 cm / 12 cm disc) 1 About the “7” Symbol Display Getting Started “7” may appear on your TV display during operation and indicates that the function explained in this owner’s manual is not available on that specific media. Symbols Used in this Manual A section whose title has one of the following symbols are applicable only to the disc or file represented by the symbol.
Getting Started File compatibility 7 Photo Files Photo size: Less than 2M recommended. Overall The file name is limited to 35 characters. Depending on the size and number of the files, it may take several minutes to read the contents on the media. Maximum Files/Folder: Less than 600 (total number of files and folders) , Note of USB Device Do not extract the USB device during operation (play, etc.).
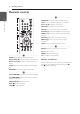
Getting Started Remote control • • • • • • • • • • c• • • • • • • • • • 1 DVD MENU: Accesses or exits the DVD menu. Getting Started TITLE: Accesses the disc’s title menu, if available. w/s/a/d: Navigates the menus. ENTER (b): Confirms menu selection. DISPLAY: Accesses or exits On-Screen Display. RETURN (x): Moves backward or exit the menu. AUDIO ([): Selects an audio language or audio channel. SUBTITLE (]): Selects a subtitle language. ANGLE (}): Selects a DVD camera angle, if available.
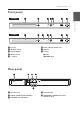
Getting Started 9 Front panel DV622 1 Getting Started DV652 a Disc Tray f Power indicator (DV622 only) b B (Open / Close) g USB Port c Display Window h d (Play) d Remote Sensor Z (Stop) e 1 (Power) C/V (Skip) Rear panel a AC power cord d VIDEO OUTPUT b DIGITAL AUDIO OUTPUT (COAXIAL) e COMPONENT / PROGRESSIVE SCAN OUTPUT (Y PB PR) c AUDIO OUTPUT (Left/Right)
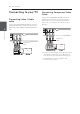
Connecting Connecting to your TV Connecting Video / Audio cable 2 Connect the VIDEO/AUDIO OUTPUT on the unit to VIDEO/AUDIO IN on TV with A/V cable, such as VIDEO with yellow, AUDIO Left/Right with white/ red. Connecting Component Video Cable Connect the COMPONENT/PROGRESSIVE SCAN OUTPUT jacks on the unit to the corresponding input jacks on the TV using Component video cable, such as Y with green, Pb with blue, and Pr with red.
Connecting Connecting to an Amplifier Connecting Audio cable Connecting COAXIAL (digital audio) cable Connect one of the unit’s DIGITAL AUDIO OUTPUT (COAXIAL) jacks to the corresponding jack on your amplifier. Connect the AUDIO OUTPUT on the unit to 2CH AUDIO IN on amplifier with Audio cable, such as AUDIO Left/Right with white/red. 2 Receiver / Amplifier Rear of the Unit Audio Cable OPTICAL If your TV is not capable of handling 96 kHz sampling frequency, set the [Sample Freq.
System Setting Settings [DISPLAY] Menu When the unit is turned-on at the first time, you have to select the desired language. TV Aspect Adjust the Setup Settings You can change the settings of the unit in the [Setup] menu. 1. Press SETUP. 2. Use w/s to select the first setup option, and press d to move to the second level. 3 3. Use w/s to select a second setup option, and press d to move to the third level. System Setting 4.
System Setting [AUDIO] Menu [OTHERS] Menu Dolby Digital / DTS / MPEG B.L.E (Black Level Expansion) Set the unit’s Audio options according to various disc output type you use. To select the black level of playback pictures, set your preference and monitor’s ability. 13 It just operates when TV system is set to NTSC. Sample Freq. (Frequency) Selects the sampling frequency of the audio signal between [48KHz] and [96KHz].
Operating General Playback On-Screen display ry You can display and adjust various information and settings about the content. Playing a Disc rt 1. Press OPEN/CLOSE (B), and place a disc on the disc tray. 2. Press OPEN/CLOSE (B) to close the disc tray For the most DVD-ROM discs, playback starts automatically. For the Audio CD, select a track using w/s/ a/d and press PLAY (z) or ENTER (b) to play the Track. Playing a file yui 1.
Operating General operation 15 Advanced Playback To Do this Playback Press PLAY (z) Pause Press PAUSE/STEP (M) Movie ry Stop Press STOP (Z) To Do this Display disc menu Press DVD MENU. (DVD Only) Play repeatedly Press REPEAT during playback. To select an option to be repeated, Press REPEAT repeatedly. Skip to the next Press C or V during or previous playback. Fast forward or Press c or v during fast reverse playback.
Operating Watch an During playback or pause mode, enlarged video press ZOOM repeatedly to select zoom mode. ZOOM: 100% : 200% : 300% : 400% : 100% w/s/a/d: Move through the zoomed picture. Record the Audio CD to USB device on X2 speed (ACD only) Do this Play repeatedly Press REPEAT during playback. To select an item to be repeated, Press REPEAT repeatedly. For all track recording: Press AUDIO([) in complete stop mode.
Operating 17 Photo i To Do this View photo files as a slide show Use w/s/a/d to highlight (`) icon then press ENTER (b) to start slide show. Adjust slide show speed You can change slide show speed using a/d when (J) icon is highlighted. Rotate a photo Use w/s to rotate the photo in full screen counterclockwise or clockwise while viewing a photo in full screen. Watch an While viewing a photo in full enlarged Photo screen, press ZOOM repeatedly to select zoom mode.
Troubleshooting Troubleshooting Symptom Cause Solution No power The power cord is disconnected. Plug the power cord into the wall outlet securely. The power is on, but the unit does not work. No disc is inserted. Insert a disc. The unit does not start playback. An unplayable disc is inserted. Insert a playable disc. (Check the disc type and regional code.) The rating level is set. Change the rating level. The remote control is not pointed at the remote sensor on the unit.
Appendix 19 Area Code List Choose an area code from this list.
Appendix Language Code List Use this list to input your desired language for the following initial settings: [Disc Audio], [Disc Subtitle] and [Disc Menu].
Appendix Specifications AC 110-240 V, 50 / 60Hz Power consumption 8W Dimensions (W x H x D) 360 x 35 x 195 mm Net Weight (Approx.) 1.7 kg Operating temperature 5 °C to 35 °C Operating humidity 5 % to 90 % Laser Semiconductor laser Signal system NTSC/PAL Bus Power Supply (USB) DC 5V 0 200 mA VIDEO OUTPUT 1.0 V (p-p), 75 Ω, sync negative, RCA jack x 1 COMPONENT / PROGRESSIVE SCAN OUTPUT (Y) 1.0 V (p-p), 75 Ω, sync negative, RCA jack x 1, (Pb)/(Pr) 0.