ENGLISH OWNER’S MANUAL Full HD Media Player Please read this manual carefully before operating your set and retain it for future reference.
Getting Started 3 Safety Informaion CAUTION CAUTION: TO REDUCE THE RISK OF ELECTRIC SHOCK DO NOT REMOVE COVER (OR BACK) NO USER-SERVICEABLE PARTS INSIDE REFER SERVICING TO QUALIFIED SERVICE PERSONNEL. This lightning flash with arrowhead symbol within an equilateral triangle is intended to alert the user to the presence of uninsulated dangerous voltage within the product’s enclosure that may be of sufficient magnitude to constitute a risk of electric shock to persons.
Getting Started This device is equipped with a portable battery or accumulator. 1 Getting Started Safety way to remove the battery or the battery from the equipment: Remove the old battery or battery pack, follow the steps in reverse order than the assembly. To prevent contamination of the environment and bring on possible threat to human and animal health, the old battery or the battery put it in the appropriate container at designated collection points.
Table of Contents 5 Table of Contents Operating Getting Started 3 6 6 6 6 6 7 8 8 8 9 Safety Informaion Introduction – Symbols Used in this Manual – About the “7” Symbol Display – Regional Code – Playable Discs – File compatibility Front panel Rear panel Supplied Accesorries Remote control Connecting 10 10 10 10 11 11 11 11 Connecting to your TV – Connecting Video (CVBS) / Audio cable – Connecting Component Video cable – Connecting HDMI cable Connecting to an Amplifier – Connecting Audio cable – Connect
Getting Started Introduction 1 Symbols Used in this Manual Getting Started A section whose title has one of the following symbols are applicable only to the disc represented by the symbol. Playable Discs DVD-VIDEO (8 cm / 12 cm disc) Discs such as movies that can be purchased or rented. DVD±R (8 cm / 12 cm disc) - Video mode and finalized only - Supports the dual layer disc also r DVD-Video, DVD±R/RW t Audio CDs - DVD±R discs that contain Movie, Music or Photo files.
Getting Started MUSIC Overall Sampling frequency: within 8 - 48 kHz (MP3), within 32 - 48 kHz (WMA) Available File extensions: “.jpg”, “.jpeg”, “.png”, “.avi”, “.divx”, “.mpg”, “.mpeg”, “.mkv”, “.mp4”, “.mp3”, “.wma” Bit rate: within 8 - 320 kbps (MP3), within 32 - 192 kbps (WMA) The file name is limited to 45 characters. Depending on the size and number of the files, it may take several minutes to read the contents on the media.
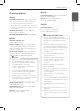
Getting Started Front panel 1 Getting Started a Disc Tray e D (Play) I (Stop) Y/U (Skip) 1 (Power) b R (Open / Close) c Remote sensor d Display window f USB Port Rear panel 5 6 a Power Cord d Component Video Out (Y PB PR) b Video Out (CVBS) e Digital Audio Out (COAXIAL) c 2CH Audio Out (Left/Right) f HDMI Out Supplied Accesorries RCA Video/Audio cable (1) Remote control (1) Battery (1)
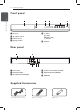
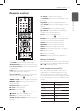
Getting Started 9 Remote control b (ENTER): Confirms menu selection. x (RETURN): Presses to move backwards or exits the menu. 1 DVD MENU: Accesses or exits the DVD menu. Getting Started [ (AUDIO): Selects an audio language or audio channel. ] (SUBTITLE): Selects a subtitle language. } (ANGLE): Selects a DVD camera angle if it is available on the disc being played. TITLE: Accesses the disc’s title menu.
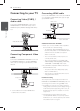
Connecting Connecting to your TV Connecting Video (CVBS) / Audio cable 2 Connecting HDMI cable Connect the HDMI OUT on the unit to the HDMI IN on compatible TV with HDMI cable. (Type A, High Speed HDMI™ Cable) Rear of TV TV Connect the VIDEO/AUDIO OUT on the unit to VIDEO/AUDIO IN on TV with AV cable, such as VIDEO with yellow, AUDIO Left/Right with white/ red.
Connecting Connecting to an Amplifier Connecting Audio cable Connecting HDMI cable Connect the HDMI OUT on the unit to the HDMI IN on amplifier with HDMI cable. Connect the HDMI OUT jack on amplifier to HDMI IN jack on TV with HDMI cable, if the amplifier has HDMI OUT jack. Connect the AUDIO OUT on the unit to 2CH AUDIO IN on amplifier with Audio cable, such as AUDIO Left/Right with white/red.
System Setting Setup When the unit is turned-on at the first time, you have to select the desired language. (optional) Adjust the settings You can change the settings of the player in the [SETUP] menu. 1. Press HOME. 2. Select the [Setup] using ad and press ENTER. The [Setup] menu appears. 3 3. Select the first setup option using ws the first setup option, and press d to move to the second level. System Setting 4. Select a second setup option using ws, and press ENTER to move to the third level.
System Setting [Slide] Menu [Other] Menu Select and set the Transition mode and Interval Time of sliding on photo mode you prefer or appropriate. DivX(R) VOD [Parental control] Menu Press B and enter the 4-digit password. Rating Rate the level from 1(Kids) to 8 (Adult). Change Password Enter the 4-digit password twice to create new password. 13 ABOUT DIVX VIDEO: DivX® is a digital video format created by DivX,Inc. This is an official DivX Certified® device that plays DivX video. Visit www.divx.
Operating On-Screen display General Playback You can display and adjust various information onscreen about the loaded disc and USB Device. Playing Disc Displaying content information on-screen ry 1. Press DISPLAY to show various playback information. 2. Select an available contents by pressing wsad and ENTER. 3. Change an available contents by pressing ENTER and numerical button. 4. Press DISPLAY to escape from playback information.
Operating General operation 15 Advanced Playback Movie ry To Do this To Do this Playback Press z Press DVD MENU (DVD Only) Pause Press M Display disc menu Stop Press Z Play repeatedly Press REPEAT during playback. Skip to the next or previous Press C or V during playback Fast / slow playback forward or backward Press c or v during playback Resume playback Press Z during playback to save the stopped point. Press REPEAT repeatedly.
Operating Music tu Photo i To To Do this Play repeatedly Press REPEAT during playback. Press REPEAT repeatedly. F (REPEAT ONE) /f (REPEAT ALL) / REPEAT Off Create or delete your own program Press PROGRAM on stop mode. Select the desired one or more files or tracks by pressing MARKER. If you want to delete the undesired lists or all lists, press MARKER or PROGRAM on stop mode. Listen to music Press DVD MENU during music during slide playback and select the PHOTO show mode.
Troubleshooting 17 Troubleshooting Symptom Cause Solution The power cord is disconnected. Plug the power cord. The unit does not start playback. An unplayable disc is inserted. Insert a playable disc. (Check the disc type and regional code.) The rating level is set. Change the rating level. The remote control does not work properly. The remote control is not pointed at the remote sensor on the unit. Point the remote control at the remote sensor of the unit.
Appendix Area Code List Choose an area code from this list.
Appendix 19 Language code List Use this list to input your desired language for the following initial settings: [Disc Audio], [Disc Subtitle] and [Disc Menu].
Appendix Specifications Power requirements AC 200 - 240 V, 50/60 Hz Power consumption 14.5 W Dimensions (W x D x H) Approx. (430 x 233 x 51) mm Net Weight (Approx.) 1.9 kg Operating temperature 0 °C to 35 °C Operating humidity 5 % to 90 % Laser Semiconductor laser Signal system PAL / NTSC Bus Power Supply (USB) 5 V 0 500 mA CVBS (Video Out) 1.0 V (p-p), 75 Ω, sync negative, RCA jack x 1 Component Video Out (Y) 1.0 V (p-p), 75 Ω, sync negative, RCA jack x 1, (PB)/(PR) 0.