
Owner's Manual


10
Connecting
2
Connecting
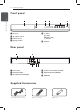
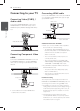
Connecting to your TV
Connecting Video (CVBS) /
Audio cable
Connect the VIDEO/AUDIO OUT on the unit to
VIDEO/AUDIO IN on TV with AV cable, such as
VIDEO with yellow, AUDIO Left/Right with white/
red.
Connecting Component Video
cable
Connect the COMPONENT VIDEO OUT on the unit
to COMPONET VIDEO IN on TV with COMPONET
cable, such as Y with green, Pb with blue, and Pr
with red.
You should still connect the AUDIO cable
between the unit and TV.
Connecting HDMI cable
Connect the HDMI OUT on the unit to the HDMI IN
on compatible TV with HDMI cable. (Type A, High
Speed HDMI™ Cable)
Additional Information for HDMI
When you connect a HDMI or DVI compatible
device make sure of the following:
-
Try switching o the HDMI/DVI device and
this unit. Next, switch on the HDMI/DVI device
and leave it for around 30 seconds, then
switch on this unit.
-
The connected device’s video input is set
correctly for this unit.
-
The connected device is compatible with
720x576i(480i), 720x576p(480p), 1280x720p,
1920x1080i or 1920x1080p video input.
Not all HDCP-compatible HDMI or DVI devices
will work with this unit.
-
The picture will not be displayed properly
with non-HDCP device.
-
This unit does not playback and TV screen is
changed to black screen.
Resolution Setting
The unit provides several output resolutions for
HDMI OUT and COMPONENT VIDEO OUT jacks. You
can change the resolution using [SETUP] menu.
Depending on your TV, some of the resolution
settings may result in the picture disappearing or
an abnormal picture appearing. In this case, set
the [Resolution] option to suitable one on the
setup menu.
Changing the resolution when the unit is
connected with HDMI connector may result in
malfunctions. To solve the problem, turn o the
unit and then turn it on again.
Rear of the Unit
Rear of TV
Video/Audio Cable
TV
Component
Cable
TV
Rear of the Unit
Rear of TV
HDMI Cable
TV
Rear of the Unit
Rear of TV