RC187P2_NA8ULL_48P_ENG DVD RECORDER/ VIDEO CASSETTE RECORDER OWNER'S MANUAL MODEL : DVR688X PAL BZ03 Before connecting, operating please read this instruction booklet Internet or adjusting this product, carefully and completely. Address:http://ua.lge.
Safety Precautions CAUTION NOTES ON COPYRIGHTS: It is forbidden RISK OF ELECTRIC SHOCK DO NOT OPEN CAUTION: TO REDUCE THE RISK OF ELECTRIC SHOCK DO NOT REMOVE COVER (OR BACK) NO USER-SERVICEABLE PARTS INSIDE REFER SERVICING TO QUALIFIED SERVICE PERSONNEL.
Table of Contents INTRODUCTION DiscSettings.......................25-27 SafetyPrecautions.......................2 ?Initialize..........................25 TableofContents........................3 ?Finalize..........................26 Overview.............................4-9 ?DiscLabel........................26 .4 ?DiscProtect.......................27 Disc-relatedterms......................5 ?PBC.............................27 AboutSymbols.........................
Overview Recordable Discs Discs Playable DVD-RW (Digital Video Disc ReWritable): These Discs can be recorded on repeatedly. Recordings can be erased, then you can record again on the same Disc. - DVD (8 DVD+R DL (Digital Video Disc Audio CD (8 and SVCD. otes -- Depending ment DVD+R -- up to disc. -- -- otes This recorder cannot record CD-R or CD-RW discs.
Overview (Continued) Disc-related terms Title (DVD only) or accompanying " assigned locate it easily. a title reference number enabling (Video Sections of a CD and audio CD picture or a enabling only) piece assigned musical audio CD. Each track is or an on a a video CD track number, you to locate the track you want. video CD with PBC (Playback control) functions, moving pictures pictures are divided into sections called "Scenes".
Overview (Continued) Is About DVD-R and DVD-RW disc How DVD-R and DVD-RW discs different? are The essential difference between DVD-R and DVD-RW is that DVD-R is is a record-once a medium, while DVD-RW re-recordable/erasable medium. You erase a DVD-RW disc can approximately 1,000 re-record/ times. Can I play my recordable discs in a regular DVD player? Generally, DVD-R discs and DVD-RW discs recorded in Video mode are playable in a regular DVD player, but they must be 'finalized' first.
Overview About DVD (Continued) Notes for recording ? The recorder otes ? This This recorder cannot make recordings on CD-R or CD-RW discs. ? Our company takes no responsibility for recording failure due to power cuts, defective discs, or damage to the recorder. ? on ? ? Fingerprints and small scratches on a disc can affect playback and/or recording performance. Please take proper ? of your discs.
Overview Recording (Continued) TV audio channels Remote Control This recorder can record either NICAM or regular audio. If the NICAM setting (page 19) is set to Auto, then if the broadcast is NICAM, you can record the NICAM audio. If the broadcast is non-NICAM, the regular audio is always recorded. Point the remote control at the remote ? on video recording battery control, and insert discs and some satellite broadcasts.
Overview (Continued) Precautions Handling Notes on Handling the unit When shipping the unit The original shipping carton and packing materials come in handy. For maximum protection, re-pack the unit as it was originally packaged at the factory. Discs discs Do not touch the disc by the playback side of the disc. Hold the edges so that fingerprints will not get on the surface. Do not stick paper or tape the disc.
Front Panel POWER EJECT Switches the Recorder ON or OFF. Ejects AV3 IN (VIDEO the IN/AUDIO IN (Z) tape in the VCR deck. (Left/Right)) Connect the audio/video output of an external source (Audio system, TV/ Monitor, VCR, Camcorder, etc.). PLAY/PAUSE (N/X) playback. Pause playback or recording temporarily, press again to exit Starts AV3 IN (S-VIDEO IN) Connect the S-Video external output of an (TV/ Monitor, VCR, Camcorder, etc.). source pause mode.
Remote Control Overview POWER Switches the recorder ON OFF. or DVD Select the Recorder's function mode to DVD. VCR Select the Recorder's function mode to VCR. AV/INPUT Changes the input to use for recording (Tuner, AV1-3, or DV IN). 0-9 numerical buttons Selects numbered I.SKIP Skips (about length a menu. (INSTANT SKIP) 30 seconds forward the in options of a the disc on typical TV com- mercial). DUBBING Press to copy DVD to VCR VCR to (or DVD).
Rear Panel AERIAL Connect the aerial to this terminal. COMPONENT/PROGRESSIVE SCAN VIDEO OUT Connect to a TV with Y Pb Pr AUDIO OUT Connect to (Y Pb Pr) inputs. (Left/Right) amplifier, receiver an stereo or system. EURO AV 2 DECODER Connect the audio/video (Pay-TV decoder, Set output of an external Top Box, VCR, etc.). source AC Power Cord Plug into the power source. AERIAL RF.OUT OPTICAL (Digital audio out jack) digital (optical) audio equipment.
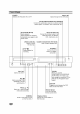
Connections ips Depending Component your TV and other equipment you wish are various ways you could connect the recorder. Use only one of the connections described below. Please refer to the manuals of your TV, VCR, Stereo System or other devices as necessary to make the best connections. to -- -- -- on connect, there Caution Make sure the Recorder is connected directly to the TV. Tune the TV to the correct video input channel.
Connections Connecting (Continued) to a cable box or Connecting satellite receiver If you have decoder, a cable or decoder box satellite receiver with a built-in connect it to this recorder and your TV If you have an external, dedicated decoder box for your satellite or cable TV system, use the setup described on as shown on this page. If you are using a separate decoder box for your cable/satellite TV, set up following the instructions on the right.
Connections Connecting (Continued) to an Amplifier Rear of Recorder Connecting to an amplifier equipped with two channel analog stereo or Dolby Pro Logic ll/ Pro Logic Connect the Left and Right AUDIO OUT jacks on the right in jacks on your stereo system, using the audio HOKUP Recorder to the audio left and amplifier, receiver, (A).
Connections Accessory (Continued) Audio/Video (A/V) Connections to Recorder Connect the input jacks (AV3) on the Recorder to the jacks on your accessory component, audio/video out using audio/video cables. Connecting Using If you use the S-VIDEO IN jack on the front panel, the VIDEO IN jack on the front panel is not available.
Before Operation Auto Set Up After the POWER is the unit or after pressed resetting Wizard function sets the clock 1 the for the first time to turn on unit, the Initial Setup language, screen a language display. for the tuner channels and Setup menu Use v / V to select a and screen you certain can access functions. 1 automatically. Select the Home Menu Using From the Home Menu Press HOME. The Home menu appears.
Before 1 2 3 4 Operation (Continued) Press HOME. The Home menu Use b / B to select the While the Start Press B to option move a PR number then press ENTER. Program List options display. Setup option. appears the left side of the on menu is selected, press ENTER. 8 Use v / V to select an option then press ENTER to confirm. Program to the second level. Edit: Edits the selected program. Station Rename: Edits the station Use v / V to select the Auto 5 option.
Before Operation (Continued) Edit Program Sort TV channels (Continued) You Station Rename You independently. Names be can long. a program on the Program List then press ENTER. Program List options appears on the left side of the menu List manually program's position on the Program List 1. Use v / V to select a program on the Program List then press ENTER. Program List options appears on the left side of the menu 1. Use v / V to select Program sort the menu.
Before Operation (Continued) Clock Set TV Aspect To record a the correct wide screen type of wide format programme screen signal successfully must be broad- the TV station. cast by You can choose: 4:3 Letter Box: Select when nected. Displays a theatrical above and below the standard 4:3 TV is images picture. 4:3 Pan Scan: Select when a with masking standard 4:3 TV is con- bars con- nected.
Before VCR Operation (Continued) Factory Set Play System Your video recorder uses two colour standards, PAL and MESECAM. During play your video recorder should select the colour system automatically, however if you experience problems you may need to do it manually. If you need to, you can reset the recorder to all its factosettings. Select 'SET' icon then press ENTER and ry auto setup menu will appear. (See page 17). ote Some options can HOKUP not be reset.
Before Audio Operation (Continued) Sampling Frequency Settings Each DVD disc has a variety of audio output options. Output according to the type Set the recorder's Audio audio system you of use. PCM: Select when connected to the PCM recorded or select 48 kHz. When this choice is signals, amplifier is NOT capable of handling made, this unit will automatically convert any 96 kHz to 48 kHz so your system can decode them. signals Dolby Digital amplifier.
Before Lock Operation (Continued) (Parental Control) Settings 5. Select "OK" then press ENTER. The 4-digit password is cleared. Enter a new code as shown above. Set Password To access the features, you Rating, Set Password and Area Code must enter a 4-digit security password. Press HOME. 1 appears. Use select the Setup option. 2 the Start option is selected, press 3 Use select the option. 4 Press the second 5 Use select the Set Password option.
Before Operation (Continued) Area Code Enter the code of a country/area used to rate the DVD video (See "Area Code whose standards disc, referring were to the list List", page 55.). Press HOME. 1 appears. Use select the Setup option. 2 the Start option is selected, press 3 Use select the option. 4 Press the second 5 Use select the Disc 6 option.
Before Operation (Continued) DV Record Audio Disc You need to set this if you have a camcorder using 32kHz/12-bit sound connected to the front panel DV IN Initialize jack. Some digital camcorders have two stereo tracks for audio. One is recorded at the time of shooting; the other is for overdubbing after shooting. On the Audio 1 setting, the sound that was recorded while shooting is used. On the Audio 2 setting, the overdubbed sound is used.
Before Operation (Continued) Finalize Disc Label Finalizing 'fixes' the recordings in place so that the disc be played on a regular DVD player or computer equipped with a suitable DVD-ROM drive. Finalizing a Video mode disc creates a menu screen for navigating the disc. This is accessed by pressing DISC can MENU / LIST or Use this to enter for the disc. This a name name appears when you display disc information on-screen. ? The disc name can be up to 32 characters long.
Before Operation (Continued) Disc Protect When recording About in DVD-RAM / DVD+RW / +R disc VR mode formatted DVD-RW accidental recording, editing disc, or set to ON to deleting DivX(R) or prevent of the disc loaded. If you need to unlock the disc to make select OFF. edits, HOKUP We provide you the DivX VOD (Video On Demand) registration code that allows you to rent and purchase videos using the DivX VOD service. For more information, visit www.divx.com/vod.
Before Operation (Continued) General Explanation On-Screen Display This manual of Information various information about the disc or is not available Displaying on Watching the TV, press DISPLAY to the information 1 on-screen or on-screen. displayed Press DISPLAY repeatedly to display/change the information displayed on-screen. The items the disc. Information While During viewing remove display basic instructions for Recorder.
with DVD and Video CD Operation Playing DVD a or Video CD DVD Playback Setup Before When the remote using Turn the TV operated. input and select the video on the 1 system: input Turn the audio source (Z) to open the disc tray. READING appears starts playback start, press N In some cases, (Z) to close the tray. The is or loading view, then press ENTER Press TITLE or title/chapter playback. you a title number.
with DVD and Video CD Operation General Features (Continued) ote On Slow Motion DVD Video (Continued) a Video CD with PBC, you must set PBC to OFF in the VR +RW 1 Press PAUSE/STEP The recorder will VCD RAM go into PAUSE mode. (m) FORWARD(M) during or The to the recorded content. (X) during playback. now 2 Press BACKWARD +R Setup menu. See page 27. play mode may vary according PAUSE mode. Time Search DVD Video VR +RW +R DivX RAM The Recorder will enter SLOW mode.
Operation with DVD and Video CD General Features (Continued) 3 (continued) Press CLEAR. "Delete selected marker? Proceed?" message appears. Zoom 4 Use b / B to select "OK" then press ENTER. DVD 5 Repeat steps 6 To Video VR +RW +R RAM The Zoom function allows you to enlarge the video image and to move through the enlarged image. 1 Press ZOOM during playback still or playback to acti- vate the Zoom function.
Operation the Audio Channel Changing VCD With Video Video a with DVD and Video CD VR +RW +R Last Condition DivX CD, press AUDIO then press repeatedly during playback to hear a (STEREO, LEFT or RIGHT). (Continued) RAM b / B different audio Memory This recorder memorizes the user DVD settings for the last disc that you have viewed. Settings remain in memory even if you remove the disc from the recorder or switch With DVD-RW discs recorded in VR mode that have off the recorder.
Playing Playing Using a DivX Movie Disc Movie DivX Movie Disc a this unit you can play DivX disc. Before playing Press v / V to select 1. 2. files, read "About DivX movie files" on page 33. Insert a disc and close the tray. The Movie menu appears on the TV screen. Press v / V to select a folder, and press ENTER. A list of files in the folder appears.
Audio CD and MP3/WMA Playing Disc an CD MP3 The Recorder can Audio CD play can or Operation MP3/WMA WMA play 1. audio CDs. MP3/WMA formatted Music Also, the Recorder recordings on CD-ROM, CD-R, CD-RW, DVD-RAM, DVD±R To display the 2. or menu options menu options, select a tack (or folder) on then press ENTER. Use v / V to select an option then press ENTER to confirm your selection. menu DVD±RW disc. Before playing MP3/WMA recordings, Recordings on page 35.
Audio CD and MP3/WMA CD Pause MP3 1 Press PAUSE/STEP Operation (Continued) Search WMA 1 Press BACKWARD (X) during playback. 2 To return to N playback, press PAUSE/STEP (X) again. (PLAY) or CD (m) FORWARD(M) during or playback. press The recorder will now go into SEARCH mode. 2 Press BACKWARD CD to Another Track Moving (m) or FORWARD(M) to required speed: m, ,, mm (backward) or M, <, MM (forward). select the MP3 WMA Search Press SKIP .
JPEG File Viewing Operation JPEG File a can play discs with playing JPEG recordings, Recordings" at right. 6 JPEG The recorder JPEG files. Before read "Notes 1 Insert a on JPEG To disc and close the tray. menu appears on the TV menu viewing a press SKIP picture, to advance to the next file Rotate screen. time, press STOP. reappears. Skip Images While The Photo at any stop viewing The Photo or (. or >) once previous file.
VCR Mode Tape Playback Before the remote using control, press the VCR but- and select on operated. the video input Horizontal lines source con- the source Normal 1 Insert indicator will light Make sure a 2 and the Recorder will power- display (N) the TV 3 (x) to STOP icon appears If the the TV screen. If time. tracking 3 Slow Motion 1 While in still function adjusts the picture mode, press FORWARD (M).
Basic Basic Recording from Recording Follow the instructions below to record Recording starts tape is full or a TV Instant Timer Instant Timer TV program. and continues until the disc a immediately you stop the recording. or easily of a Recording Recording allows you to make a recording preset length without using the program timer. Follow 1-5 shown left steps 1 from TV). Press REC (z) repeatedly 2 ing time length.
Basic Recording (Continued) from DVD to VCR Copying You copy the contents of the DUBBING button. can using a DVD to Copying a VHS tape from VCR to DVD You can copy the contents of a VHS tape to a recordable DVD disc using the DUBBING button. This allows you to archive your old VHS tapes to DVD. ote If the DVD (or Discs) you are attempting to copy is copy protected, you will not be able to copy the disc. It is not permitted to copy Macrovision encoded DVDs (or Discs).
Timer Recording This Recorder be can programmed to record up to 16 Enter the necessary information for your timer 5 recording(s). programs within a period of 1 month. Press HOME. 1 The Home menu b / B (left/right) move the cursor left/right v / V (up/down) change the setting at the current cursor position Press RETURN (O) to exit the Timer Record ? appears. ? 2 Use b / B to select the TV 3 Use v / V to select the Timer Record -- option. -- ? menu.
Timer Recording (Continued) Timer Checking Programming is turned Details steps 1-3 timer as shown on page 40. ? Use v / V to select ? Press ENTER to edit the selected program. Timer Record menu appears. ? Playing be checked whenever the Recorder can Follow on. Recording a You start can continuing recording. While 1 Press CLEAR to delete the selected program from the Timer Record List. 2 while you play from the Press beginning RAM of the title while to record it.
from Recording from External Recording You can record from camcorder external or an external VCR, connected Input Components component, such as a to any of the recorder's from Recording You record from can the DV IN jack on a component you record from is connected properly want to Before to the DV IN Digital Camcorder a digital camcorder connected to panel of this recorder. Using the front the recorder's remote, you corder and this recorder. inputs.
from Recording External an Input (Continued) DV-Related What is DV? You DV-equipped camcorder to this using single DV cable for input and output audio, video, data and control signals. This recorder is only compatible with DV-format (DVC-SD) camcorders. Digital satellite tuners and Digital VHS video recorders are not compatible. can connect recorder a a of ? ? You cannot connect a ? more than You cannot control this recorder from external DVD ? jack (including recorders).
Title List and the Title Using VR List Menu Chapter List-Original menu ip Press DISPLAY to RAM display more detailed title information for selected title. The Title List-Original is where you build and edit your Playlist, and where you can delete titles and make other changes to the Original content of the disc. You can also play individual titles directly from the Title ListOriginal menu. The recorder must be stopped in order to edit using the Title List-Original.
Title List and Using the Title VR 1 List Menu Chapter List-Playlist (Continued) Menu RAM VR Press DISC MENU / LIST the Title List-Playlist next page if there To exit the Title ? to repeatedly display menu. Use the v / V buttons to ? the Using RAM Press DISC MENU / LIST to 1 the Title List-Playlist repeatedly display Use vVbBto choose the title you 2 then press Chapter List-Playlist menu.
Title List and Chapter the Title List Using From the Title List display play, can (Continued) Video menu you List Menu Deleting name and delete titles. Once a screen select 1 Before Video mode disc is Title disc is a Video finalized, you Press DISC MENU / LIST to can do is Caution ? If you delete a title from disappear from the Title ? When the Title display ing List. DVD-R disc, the title will List, but the available record- a time will not increase.
Title List and the Title List Using List Menu Chapter +RW menu +R ip The Title List is where you can see the all recorded titles, and where you can delete titles and make other changes to the Original content of the disc. You can also play titles directly from the Title List menu. The recorder must be stopped in order to edit using Title List 1 the Title List display Press DISPLAY to display more detailed title information for selected title. Caution the menu.
Title and Chapter Editing Edits you make to the Original content changes the actual content of the disc. For example, if you delete title a chapter from the Original content (Title or Chapter), that title or chapter is deleted from the disc, freeing up extra recording time. When you edit the Playlist, on the other hand, you are not changing the content of the disc.
Title and Making Chapter Editing (Continued) New a Playlist VR RAM Use this function to add an Original title or chapter to Playlist. When you do this, the whole title is put into the Playlist (you can delete bits you don't need later see Deleting an Original or Playlist title/chapter on page 50). the Adding Additional Title/Chapters RAM Playlist VR You add can an --- The title appears in the Playlist complete with the chapter markers that appear in the Original.
Title and Deleting VR a Chapter Editing (Continued) Title/Chapter +RW +R Deleting RAM When you erase a title or chapter from the Playlist menu on DVD-RW discs formatted in VR mode, you only remove in the it from the Original Playlist; the title/chapter remains menu. If you choose to delete a title or chapter from Title List Chapter List menu, the title or chapter is actually You can 1 Title remaining time available for recording increases.
Title and Naming VR You a 2 Title Video can name 32 characters 1 Chapter Editing (Continued) Combining +RW titles +R RAM independently. VR Names can be up to long. +RW Use v/V to select 'Title Name' option menu e.g., If you select "Title Name" on Title RAM into or only one chapter within the title. On the Chapter List menu, select the second chapter of the two chapters you want to combine then press ENTER. Chapter List options appears List-Original menu.
Title and Moving Chapter Editing (Continued) VR Playlist Chapter a RAM 3 Use this function to re-arrange the playing order of Playlist chapters on the Title List-Playlist menu. Press DISC MENU / LIST 1 Title to repeatedly List-Playlist To display the Chapter List-Playlist menu, "Using the Chapter List-Playlist Menu" on Select 'Protect' option the on e.g., If you select "Protect" on options. Title List menu.(DVD+RW/+R) display menu. refer to page 45.
Title and Chapter Editing (Continued) Divide One Title Into Two Use this command to 1 split a Time Search +RW title up into two new titles. On the Title List menu, select a title you want to divide then press ENTER. The menu options appears on the left side of the You 1 screen. Select 'Edit 2 options. 3 - Divide' from the Title List menu 2 can select start option is of the title. Useb/B/v/VtochooseatitleontheTitle then press ENTER.
Additional Information Overwrite To overwrite +RW Recording a new video recording to a previously recorded title, follow these steps. This feature is not available on DVD+R, which always record at the end of Insert DVD+R 1 already. 2 Title List or DVD+RW disc recorded Press TITLE button. will appear menu as below. the Disc. Select input source nel, AV1-3, DV).
Language Code and Area Code List Language Codes Use this list to Disc input your desired language for the following initial settings: Audio, Disc Subtitle, Disc Menu.
Controlling You can Your TV with the control the sound level, input power switch of your LG TV with the source, and supplied remote. can control your TV using the buttons below. other TVs with the remote Controlling You You Remote Supplied can control the sound level, input source, and power switch of non-LG TVs as well. If your TV is listed in the table below, set the appropriate manufacturer code. 1.
Troubleshooting Check the following guide for the possible cause of a before problem contacting service. Cause Symptom Solution No power. The power cord is disconnected. Plug the power securely. No The TV is not set to receive Recorder Select the signal output. on picture. the TV cord into the wall outlet appropriate video input the picture from the Recorder appears The video cable is not connected mode so on the TV Connect the video cable screen. securely. securely.
Troubleshooting (Continued) Cause Symptom Can't The disc play a disc using this recorded recorder on Some another was Solution recorded in Video mode. Finalize the disc. will not No solution. players play final- even a (page 26) ized disc recorded in Video mode. player. The disc recorded in VR was The other mode, player must play it. be RW compati- ble in order to Discs recorded with copy-once material played on other players. No solution. The Use another disc.
Specifications General Power AC Power 27W requirements consumption Dimensions (approx.) Mass (approx.) Operating temperature Operating humidity Television 200-240V, 50/60 Hz 430 X 78.5 X 310 5.
P/NO : 3834RV0048P