ENGLISH MINI HI-FI AUDIO SYSTEM OWNER'S MANUAL MODELS : FFH-376A/L/S/AX/AD FE-376E FFH-576A/L/S/AX/AD FE-576E Please read this manual carefully before operating your unit. Retain it for future reference. and specifications are subject without notice for improvement.
MISE EN GARDE Cet appareil numerique de la classe B respecte toutes les exigences de Reglement sur le materiel brouilleur de Canada. CAUTION AVERTISSEMENT CAUTION: TO REDUCE THE RISK OF RISQUE DE CHOC ELECTRIQUENE-PAS OUVRIR ELECTRIC SHOCK (FOR DO NOT REMOVE COVER(OR BACK). NO USER SERVICEABLE PARTS INSIDE.
IMPORTANT SAFETY INSTRUCTIONS FOR CUSTOMERS IN THE UNITED STATES ? CAUTION: Read all of these instructions. ? ? Save these instructions for later Follow all ? the audio ? warnings and equipment. Read instructions - use. instructions marked on All the and safety installation such operating product is - The safety and ? operating instructions should be retained for future reference.
? Outdoor Antenna Grounding - If outside antenna an power-supply cord or plug is damaged. liquid has been spilled, or objects have fallen into the product. c) If the product has been exposed to rain or water. d) If the product does not operate normally by following the operating instructions.
OPERATING ELEMENTS FRONT VIEW REAR VIEW 32 31 1 30 2 29 3 28 27 4 26 56 25 33 7 24 8 23 34 22 910 11 21 12 13 20 19 35 14 18 15 16 17 37 FRONT VIEW 1. 2. 3. 4. 5. 6. 7. 8. 9. 10. 11. 12. 13. 14. 15. 16. 17. 18. 19. 20. 21. DISC DIRECT PLAY buttons (DISC1, DISC2, DISC3) PRESET DOWN / BACKWARD PLAY (OPTIONAL) button (PRESET DOWN / ) MDSS button TUNING DOWN(TUNER: OPTIONAL), TAPE REWIND, TRACK BACKWARD, SKIP/SEARCH(CD) button( 36 22. DISC SKIP button 23.
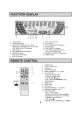
FUNCTION DISPLAY 16 9 8 DISC entered indicator 1. LEVEL indicator 9. 2. CD REPEAT indicator 10. R.I.F. indicator 3. FUNCTION, VOLUME LEVEL, CLOCK, 11. FREQUENCY, TAPE COUNTER, CD PLAYING 12. MUTE indicator AUTO TUNE RECEIVING indicator TIME, MDSS, EQ PATTERN display 13. TAPE DIRECTION indicator 4. LEVEL indicator 14. PLAY MODE 5. FM STEREO RECEIVING indicator 6. FM MONO indicator 15. RECORD / RECORD PAUSE indicator 7. RDS indicator 16. TIMER indicator 8. DISC NO.
REMOTE CONTROL Control Range The remote control device is designed for the range shown in the illustration. NOTE Strong light or obstacles between the remote control device and the stereo system may interfere with the functioning of the remote control. Approx.7m Notes on Batteries Your remote control Use two comes with batteries. "AAA(UM-4. IEC R03)" type high quality batteries. When the remote control fails to operate accurately at maximum distance from the unit.
CONNECTIONS Antenna(aerial) Connection For the models for other countries For the European and U.K. model IMPORTANT figure (1), (3). figure (2), (4).
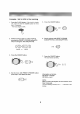
CLOCK SETTING Example 1. Set to 9:25 in the : Press the CLOCK button. (If morning the clock is already set, press and hold the CLOCK button for than 1.5 seconds) - 2. The hours begin 3. Press the CDII/SET button. 6. Set the minutes with RESET UP/DOWN more to blink. Select a 24 hour cycle or 12 hour cycle by pressing the PRESET UP/DOWN button(FFH376) or turning the JOG DIAL(FFH-576). (24HR) 5. or button(FFH-376) JOG DIAL(FFH-576). (12HR) Press the CDII/SET button. 7.
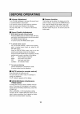
BEFORE OPERATING Volume Dimmer function Adjustment Turn VOLUME clockwise to increase the sound level, or This function will be darken the counterclockwise to decrease it. If you turn the volume up more display by half in power-on status, if you press the DIMMER button than the maximum once, only display will be darken, and if you again the LEDs of the FUNCTION the level, the volume level flashes in the display. press it (Or press VOLUME control.) SELECT button will go out.
RADIO RECEPTION in Tuning (3) Select Automatically 2. Turn the FUNCTION SELECT button Press the PROG./MEMO button (4) the channel number stops 3. IN CASE OF FFH-376 Press the TUNING in a more station DOWN/UP( 4. To recall presets. Press and hold the PRESET DOWN / UP button automatically. until the desired preset number appears IN CASE OF FFH-576 DOWN/UP( button. The unit tunes in a station Tuning 1. Turn on the power.
CD PLAYING To play Press one one disc buttons to start To only of the DISC DIRECT remove PLAY(DISC 1,2,3) play. discs Press the CD OPEN/CLOSE button to open the disc compartment. You can remove two discs. To remove on the back tray, press the DISC SKIP button to rotate the disc tray. the disc Basic Operation 1. Select the CD FUNCTION by turning FUNCTION SELECTOR. Two discs 2. Press the CD OPEN/CLOSE button to open the disc compartment. disc is 3. Load disc play.
CD PLAYING Beginning of to the Skipping a Track Programmed Play You can locate the To return the to of any track beginning of the beginning on a disc. current The player has a memory function that allows play of up to 20 tracks over three discs in any order. 1. Press the PROG. / MEMO. button in the stop or track previous mode. Press the button once to return to the beginning 2.
AUXILIARY FUNCTION 1. Switch on the auxiliary connected to the rear device i.e. TV mounted AUX NOTE: VCR, or (PHONO) sockets. You can see RECORDING section. also record from the auxiliary input source, 2. Press the "AUX" function button. TAPE PLAYBACK Playback Preparation You All sides can use : normal tapes. only Unit plays reverse and stops 1.
RECORDING Recording from a CD, Radio Connected Equipment CD or The CD Wind up the tape to the only You can synchro recording function dubs a complete programmed titles automatically into a CD and Preparation Use Synchro Recording point recording cassette. starts. normal tapes. record from cassette deck 2 1. To select the function Switch the unit on 1. Select the CD function. only. 2.
RECORDING Recording from Tape (Dubbing) to Tape 3. To Preparation Wind up the tape to the Use only point recording starts. DUBBING for double 1 The NOTE 1. Select the TAPE function. of the tape. speed dubbing. automatically. starts up dubbing : The pause function does not operate during dubbing. : Open cassette deck 1. Insert a 4.
TIMER (8) the time to switch off in the Program 3. When the TAPE is selected for way as the time to turn on. Set the volume level by pressing the cassette decks have cassette same (9) PRESET UP/DOWN turning the JOG button(FFH-376) DIAL(FFH-576). cassette case of power-on by if both 2 will be selected first. operated only the timer in the on. Press the CDII/SET button to confirm the (10) Sleep selected volume level. remains in the setting (11) tape in deck 4.
SPECIFICATIONS MODEL SECTION FFH FFH 376 - - 576 AMP Output Power Frequency Response Signal-to-Noise Ratio 20W+20W (6Ω, 2ch, T.H.D 10%) 50W+50W (6Ω, 2ch, 42-25000 Hz 42-25000 Hz 80 dB 80 dB T.H.D 10%) TUNER FM 87.5-108 MHz Tuning Range(optional) 65-74 MHz or 87.5-108 MHz & 87.5-108 MHz Intermediate Frequency Signal-to-Noise Ratio(Mono/Stereo, 98MHz) Frequency Response 65-74 MHz or & 87.5-108 MHz 10.7 MHz 10.
P/NO : 3828R-A005T