English Russian Kazakh NEW KARAOKE MUSIC SYSTEM OWNER'S MANUAL MODELS : FFH-2005AX FE-2005VE Please read this manual carefully before operating your unit. Retain it for future reference. Designs without and specifications are subject notice for improvement.
1
IMPORTANT SAFETY INSTRUCTIONS FOR CUSTOMERS IN THE UNITED STATES ? Ventilation Slots and openings in the cabinet are ensure reliable provided of the and to operation product protect it from overheating, and these openings must not be blocked or covered. The openings should never be blocked by placing the product on a bed, sofa, - for ventilation and to CAUTION: ? Read all of these instructions. ? Save these instructions for later ? Follow all the audio ? warnings and equipment.
? Outdoor Antenna Grounding - If outside antenna an power-supply cord or plug is damaged. liquid has been spilled, or objects have fallen into the product. If c) the product has been exposed to rain or water. d) If the product does not operate normally by following the operating instructions.
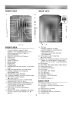
OPERATING ELEMENTS FRONT VIEW BACK VIEW 19. JOG DIAL FRONT VIEW ? 1. TUNING DOWN/UP buttons(TUNER) REWIND / FAST FORWARD buttons(TAPE) SEARCH buttons(CD/VCD) / TEMPO +/buttons(KARAOKE) PRESET DOWN/UP (TUNER) (CLOCK/TIMER) (CD) ? ADJUST DOWN/UP ? SKIP DOWN/UP ? PREVIOUS / NEXT, KEY CONTROL (VCD,KARAOKE) 20. TAPE DECK 2 EJECT POSITION 2. RECORD / RECORD PAUSE buttons 3. TIMER button 4. CLOCK button 5. REMOTE SENSOR 6. MDSS indicator 7. MDSS button 8. POWER button 23.
FUNCTION DISPLAY 3. 4. LEVEL indicator FUNCTION, VOLUME LEVEL, CLOCK, FREQUENCY, TAPE COUNTER, CD PLAYING TIME display MUTE indicator PLAY MODE indicator 5. 6. 7. 8. 9. TAPE DIRECTION indicator UBB indicator ECHO indicator CD MUSIC CALENDAR OVER indicator FM STEREO indicator 1. 2. (Use only auto reverse FM MONO indicator VOLUME indicator RDS function indicator (OPTIONAL) TIMER indicator DISC NO.
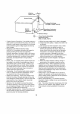
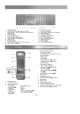
REMOTE CONTROL Control Range The remote control device is designed for the range shown in the illustration. NOTE Strong light Approx.7m or obstacles between the remote control device and the stereo system may interfere with the of the remote control. functioning Notes on Batteries Your remote control Use two comes "AAA(UM-4. IEC with batteries. R03)" type high quality batteries. Open rear cover.
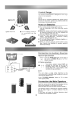
SYSTEM CONNECTIONS Antenna(aerial) Connection For the models for other countries For the European and U.K. model IMPORTANT figure (1), (3). figure (2), (4).
BEFORE OPERATING Volume MUTE Adjustment Turn VOLUME clockwise to increase the sound level, or counterclockwise to decrease it. If you turn the volume up more answer than the maximum (Or press VOLUME commander.) Sound MDSS + or button the remote on Quality Adjustment Sound (UBB Ultra : System) Bass Booster), the (Hiand to telephone. on the display. remote control) display. MODE/RIF surround effect. (Radio Interference Filter) button The MDSS indicator lights up.
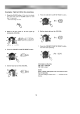
CLOCK SETTING Example 1. : Set to 9:25 in the Press the CLOCK button. (If morning the clock is already set, press and hold the CLOCK button for than 1.5 seconds) - 2. The hours Select turning (24HR) a begin 5. Press the CDII/SET/COUNTER RESET button. 6. Set the minute more to blink. 24 hour cycle or 12 hour cycle by by turn the JOG DIAL. the JOG DIAL. or (12HR) 7. Press the CDII/SET/COUNTER RESET button. The clock starts 3. Press the CDII/SET/COUNTER RESET button. 4.
RADIO RECEPTION Tuning in 1. Turn the power. 2. on 4. To recall Automatically Press TUNER/BAND button repeatedly until the desired until the Keep TUNING depressed for tunes in DOWN/UP more station a in 1. Turn the power. 2. on than ( You button ) or 0.5 second. The briefly and can also recall What is RDS? RDS repeatedly until the Data (Radio introduced on DOWN/UP repeatedly, until ( or the desired )button normal station information Stations 1.
BEFORE CD PLAYING Type of discs and contents Note: This ?CD: equipment has been designed to discs play bearing the identification logo as shown below. compact disc recorded only with digital audio signals. compact disc recorded with compressed digital audio and video signals. ?VIDEO CD: Disc Disc Size Type Recording Recorded Contents Time in this unit.
PLAYING A VIDEO CD Basic You can Operation play To both VIDEO CDs without PBC (Ver.1.1) (Ver.2.0). Find functions and those with PBC functions Before you begin, make sure you've connected the system to 1. Turn on a TV correctly and Select input so in point a a track or scene*2 firmly. the TV and select the video Do this that CD in you can view the pictures from this system. 2. Press POWER button to turn on the system. 3. Changing into VCD mode.
PLAYING A VIDEO CD To Do this Stop play Press See the next of Go back to the Press NEXT. a menu top of Press RETURN. a the remote (on menu Go back to control). Press PREV. previous a /CLEAR. menu RETURN function (only for VIDEO CD version Returns to the If there is 2.0) MENU. preceding preceding menu (in no case of the first menu), this function may not be executed. PLAYING A AUDIO CD / VIDEO CD Normal Play You play can also Do not disc on the disc 3.
PLAYING AN AUDIO CD / VIDEO CD Skipping to the of Beginning ? a time can To return locate the previous to the beginning of beginning absolute as beginning of the disc). After time search is completed, it will be indicated as relative time(time from the beginning of the track). Track You The time entered will be considered any track on a disc. of the current or from the (time track. NOTES: Turn the JOG DIAL counter clockwise to the beginning ? to return of the current track.
PLAYING AN AUDIO CD/VIDEO CD 4. Press the MEMORY / PROGRAM button. Repeat Play with (Operating To play one track the remote only Repeat steps 1 to 4. PLAY( ) 6. Press the button to start PLAY( ) display "REPEAT play. To check the 1" and Each button to start time contents programmed the in the pressed MEMORY / stop mode, PROGRAM a play. To play all tracks on all discs repeatedly.
OTHER FUNCTIONS OF VIDEO CD Return Function with Ver. 2.0 VCD Returns to the ? If there is case RETURN preceding preceding menu), this no MENU. menu of the fist Remain Time REMAIN (Remote Controller Only) 1. If pressed the remaining displayed. the (in function REMAIN button once, time of the track is may not be executed. PBC(Play Back Control) Function with Ver. 2.0 VCD When this function is used for playback by which has the function of PBC driven operation 1.
KARAOKE IN VCD FUNCTION Connect the microphone while playing Video CD and you house. You can connect 2 microphones at the same time. Precution: Turn the volume of each 1 Insert to page enjoy the karaoke at your own to the lowest. 2 Check if the system is connected. (refer 2 equipment can Turn on the powers of TV, Amplifier, and this equipment.
PLAYING AN LG KARAOKE CD Main functions could be operated in disc for only LG exclusive use. Connect the microphone while playing KARAOKE CD disc and you at your own house. You can connect 2 microphones at the same time. ? Precation: Turn the volume of each 1 Check if the system is connected. (refer 3 Insert to page Insert when on the powers of TV, Amplifier, and this equipment. only MIC 2 Jack one microphone Insert when two are used microphones ON/OFF If there is a the turn it off.
PLAYING A LG KARAOKE CD Key Control (During Use it to control the ? a musical melody choosing key when you performance) sing. b ? Each time "Lower ? Each time # (b)" button is pressed, a half of key will be lowered in 6 steps (screen indicates Low 6). "Higher (#)" button is pressed, a half of key will be raised in 6 steps (screen indicates High 6).
PLAYING A LG KARAOKE CD Echo Volume Control Press the ECHO button to The same adjust the strength of echo. applied to microphones connected echo level is ECHO Press the ECHO button ECHO-2 or ECHO-3 appears. Press the button the desired letters appear. repeatedly, ECHO-1 Reservating to the MIC 1 and MIC 2 MIC VOL that so jacks. ? Turn clockwise ? Turn counterclockwise : Up : Down Function When you want to make Without waiting.
MENU SELECTION PLAY Preparation: If you press the MENU button, display the main menu screen. Selection of Melody Press your wanted NUMERIC button ex) No. 123 If you cancel the selected melody press the CANCEL button. In condition of POWER ON, scoring fanfare operate. When singing by comes out after In the condition If not appears then the selection of melody, song of piece song is ended. of first POWER-ON, the score In the one wanting of score, expressed mark is score press No.
MENU SELECTION PLAY Challenging For movement of Karaoke challenging karaoke melody, First Second Challenge (70 Points) Challenge (75 Points) Melody performance PLS select. Challenge will be Third Challenge (80 Points) going up to three times. Over corresponding score, challenge is possible. Under corresponding score, no challenge is possible. random Melody played is randomly (K-CD 3.
MENU SELECTION PLAY Melody Karaoke Serial melody performance Please, select for playing melody successfully.
MENU SELECTION PLAY Hot Sing Room Game Hot sing room game Hot sing room It has a function which enjoy deviding by two teams of blue & red. - a game Selection of Winner's number selection Press the number (1~9) winner's success score Press your wanted ideal NUMERIC button. Number selection PLAY (1~20) Randomly slelected melody is played or good or the chance no is made. Ideal No. selection by a 1. When 2. If "The chance in going to over next team" ( ) comes out To next team.
MENU SELECTION PLAY Masterpiece Impression Masterpiece impression Select when masterpiece as you want to kinds you like. impress the Selection per melo Choose melody a NO. yed Selection of music When p button o melody ected ed in (K-CD i Make sure to her composer V/NEXTbutton. re If can be different, for electronic musical inst Note: Press your wanted NUMERIC button. RETURN is played cted which elf.
AUXILIARY FUNCTION 1. Switch the on auxiliary connected to the rear device i.e. TV mounted AUX NOTE: VCR, or (PHONO) sockets. You can see RECORDING section. also record from the auxiliary input source, 2. Press the "AUX" function button. TAPE PLAYBACK Playback Preparation You All side only can use normal Unit : tapes. and 1. To set the cassette function: Switch the unit (If on and press the TAPE 1/2 button. again Endless 2nd In (or 2) of both by pushing the EJECTposition.
RECORDING CD, Radio Connected Equipment Recording from a CD or CD and Preparation Wind the on Use only You can Synchro Recording The CD tape normal to the tapes. record from cassette deck 2 1. To select the function Switch the unit cassette. starts. point recording on synchro recording function dubs a complete programmed titles automatically into a 1. Select the CD function. only. 2.
RECORDING from Recording (Dubbing) Tape to Tape 3. To Preparation Wind the on tape to the point recording only normal tapes. Dubbing only functions from cassette deck (playback) to cassette deck 2 (recording) dub(auto dubbing): Rewind both cassettes to the starts. of the tape. Use Press NORMAL DUBBING for normal and HIGH 1 DUBBING for double The 1. Select the TAPE function. NOTES speed dubbing. automatically. starts up dubbing : The pause function does not 2.
TIMER (8) the time to switch off in the Program 3. The timer-off function will be (9) way as the time to turn on. Set the volume level by pressing PRESET (10) Press the CDII/SET/COUNTER RESET same DOWN UP or (or turning the JOG case Sleep DIAL). Timer (Operating button to confirm the selected volume with by operated only the timer in the on. Setting the remote only control) When the sleep timer is used, the power is automatically turned off after the specified time has level.
TROUBLE SHOOTING GUIDE Should faults occur, check the corresponding CHECK ITEM and CORRECTIVE ACTION columns remedy the problem. If the fault cannot be remedied after the check, please consult to locate and nearest service agent customer information center. or SYMPTOM CHECK ITEM No power when the POWER button is set to ? Is power plug Is power supply CORRECTIVE ACTION connected properly? ? Insert the power plug firmly into the outlet. ON.
SPECIFICATIONS ? AMP Output Power............................................................................50W+50W (6Ω 2ch, T.H.D 10%) Frequency Response ..............................................................................................42~25,000 Hz Signal-to-Noise Ratio............................................................................................................80 dB ? , ? ? ? TUNER FM Tuning Range(optional)......................................87.