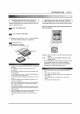
FFH-376/576/377/577/379/579MVA(ENG) Mini Hi-Fi Audio System OWNER'S MANUAL MODEL : FFH-376MVA / FE-376VE FFH-377MVA / FE-377VE FFH-379MVA / FE-379VE FFH-576MVA / FE-576VE FFH-577MVA / FE-577VE FFH-579MVA / FE-579VE VIDEO CD Please read this manual carefully Retain it for future reference. before operating your set.
PAGE 2 INTRODUCTION CAUTION Use of controls than those or adjustments or performance of procedures other specified herein may result in hazardous radiation exposure. RISK OF ELECTRIC SHOCK DO NOT OPEN Laser component in this product is capable of emitting radiation exceeding the limit for Class 1. CAUTION:TO REDUCE THE RISK OF ELECTRIC SHOCK DO NOT REMOVE COVER(OR BACK) NO USER SERVICEABLE PARTS INSIDE. REFER SERVICING TO QUALIFIED SERVICE PERSONNEL.
INTRODUCTION PAGE 3 Introduction CD/VCD Precautions.............................2 BasicPlayback.......................18-19 TableofContents.........................3 NotesonDiscs..........................4 ToStopPlay..........................18 ToPausePlay.........................18 IdentificationofControls..................5-8 ToGotothenextdiscs...................18 FrontPanel...............................5 ToSelectadiscdirectly..................18 RemoteControl............................
PAGE 4 Notes INTRODUCTION on Discs This section shows you how to On handle, clean, and store discs. On Discs Handling Do not touch the playback side of the disc. Storing Discs Do not store discs in direct sunlight place subject a or near Do not store discs in heat places subject moisture and dust such near a to sources. as a to bathroom or humidifier. Store discs vertically in a case. Stacking placing objects on discs outside of their case may cause may damage the discs.
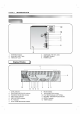
INTRODUCTION Identification of Controls PAGE 5 (Cont'd) Front Panel 33 32 31 1 30 2 29 3 28 27 4 26 56 78 25 910 22 24 23 11 21 12 13 20 19 14 18 15 16 17 1. PRESET DOWN button BACKWARD PLAY button 17. VOLUME KNOB ( ) : OPTIONAL 18. STOP button 2. 3. MENU 4. REMOTE SENSOR 5. POWER button (+) button ( 6. TIMER 7. CLOCK button ? button 9. 10. (-) ? button ( ) RESET(TAPE) button (COUNTER): PLAY MODE button : ? 13. ? ? 14.
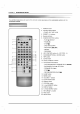
PAGE 6 INTRODUCTION Identification of Controls (cont'd) You will find instructions for each of the remote control functions in the appropriate sections of this instruction manual. Remote Control 1. POWER button 2. Function select buttons 3. PRESET 4. Numeric buttons 5. VCD/CD CONTROL buttons (TUNER, CD, TAPE, AUX) 1 2 TUNER CD 23 MUTE POWER TAPE - AUX - PRESET - 3 - 12345 - 4 (-/+) PLAY( )/SELECT PAUSE( STOP( DISC buttons ) ) SKIP(D.
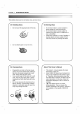
INTRODUCTION Identification of Controls (cont'd) the Remote Control Preparing Insert the batteries into the remote control use it to PAGE 7 so you Operating can with the Remote Control This section shows you how to use the remote control. operate the unit. Point the remote control at the remote Open 1 the battery Insert batteries 2 Make the marks inside the Close the 3 and (AAA size). to match the sure sensor press the buttons. cover.
PAGE 8 INTRODUCTION Identification of Controls Rear Panel AM FM 1 AM FM 432 RL L R L+ - 5 - R+ 6 LINE OUT Jacks 1. ANTENNA Terminal 4. AUDIO(CD) 2. AUXILIARY INPUT Jack 5. SPEAKER Terminal 3. VIDEO OUT Jack 6. POWER Cord Display Window 1 2 9 11 13 12 10 7 8 5 4 3 6 1. LEVEL indicator 8. MUTE indicator 2. FM STEREO RECEIVING indicator 9. TAPE DIRECTION indicator 3. FM MONO RECEIVING indicator 10. PLAY MODE indicator 4. DISC Number indicator 11. 5.
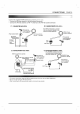
CONNECTIONS PAGE 9 Antenna(Aerial) Connections Connect the supplied FM/AM antennas for listening to the radio. loop antenna to the AM antenna connector. Connect the FM wire antenna (or FM "T" antenna) to the FM 75Ω Connect the AM ? ? (1) 2 BAND(FM/AM) (2) 3 BAND(FM/MW/LW) AREA AREA For MW/LW reception, connect the loop antenna (aerial) to the FM external antenna(aerial) (not supplied) 75 coaxial connector. terminal marked MW/LW coaxial cable MW/LW antenna AM loop antenna (aerial)...
PAGE 10 CONNECTIONS Speaker System Connect to speaker Connection connector the cords. To obtain the best possible supplied speaker cords by matching the colors of the terminals and those adjust the speaker parameters (distance, level, etc.). of the surround sound, + - + Left speaker Right speaker Notes Be sure to match the speaker cord to the appropriate terminal on the components: + to + and -- to --.
BEFORE OPERATION Setting the Clock You must set the time for the Sleep and Timer function. 1 Press CLOCK. SET CLOCK 2 (If the clock is and hold CLOCK for - The hours begin more 3 4 JOG DIAL (OPTIONAL) 5 6 7 PRESET DOWN/UP 8 When the already set, seconds.) press than 2 to flash. a 24 hour cycle or 12 hour cycle by pressing PRESET DOWN/UP (or turning JOG DIAL: OPTIONAL). Select (12HR) Sleep PAGE 11 (24HR) or Press SET to confirm the selected hour cycle.
PAGE 12 BEFORE OPERATION Timer Function With the TIMER function you can have the radio reception and recording, CD play, tape play or auxiliary source and play recording turned on Set the hour to switch 6 DOWN/UP (or turning by pressing PRESET OPTIONAL). on JOG DIAL: and off at the time desired. Press SET to confirm the hour to switch 7 The minute with ON display on. flashes. TIMER 8 CLOCK by pressing PREOPTIONAL).
BEFORE OPERATION Audio PAGE 13 Adjustment POWER TUNER MUTE MUTE CD TAPE AUX PRESET 12345 67890 MDSS VOLUME SELECT PAUSE PREV NEXT STOP D.SKIP PBC REPEAT PROGRAM RETURN KNOB b-KEY CON-# L.MEMORY T.SEARCH DISPLAY HEADPHONE FANFARE / MPX jack TAPE 1 ECHO DIGEST NTSC/PAL SCORE CD/ TAPE 2 KARAOKE TAPE EQ. PATT SLEEP EQ.PATT MDSS VOLUME +/- VOLUME MDSS Volume MUTE Adjustment ?Turn VOLUME KNOB clockwise to increase the sound level, ? counterclockwise to decrease it.
PAGE 14 RADIO OPERATION Presetting You can the radio stations preset 30 stations for FM and AM. Before sure that you have turned down the volume to the minimum. tuning, make MUTE POWER TUNER CD TAPE AUX TUNER PRESET PRESET(-/+) 12345 67890 PRESET DOWN / UP SELECT PAUSE PREV NEXT b-KEY CON-# PROG./MEMO. MPX TAPE 1 NEXT( PREV( TUNER/ BAND ECHO STOP D.SKIP PBC REPEAT PROGRAM RETURN L.MEMORY T.
RADIO OPERATION PAGE 15 to the radio Listening Preset radio stations in the units memory first (see radio stations" on the previous page). "Presetting MUTE POWER TUNER CD TAPE AUX TUNER PRESET PRESET (-/+) 12345 67890 PRESET POWER DOWN/UP SELECT PAUSE PREV NEXT b-KEY CON-# MPX NEXT( PREV( MODE/ ) ) TAPE 1 ECHO STOP D.SKIP PBC REPEAT PROGRAM RETURN L.MEMORY T.SEARCH DISPLAY FANFARE / SCORE DIGEST NTSC/PAL CD/ TAPE 2 KARAOKE TAPE RIF SLEEP EQ.
PAGE 16 CASSETTE DECK OPERATION Tape Play You only can use normal tape. POWER TUNER MUTE CD TAPE TAPE AUX PRESET 12345 67890 PLAY / SELECT PAUSE PREV NEXT b-KEY CON-# MPX TAPE 1 / PLAY MODE ECHO STOP D.SKIP PBC REPEAT PROGRAM RETURN L.MEMORY T.SEARCH DISPLAY FANFARE / SCORE DIGEST NTSC/PAL CD/ TAPE 2 KARAOKE / TAPE NOR/HI SLEEP STOP( DUBBING STOP( EQ.PATT ) MDSS ) VOLUME Deck 2 Deck 1 TAPE 1/2 Press TAPE 1/2 1 (or TAPE on the remote To control).
CASSETTE DECK OPERATION PAGE 17 Recording Wind up the tape to the Use only normal tapes. You can point recording record from cassette deck 2 starts. MUTE POWER only. TUNER CD TAPE AUX PRESET 12345 67890 PLAY( ) SELECT PAUSE PREV NEXT STOP D.SKIP PBC REPEAT PROGRAM RETURN / b-KEY CON-# MPX PLAY MODE TAPE 1 ECHO L.MEMORY T.SEARCH DISPLAY FANFARE / SCORE DIGEST NTSC/PAL CD/ TAPE 2 KARAOKE (OPTIONAL) / PLAY( ) TAPE CD SYNC. SLEEP EQ.
PAGE 18 Basic CD/VCD OPERATIONS Playback(Cont'd) Preparation In case Turn can In on case on of using TV TUNER pictures using an amplifier amplifier and select can input so that you CD CD MUTE TAPE AUX PRESET from this unit. the that you POWER POWER a the TV and select the video view the Turn so of 12345 67890 the CD player position PLAY( listen to the sound from this unit. ) SELECT PAUSE PAUSE NEXT PREV / b KEY CON-# STOP REPEAT D.SKIP PROGRAM D.
ADVANCED OPERATION Basic PAGE 19 Playback To Replace You TUNER discs during Playback MUTE POWER CD TAPE can open the disc tray check what discs are to be AUX PRESET discs without during playing a disc to played next and replace interrupting playback of the current disc. 12345 NUMERIC 67890 buttons SELECT PAUSE PREV NEXT L. MEMORY b-KEY CON-# MPX TAPE 1 ECHO STOP D.SKIP STOP( REPEAT PROGRAM RETURN L.MEMORY T.SEARCH Press the CD OPEN/CLOSE 1 ) n't T.
PAGE 20 ADVANCED OPERATION Multiplex Function You POWER CD TUNER TAPE select the sound from the can right or left channel and listen to the sound of the selected channel MUTE both the AUX right and left speakers. through In this case, the sound loses the stereo effect. PRESET 12345 NUMERIC Press MPX 67890 buttons SELECT PAUSE PREV NEXT b-KEY CON-# STOP REPEAT D.SKIP PROGRAM RETURN L.MEMORY T.
ADVANCED OPERATION PAGE 21 Digest play Disc Track You TUNER CD TAPE can PLAY() PAUSE PREV NEXT STOP )/ ) MPX D.SKIP L.MEMORY T.SEARCH STOP( DISPLAY ) RETURN( a the and TV pictures of each section in TAPE order. VOLUME Press playing VIDEO CD with PBC functions Also refer to the instructions supplied (Version 2.0 9 4 7 6 5 NEXT( ) Press NUMERIC buttons to select the point point. playing STOP( from the selected play ). discs), into the disc tray.
PAGE 22 ADVANCED OPERATION Repeat Play NOTE: The repeat play does not work in PBC ON sta- tus of the VIDEO CD with PBC function(Version 2.0). To play " -" To MUTE POWER TUNER CD TAPE one Press REPEAT AUX play one PRESET " -" 12345 67890 buttons SELECT PAUSE PREV NEXT PLAY() L bKEYCON# REPEAT MPX ECHO TAPE 1 STOP D.SKIP REPEAT PROGRAM MEMORY T.SEARCH To PBC RETURN DISPLAY D.SKIP PROGRAM FANFARE / SCORE DIGEST NTSC/PAL play - display in the window.
ADVANCED OPERATION Playback PAGE 23 with MP3 Press PREV/NEXT( / ) to select the desired MP3 file of the selected directory 3 MUTE POWER TUNER CD TAPE on the disc. AUX PRESET PAUSE( STOP( ) ) MP3 FILE 12345 TRACK_1 : PAGE 01/ 02 SELECT/ 67890 PLAY() SELECT PAUSE STOP D.SKIP RETURN( PREV NEXT (/) MPX ECHO TAPE 1 ) REPEAT PROGRAM RETURN PREV/NEXT b-KEY CON-# MUSIC_1 MUSIC_3 MUSIC_5 MUSIC_4 MUSIC_5 PBC L.MEMORY T.
PAGE 24 ADVANCED OPERATION Karaoke You can You can play KARAOKE(singing along) with CD by connecting a microphone to the unit. enjoy KARAOKE with a stereo-recorded disc, even if it is a non-karaoke disc, by reducing the singer's voice. Notes POWER POWER TUNER Comes out the Fanfare MUTE CD TAPE If the track PRESET 12345 will 67890 SELECT PAUSE STOP D.SKIP NEXT b-KEY CON-# KEY MPX TAPE 1 ECHO SCORE back of each track.
REFERENCE Select Function System You ? ? ? enjoy NTSC can PAL discs or PAGE 25 (NTSC/PAL) the NTSC/PAL button to choose the by using appropriate system. If you try to play back PAL disc with NTSC-TV. The unit will not play back the disc. When the system of your unit does not coincide with the system of your TV, normal color When you play L.MEMORY T.
PAGE 26 REFERENCE Symptoms Check the following guide for the possible a problem before contacting service. Cause Symptom No power. No of cause and Correction ? picture. ? Correction The power cord is disconnected. ? The TV is not set to receive VCD signal ? output. the power cord into the wall outlet Plug securely. Select the the TV on on appears ?T he video cable is not connected ? securely. There is no sound or very low-level sound is heard.
REFERENCE MODEL SECTION Power [Genral] [VCD/ ] Power AM FFH-576MVA FFH-377MVA FFH-577MVA FFH-379MVA FFH-579MVA Mass External dimensions (W x H x D) (MW) [Amp] [TAPE] 273 40 Frequency response Signal-to-noise ratio Dynamic range FM [Tuner] FFH-376MVA Refer to the back supply consumption - x 330 x panel of the unit. 80W 100W 6.7kg 7.3kg 360 mm 18,000 Hz More than 70 dB (1 kHz) More than 70 dB Video output 1.