AP_FFH-786(Eng)-A052T MINI COMPO System OWNER'S MANUAL MODEL : FFH-786A FE-786E Please read this manual carefully before operating your set. Retain it for future reference. Designs and notice for specifications improvement.
Precautions CAUTION CAUTION Use of controls or adjustments or performance specified herein may cedures other than those RISK OF ELECTRIC in hazardous radiation of proresult exposure. SHOCK DO NOT OPEN Laser CAUTION:TO REDUCE THE RISK OF ELECTRIC SHOCK DO NOT REMOVE ting component in this product is capable of emit- radiation exceeding the limit for Class 1. COVER(OR BACK) NO USER SERVICEABLE PARTS INSIDE. REFER SERVICING TO QUALIFIED SERVICE PERSONNEL.
Table of Contents INTRODUCTION OPERATION Precautions...............................2 Presettingtheradiostations.................11 TableofContents..........................3 Listeningtotheradio......................12 BeforeUse................................4 TapePlayback............................13 BasicPlayback..........................13 ToStopPlay...........................13 TapeCounterReset......................13 .13 ToPlayFastRewindorFastForward. Dubbing...............................
Before Use shipping ture the unit The original shipping carton and packing materials come in handy. For maximum protection, re-pack the unit as it was originally packed at the factory. To near use volatile liquids, such as the unit. Do not leave rubber contact with the unit for leave marks Cleaning a insecticide spray, or long period plastic products in of time. They will the surface. on a Notes soft, dry cloth. If the surfaces soft cloth use a solution.
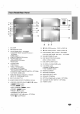
Front Panel/Rear Panel AM 2019 12 34 18 56 21 FM 1615 78 910 FM AM 17 22 RL 14 11 13 12 L+ - 23 - R+ 262524 1. CD DOOR 2. FM MODE/RIF button 3. ? ? PLAY MODE button COUNTER RESET : 12. PUSH OPEN position 13. PUSH OPEN position OPTIONAL (COUNTER) button 14. : OPTIONAL ? DEMO button 4. POWER 5. ? 6. 16. SURROUND button ? EQUALIZER ? XDSS button ? CLOCK button ? TIMER button TAPE B (DECK B) 6.
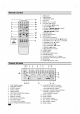
Remote Control 1. 1 17 16 X 2345 XDSS button 2. POWER button 3. TUNER/BAND button 4. AUX button 5. PRESET 6. CD FUNCTION buttons 15 ) PLAY/ PAUSE ( CD button ? REWIND/ FAST FORWARD STOP( ?CDSKIP( 13 6 ( 12 78 ? 11 10 A A ) button ) button ) / REPEAT button DISPLAY MODE button 8. CLOCK button 9.
Connections Connection Speaker System Connect the speakers using the supplied speaker cords by matching the colors of the terminals and those possible surround sound, adjust the speaker parameters (distance, level, etc.). of the cords. To obtain the best RL Red INTRODUC L+ - Black - R+ Right speaker Left speaker to and Red Notes ? Be to match the sure are speaker cord to the appropriate terminal on the components: + + -- to --.
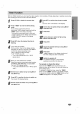
the Setting Voltage (OPTIONAL) If your set is equipped with a voltage selector at the back the AC power cord. side, be to set it to your local power sure supplied before connecting the CLOCK Setting 1 Press CLOCK. (If CLOCK for - 2 the clock is The hours Select 24 hour a turning requires setting, press more than 2 seconds.) begin to blink. cycle When the To Use MULTI JOG SHUTTLE to set the correct 5 Press SET. cycle by hours.
Timer Function With the TIMER function you can have the radio reception and and recording turned on and off at the time desired. 1 Press CLOCK to check the current time. CD recording, play, tape play 2 you want to correct the previous memorized TIMER setting, press and hold the (If "TIMER" button The previous more than 2 seconds.) memorized timer on time and "TIMER" appears in the display.
Audio Adjustment Volume ? the sound ? level, level, decrease it Sound or on ( press the VOLUME CONTROL the remote control. ( - You to ) can button (EQ desired sound mode on the front by using panel). impressions. the EQ PATT. ROCK → POP → changes as VOCAL → ↑ SALSA ← Headphone Connect JAZZ ← CLASSIC ← Jack headphone plug ( 6.3mm) into the headphone jack. The speakers are automatically disconnected when you plug in the headphones (not supplied).
Presetting You preset can the radio stations 30 stations for FM and AM. Before tuning, make sure that you have turned down the volume to the minimum. / PRESET( ) X TUNER/ OPERATION BAND PRESET ( ) PROG./MEMO TUNER/ MULTI JOG BAND SHUTTLE STOP CLEAR )/ / TUNING 1 ( Press POWER to turn on To tune in the unit. station 2 a station with Tu r n MULTI JOG SHUTTLE in Press TUNER/BAND until the FM in the or AM appears display window.
Listening to the radio Preset radio stations in the units memory first / PRESET( (see "Presetting radio stations" on the previous page). ) X TUNER/ BAND PRESET FM MODE/RIF ( VOLUME () ) POWER VOLUME DOWN/ TUNER/ UP KNOB BAND / TUNING 1 2 Press TUNER/BAND until AM the display or FM appears in function mode The last received station is tuned in.
Tape Playback / PLAY( ) X NOR./ HIGH DUBBING TAPE / PLAY( / ) STOP( TAPE-A/B STOP ( )/ CLEAR / Basic 1 To Playback Press TAPE repeatedly or TAPE-A/B to select TAPE Stop Play Press STOP( ) during playback. AorTAPEB. TAPE" appears in the ("NO Tape Counter display window.) Reset Press COUNTER cassette TAPE A 2 Open 3 Insert PUSH OPEN Playing (or B) by pushing position. 4 two cassette with the Press PLAY ( or : to (or B). OPTIONAL).
Recording Wind the tape Use normal You only can to the point recording starts. tapes. record from cassette deck B PRESET ( / only. )/PLAY ( ) X TUNER/ BAND CD SYNC. / PLAY( CD, TUNER/ ) BAND TAPE STOP( STOP ( )/ ) CLEAR REC / Basic 1 Setting Press CD or TUNER/BAND.
CD Playback X PLAY/ PAUSE CD OPEN/ CLOSE( DISC / ) OPERATION D.SKIP POWER PLAY( () ) 1,2,3 STOP( CD PAUSE STOP ( )/ (CD ) D.SKIP ) CLEAR / Basic To Pause Playback Press POWER to turn 1 on the unit. (CD ) or PLAY/ PAUSE ( during playback. Press the CD button to enter the CD mode. To If Press no disc is entered in the disc DISC" indicator is Press CD 3 drawer, the "NO displayed.
CD Playback (Cont'd) X CD OPEN/CLOSE( ) REPEAT To Replace You can discs during Playback open the disc tray check what discs are to be discs without 1 during playing a disc to played next and replace interrupting playback of the current disc. Press the CD OPEN/CLOSE (CD ). To Repeat Play To play - "REPEAT 1" To The disc tray is opened. Two disc compartments appear. Even if the unit is playing a disc, it doesn't stop playing. 2 discs in the compartments with ones.
CD Playback X PLAY/ PAUSE () PROGRAM PROG./MEMO CD STOP () PLAY( / ) STOP ( )CLEAR / To Program Play You can To check program contents arrange the order of the tracks own program. The program create your the discs and on can contain up Press - to 20 tracks. PROG./MEMO control) The on the PROGRAM (or on the remote stop mode. disc, track and program number will be displayed. To clear program contents 1 Press PROG.
Troubleshooting Check the following guide for the possible cause of a problem before Cause Symptom Correction No power. ? The power cord is disconnected. ? No sound. ? The audio cables ? are not connected securely. ? ? The power of the external ment is switched off. The playback. Plug the power securely. cord into the wall outlet Connect the audio cable into the jacks securely. Digital Audio to the wrong The unit does not start service. contacting Output position.
Specifications Power [Genral] Power consumption 120W (MW) [Amp] [TAPE] Designs of the unit. H 273 x Frequency response Signal-to-noise ratio Dynamic range Tuning Range Intermediate Frequency Signal to Noise Ratio 40 18000 Hz Frequency Response 60 Tuning Range Intermediate Frequency Signal to Noise Ratio Frequency Response Output Power 522-1611kHzor530-1610kHz 100W T.H.D 0.15% Frequency Response Signal-to-noise ratio Tape Speed 42 Wow Flutter 0.25% F.
P/NO :3828R-A052T