INSTALLATION CONTENTS ................................................. FEATURE CHART OPERATIONS ............................................ ................................................... ADVICE ON FOOD STORAGE CARE AND CLEANING LAMP ......................... .................................... REPLACEMENT(Option) IMPORTANT WARNINGS ...................... ................................. REPOSITIONING THE DOOR HINGE BEFORE CALLING FOR SERVICE 2 .............. ...............
THIS REFRIGERATOR IS MANUFACTURED WITH GREAT CARE, AND UTILIZES THE LATEST IN TECHNOLOGY. WE ARE CONFIDENT THAT YOU WILL BE FULLY SATISFIED WITH IT'S PERFORMANCE AND RELIABILITY. BEFORE YOU START YOUR REFRIGERATOR, PLEASE READ THIS BOOKLET CAREFULLY. IT PROVIDES EXACT INSTRUCTIONS FOR INSTALLATION, OPERATION AND MAINTENANCE, AND ALSO SUPPLIES SOME USEFUL HINTS. INSTALLATION 1. Place your 2. Avoid refrigerator placing at a convenient location.
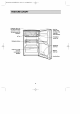
FEATURE CHART Evaporator: Never use sharp instruments Drip Tray: any to remove This may ice or Collects water frost. that puncture the evaporator. Ice drips off the evaporator when Tray defrosting. Temperature control Dial. Refrigerator shelves Refrigerator Door Rack Crisper or P.V.C Bar (Optional): For fruits and Magnetic Door Seal v egetables.
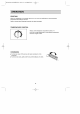
OPERATION STARTING When your refrigerator is first installed, leave it for temperature before filling it with food. Delay 5 minutes before restarting if operation 2 or 3 hours for stabilization to normal has been operating interrupted. TEMPERATURE CONTROL 4 3 Initially, 5 set the refrigerator compartment 2 6 1 7 0 ICE MAKING To make ice cubes, fill the ice tray with water and place it on the evaporator. To control at '4'.
OPERATION DEFROSTING It is necessary to As soon as start the To regularly the thickness of ice/frost refrigerator on in order to the surface of the ensure evaporator reaches operation. a quarter of an inch(6mm), turn the control to "0". Before you start the defrosting operation, food from the remove evaporator and place the drip tray in its position. When defrosting is completed, remove the drip tray, empty water, dry position. Turn the control dial to desired position.
CARE AND CLEANING CLEANING To clean the water, - INSIDE inside, or some mild use a soft cloth dampered with solution of a tablespoon This solution both cleans and neutralizes odors. Rinse with water and Follow the CLEANING Use a a procedure same - of baking soda to a quarter of detergent. to clean the interior wipe dry. parts. OUTSIDE lukewarm solution of mild soap or detergent to clean the durable finish of your refrigerator. Wipe with clean, dampered cloth, then dry.
LAMP 1. Unplug REPLACEMENT(OPTION) the power cord from the outlet. 2. Remove refrigerator shelves. 3. Remove the figure at lamp by turning right. 4. Assemble in be the same reverse order of specification as it counterclockwise as shown in the disassembly. Replacement original.
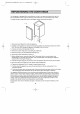
REPOSITIONING THE DOOR HINGE Your refrigerator is designed with a reversible door so that is may open from either left or right. It is reposition the door hinge as necessary at the outset since it is inconvenient to do so later. best to To change the door hinge please refer to the below and diagram proceed as follows:--- F G H CE D A B 1. Remove all loose 2. fittings appliance. Carefully lay the appliance on its back on the original packing (You will need this).
BEFORE CALLING FOR SERVICE IT IS OFTEN POSSIBLE TO AVOID A SERVICE CALL. BEFORE CALLING FOR Has a house fuse blown Has the power cord Is the Is the In or a plug appliance placed refrigerator case kept circuit breaker been removed temperature control Has the door been Is the SERVICE, MAKE THE FOLLOWING CHECKS. set to a proper too close to open installed of odor.