OWNER'S MANUAL FRIDGE & FREEZER Before beginning installation, read these instructions carefully. This will simplify installation and ensure that the product is installed correctly and safely. Leave these instructions near the product after installation for future reference. EN ENGLISH GF-B725MBL GF-B725PL GF-B730MBL GF-B730PL MFL71667901 Rev.03_020421 www.lg.com Copyright © 2020-2021 LG Electronics Inc. All Rights Reserved.
TABLE OF CONTENTS This manual may contain images or content that may be different from the model you purchased. This manual is subject to revision by the manufacturer. SAFETY INSTRUCTIONS ................................. 4 READ ALL INSTRUCTIONS BEFORE USE............................4 WARNING.............................................................................4 CAUTION ..............................................................................9 INSTALLATION ...................................
TROUBLESHOOTING .................................... 36 Before Calling for Service ................................................
EN 4 SAFETY INSTRUCTIONS SAFETY INSTRUCTIONS READ ALL INSTRUCTIONS BEFORE USE The following safety guidelines are intended to prevent unforeseen risks or damage from unsafe or incorrect operation of the appliance. The guidelines are separated into ‘WARNING’ and ‘CAUTION’ as described below. Safety Messages This symbol is displayed to indicate matters and operations that can cause risk. Read the part with this symbol carefully and follow the instructions in order to avoid risk.
SAFETY INSTRUCTIONS • • • • • • • • 5 EN responsible for their safety. Children should be supervised to ensure that they do not play with the appliance. If the power cord is damaged or the hole of the outlet socket is loose, do not use the power cord and contact an authorized service centre. Do not damage the refrigerant circuit. Do not use mechanical devices or other means to accelerate the defrosting process.
EN 6 SAFETY INSTRUCTIONS • Never unplug the appliance by pulling on the power cable. Always grip the power plug firmly and pull straight out from the outlet socket. • Do not spray water or inflammable substances (toothpaste, alcohol, thinner, benzene, flammable liquid, abrasive, etc.) over the interior or exterior of the appliance to clean it. • Do not clean the appliance with brushes, cloths or sponges with rough surfaces or which are made of metallic material.
SAFETY INSTRUCTIONS 7 EN • Install the appliance on a firm and level floor. • Do not install the appliance in a damp and dusty place. Do not install or store the appliance in any outdoor area, or any area that is subject to weathering conditions such as direct sunlight, wind, rain, or temperatures below freezing. • Do not place the appliance in direct sunlight or expose it to the heat from heating appliances such as stoves or heaters. • Be careful not to expose the rear of the appliance when installing.
EN 8 SAFETY INSTRUCTIONS • Do not plug the appliance into multiple outlet sockets, power boards, or an extension power cable. • Do not use an extension cord or double adapter. Operation • Do not use the appliance for any purpose (storage of medical or experimental materials or temperature strict medicines) other than any domestic household food storage use. • If water penetrates electrical parts of the appliance, disconnect power plug and contact an LG Electronics customer information centre.
SAFETY INSTRUCTIONS 9 EN • Do not place any electronic appliance (such as heater and mobile phone) inside the appliance. • If there is a gas leakage (isobutane, propane, natural gas, etc.), do not touch the appliance or power plug and ventilate the area immediately. This appliance uses a refrigerant gas (isobutane, R600a). Although it uses a small amount of the gas, it is still combustible gas.
EN 10 SAFETY INSTRUCTIONS • Do not hang from the appliance doors, door baskets, storage compartments or shelves, or climb up into the appliance. • Do not store an excessive amount of water bottles or containers in the door baskets. • Do not open or close the appliance door with excessive force. • If the hinge of the appliance door is damaged or operates improperly, stop using the appliance and contact an authorized service centre. • Prevent animals from nibbling on the power cable or water hose.
INSTALLATION 11 EN INSTALLATION Before Installation Ambient Temperature Dimensions and Clearances • The appliance is designed to operate within a limited range of ambient temperatures, depending on the climate zone. Too small of a distance from adjacent items may result in the degradation of freezing capability and increased electricity costs. Allow over 50 mm of clearance between the back of the appliance and the wall when installing the appliance.
EN 12 INSTALLATION Accessories *1:This feature is only available on some models. Removing the Left/Right Fridge Door 1 Disconnect all wire harnesses a. a Spanner A*1 b Spanner B*1 c C-Clip (Snap Ring)*1 Removing the Fridge and Freezer Door 2 Rotate the hinge lever b clockwise. Lift the top hinge c free of the hinge lever latch d . If your entrance door is too narrow for the appliance to pass through, remove the appliance doors and pass the appliance laterally.
INSTALLATION 13 CAUTION • Place the door on a non-scratching surface with the inner side facing up. Removing the Freezer Door 1 Remove the two hinge bolts. EN Levelling and Door Alignment Before Beginning When the appliance doors appear to be uneven, follow the instructions below to align the doors. NOTE • The spanner may differ depending on the model. You will be provided with either spanner type A or B.
EN 14 INSTALLATION Use the spanner a to adjust the height by turning the levelling leg to the left to raise it or to the right to lower it. 2 Use the spanner b to adjust the height by turning the adjustment hinge pin to the left or to the right. CAUTION • Do not adjust the height of the appliance door more than 3 mm. Door Alignment for Freezer Door 3 Use the spanner a to fasten the keeper nut by turning it to the right.
INSTALLATION 15 Door Alignment for Left Fridge Door EN If the door is too low, lift the right door up and use a pair of long nose pliers to insert C-Clips until both doors are level. Open the fridge door and use the spanner c to rotate the door hinge bolt. Door Alignment for Right Fridge Door (Standard Door Model) Open the fridge door and use the spanner c to rotate the door hinge bolt.
EN 4 5 16 INSTALLATION Move the appliance with more than two people carefully. When transporting the appliance over a long distance, keep the appliance upright. After installing the appliance, connect the power plug into a mains outlet socket and switch it on.
OPERATION 17 EN OPERATION Before Use the repair technician from the our information centre may have difficulty finding the problem. Notes for Operation • Users should keep in mind that frost can form if the door is not closed completely or if the humidity is high during the summer. • Ensure there is sufficient space between food stored on the shelf or door basket to allow the door to close completely.
EN 18 OPERATION • Store raw meat and fish in suitable containers in the refrigerator, so that it is not in contact with or drip onto other food. Freezing the Maximum Amount of Food • Refrigerated foods and other food items can be stored on top of the vegetable drawer. If large quantities of food are to be stored, all the freezer drawers should be taken out of the appliance except the bottom one and the food should be stacked directly on the freezer shelves in the freezer compartment.
OPERATION 19 Product Features The appearance or components of the appliance may differ from model to model. Exterior *1:This feature is only available on some models. a Control Panel*1 Sets the fridge temperature and freezer temperature. b InstaView Door in Door*1 The InstaView Door in Door compartment allows for easy access to frequently used food items. c Door in Door Lever*1 Opens the Door in Door.
EN 20 OPERATION Interior *1:This feature is only available on some models.
OPERATION 21 EN InstaView Door in Door Model: a Control Panel*1 Sets the fridge temperature and freezer temperature. b LED Lamp The LED lamps inside the fridge light up when you open the door. c Air Filter Reduces odours inside the fridge compartment. d Fridge Door Basket Stores small packages of refrigerated foods, drinks and sauce containers. e Door Mullion Prevents cold air from leaking from the appliance.
EN 22 OPERATION i Fridge Shelf Stores refrigerated foods and fresh foods. Stores the foods with higher moisture content at the front of the shelf. The shelf height can be adjusted by inserting the shelf in another groove of different height. j Folding Shelf*1 This is adjustable to meet individual storage needs. k Door in Door Compartment*1 Stores commonly used food items such as beverages and snacks. l Fridge Drawer Stores fruits and vegetables to keep fresh for as long as possible.
OPERATION 23 EN Control Panel The actual control panel may differ from model to model. Control Panel and Functions *1:This feature is only available on some models. Control Panel: Type A*1 Control Panel: Type B*1 a Fridge Press this button repeatedly to select a desired temperature between 1 °C and 7 °C. • The default fridge temperature is 3 °C. b Replace Air Filter Replace the air filter when the indicator light turns on.
EN 24 OPERATION e Wi-Fi This button allows the appliance to connect to a home Wi-Fi network. Refer to SMART FUNCTIONS for information on the initial setup of the LG ThinQ application. f Lock*1 This locks buttons on the control panel. • To lock the control panel buttons, press and hold the Lock button for 3 seconds until the indicator appears and the function is activated. • To disable the function, press and hold the Lock button for 3 seconds until the indicator appears and the function is deactivated.
OPERATION 25 with lukewarm water or a glass cleaner. Do not spray glass cleaner directly at the glass door. 1 EN To raise the moving basket, hold the basket in the centre and push the basket up until it clicks into place. Door in Door This feature is only available on some models. Using the Door in Door Pull the lever at the bottom of the door upwards until the door in door opens.
EN 1 2 26 OPERATION Open the doors completely and remove the contents of the Door in Door case. Lift up and pull out the Door in Door case. Lift up and remove the dairy basket from the whole case. 4 5 Remove the screws from each of the side rails, and lift up and remove the basket from the case. Refit the Door in Door case in the reverse order of the removal process. Drawer CAUTION • Always empty the drawers before removing them, and use both hands when removing and refitting them.
OPERATION 27 2 Remove the contents of the drawer. Hold the handle of the vegetable drawer and gently pull it out. 2 3 EN With the drawer fully extended, lift up the front and pull the drawer out to remove it. Mount the freezer drawer in the reverse order of the removal process. CAUTION • The drawers are heavy. Always use two hands when removing or refitting the drawers to avoid product damage or personal injury. • Always open the freezer doors completely before removing or refitting the drawers.
EN 28 OPERATION Shelf 4 Lower the front of the shelf so that the hooks drop into the slots. CAUTION • Glass shelves are heavy. Use special care when removing them. • Do not clean glass shelves with warm water while they are cold. Shelves may break if exposed to sudden temperature changes or impact. Using the Folding Shelf Store taller items, such as a gallon container or bottles, by pushing the front half of the shelf underneath the back half of the shelf.
OPERATION 29 Using the Icemaker 3 EN Refit the cover and place the filled water tank back into the easy icemaker. *1:This feature is only available on some models. Icemaker Type A*1 1 To make ice, fill the ice tray with water and insert it into its position. 4 2 Rotate the knob of the ice tray clockwise and pull out the ice basket. Icemaker Type B*1 1 Rotate the knob on the easy icemaker clockwise. 5 Lift the ice storage bin slightly and remove.
EN 30 OPERATION taken out and used to move required condiments, drinks, snacks, etc. for cooking. • Do not allow children to hang from the basket when it is open or closed. Removing/Refitting the Door Basket 1 CAUTION To remove the baskets, simply lift the basket up and pull straight out. • Do not place near any heat sources. Using the Tilting Fresh Basket This feature is only available on some models. Store small items such as vegetables, snacks or sausage.
SMART FUNCTIONS 31 EN SMART FUNCTIONS LG ThinQ Application 2 Turn off the Mobile data or Cellular Data on your smartphone. This feature is only available on models with Wi-Fi. The LG ThinQ application allows you to communicate with the appliance using a smartphone. LG ThinQ Application Features Communicate with the appliance from a smartphone using the convenient smart features. Smart Diagnosis 3 Connect your smartphone to the wireless router.
EN 32 SMART FUNCTIONS NOTE NOTE • If the firewall on your wireless router is enabled, disable the firewall or add an exception to it. • To disable the Wi-Fi function, press and hold the Wi-Fi button for 3 seconds. The f icon will be turned off. • The wireless network name (SSID) should be a combination of English letters and numbers. (Do not use special characters.) • Smartphone user interface (UI) may vary depending on the mobile operating system (OS) and the manufacturer.
SMART FUNCTIONS 33 • The feature may be subject to change without prior notice and may have a different form depending on where you are located. Using LG ThinQ to Diagnose Issues If you experience a problem with your Wi-Fi equipped appliance, it can transmit troubleshooting data to a smartphone using the LG ThinQ application. • Launch the LG ThinQ application and select the Smart Diagnosis feature in the menu. Follow the instructions provided in the LG ThinQ application.
EN 34 MAINTENANCE MAINTENANCE Cleaning General Cleaning Tips • When cleaning the inside or outside of the appliance, do not wipe it with a rough brush, toothpaste, or flammable materials. Do not use cleaning agents containing flammable substances. This may cause discolouration or damage to the appliance. - Flammable substances: alcohol (ethanol, methanol, isopropyl alcohol, isobutyl alcohol, etc.), thinner, bleach, benzene, flammable liquid, abrasive, etc.
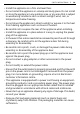
MAINTENANCE 35 Centre. For further assistance, visit our website at lg.com 1 5 Rotate the air filter cover clockwise until the hooks engage and the cover locks in place. Rotate the filter cover counterclockwise to release the tabs, and remove the cover. 6 2 EN Remove the filter from the inside of the cover by pressing the side of the filter in and pulling the centre out. Press and hold the Replace Air Filter button on the control panel for 3 seconds to reset the filter.
EN 36 TROUBLESHOOTING TROUBLESHOOTING Before Calling for Service Cooling Symptoms There is no refrigeration or freezing. Possible Cause & Solution Is there a power interruption? • Check the power of other appliances. Check the power of other appliances. • Plug the power plug in the outlet properly. There is poor refrigeration or freezing. Is the fridge or freezer temperature set to its warmest setting? • Set the fridge or freezer temperature to a colder setting.
TROUBLESHOOTING 37 EN Condensation & Frost Symptoms There is condensation inside the appliance or on the bottom of the vegetable drawer cover. Possible Cause & Solution Did you store hot food without cooling it first? • Cool the hot food first before putting it inside the fridge or freezer. Did you leave the appliance door open? • Although the condensation will disappear soon after you close the appliance door, you can wipe it with a dry cloth.
EN 38 TROUBLESHOOTING Symptoms There is water inside or outside of the appliance. Possible Cause & Solution Is there water leakage around the appliance? • Check if the water has leaked from a sink or another place. Is there water on the bottom of the appliance? • Check if the water is from the thawed frozen food or a broken or dropped container. Parts & Features Symptoms The appliance door is not closed tightly.
TROUBLESHOOTING 39 EN Noises Symptoms The appliance is noisy and generates abnormal sounds. Possible Cause & Solution Is the appliance installed on a weak floor or improperly levelled? • Install the appliance on a solid and flat area. Does the rear of the appliance touch the wall? • Adjust the installation position to allow enough clearance around the appliance. Are objects scattered behind the appliance? • Remove the scattered objects from behind the appliance.
EN 40 TROUBLESHOOTING Symptoms Vibrating Possible Cause & Solution If the side or back of the appliance is touching a cabinet or wall, some of the normal vibrations may make an audible sound. • To eliminate the noise, make sure that the sides and back do not make any contact with any wall or cabinet. Wi-Fi Symptoms Your home appliance and smartphone are not connected to the Wi-Fi network. Possible Cause & Solution The password for the Wi-Fi that you are trying to connect to is incorrect.
Memo
Memo
Memo