website http://www.lgservice.com e-mail http://lgservice.com/techsup.html LG LG Single Package Type Air Conditioner OWNER'S MANUAL Prior to installation, this air-conditioning unit must be submitted for approval by the utility service which provides electricity (EN 61000-2, 61000-3 Norm). IMPORTANT • Please read this owner's manual carefully and thoroughly before installing and operating your room air conditioner. • Please retain this owner's manual for future reference after reading it thoroughly.
Single Package Type Air Conditioner Owner’s Manual TABLE OF CONTENTS FOR YOUR RECORDS Safety Precautions ..............3 Write the model and serial numbers here: Model # Serial # Operating Instructions........9 You can find them on a label on the side of each unit. Dealer's Name Date Purchased Care and Maintenance ......18 Before You Call for Service..........................20 ■ Staple your receipt to this page in the event you need it to prove date of purchase or for warranty issues.
Safety Precautions Safety Precautions To prevent injury to the user or other people and property damage, the following instructions must be followed. ■ Incorrect operation due to ignoring instruction will cause harm or damage. The seriousness is classified by the following indications. WARNING This symbol indicates the possibility of death or serious injury. CAUTION This symbol indicates the possibility of injury or damage. ■ Meanings of symbols used in this manual are as shown below.
Safety Precautions Use the specified wires to connect the unit. • There is risk of fire or electric shock. For installation, always contact the dealer or an Authorized Service Center. • There is risk of fire, electric shock, explosion, or injury. Do not install, remove, or re-install the unit by yourself (customer). • There is risk of fire, electric shock, explosion, or injury. Do not install the product on a defective installation stand. • It may cause injury, accident, or damage to the product.
Safety Precautions Do not allow water to run into electric parts. • It may cause There is risk of fire, failure of the product, or electric shock. Do not store or use flammable gas or combustibles near the product. • There is risk of fire or failure of product. Do not use the product in a tightly closed space for a long time. • Oxygen deficiency could occur. Gasolin When flammable gas leaks, turn off the gas and open a window for ventilation before turn the product on.
Safety Precautions When the product is not be used for a long time, disconnect the power supply plug or turn off the breaker. Take care to ensure that nobody could step on or fall onto the unit. • This could result in personal injury and product damage. • There is risk of product damage or failure, or unintended operation. CAUTION ■ Installation Always check for gas (refrigerant) pressure after installation or repair of product. • Low refrigerant levels may cause failure of product.
Safety Precautions ■ Operation Do not expose the skin directly to cool air for long periods of time. (Don't sit in the draft.) • This could harm to your health. Do not use the product for special purposes, such as preserving foods, works of art, etc. It is a consumer air conditioner, not a precision refrigeration system. • There is risk of damage or loss of property. Do not block the inlet or outlet of air flow. Use a soft cloth to clean. Do not use harsh detergents, solvents, etc.
Prior to Operation Prior to Operation Preparing for operation 1. Contact an installation specialist for installation. 2. Plug in the power plug properly. 3. Use a dedicated circuit. 4. Do not use an extension cord. 5. Do not start/stop operation by plugging/unplugging the power cord. 6. If the cord/plug is damaged, replace it with only an authorized replacement part. Usage 1. Being exposed to direct airflow for an extended period of time could be hazardous to your health.
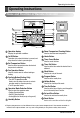
Operating Instructions Operating Instructions Name and Function of Remote Controller AUTO SWING OPERATION SET TEMP Room Temp Time Timer Operation unit On Off Set no.
Operating Instructions Wireless Remote Controller(Optional) 1 2 10 1 Signal Transmitter • Transmits the signals to the package air conditioner 2 Operation Display of the Remote Control 3 11 3 Humidify Button 7 4 4 Cooling ON Button 8 6 5 Temperature Setting Buttons 5 6 Power ON/OFF Button • Operation will start when this button is pressed, and stop when the button is pressed again. 7 Timer Set Button • Each time the button is pressed, the mode is changed in the following process.
Operating Instructions Set the Current Time and a day of the Week 1 Press the ' Hour ' button. Each time the button is pressed, the number is changed from 00 to 23. You can set the number of the current hour. AUTO SWING OPERATION SET TEMP Room Temp AUTO Heater Preheat JET Defrost Humidify Filter Out door ZONE 1 2 3 4 Hour Time Timer Operation unit On Off Set no. Time 01 2 Press the ' 03 SUB FUNCTION HI MED LO Program set 05 07 09 11 13 15 17 19 21 23 ' button.
Operating Instructions Weekly Programming 1 Press the Program button. The remote controller is displayed like a picture. Then ' Program AUTO SWING ', ' Program set OPERATION ' and '01' is blinked. SET TEMP Room Temp AUTO Heater Preheat JET Defrost Humidify Filter Out door ZONE 1 2 3 4 Time Operation unit Timer On Off Set no. Time 01 2 Press the ' Week 03 SUB FUNCTION HI MED LO Program set 05 07 09 11 13 15 17 19 21 23 ' button. Select Monday.
Operating Instructions Holiday Setting If Tuesday is a holiday in this week, you may set a holiday. 1 Press the Program button. 2 Press the Week button. Program Week AUTO SWING OPERATION SET TEMP Room Temp AUTO Heater Preheat JET Defrost Humidify Filter Out door ZONE 1 2 3 4 Time On Off Set no. Time 01 3 Press the Holiday button. Then the remote controller will be displayed ' The outside rectangular means holiday. Operation unit Timer Holiday 03 SUB FUNCTION HI MED LO Select the Tuesday.
Operating Instructions Operation Mode Cooling Mode Cooling Mode Soft Dry Mode Soft Dry Mode (Cooling Model) Heating Mode (Heat Pump Model) Operation Procedure 1 On/Off Button AUTO SWING OPERATION SET TEMP Room Temp AUTO Heater Preheat JET Defrost Humidify Filter Out door ZONE 1 2 3 4 Time Timer Operation unit On Off Set no.
Operating Instructions Cooling Operation Mode 1 Press the On/Off Button. 2 Select Cooling Operation. Press the Operation Mode Selection Button. Each time the button is pressed, the operation mode is shifted in the arrow direction. HEAT PUMP MODEL Operation Display AUTO SWING OPERATION SET TEMP Room Temp Time Timer Operation unit On Off Set no. Time 01 03 SUB FUNCTION AUTO SWING 07 09 11 15 17 19 21 Operation unit On Off Set no.
Operating Instructions Soft Dry Operation Mode This mode dehumidifies without overcooling. 1 Press the On/Off Button. 2 Select Soft Dry Operation. Press the operation Mode Selection Button. Each time the button is pressed, the operation mode is shifted in the arrow direction. HEAT PUMP MODEL Operation Display AUTO SWING OPERATION SET TEMP Room Temp Time Timer Operation unit On Off Set no.
Operating Instructions Heating Operation Mode(Heat pump model only) 1 Press the On/Off Button. 2 Select Heating Operation. Press the Operation Mode Selection Button. Each time the button is pressed, the operation mode is shifted in the arrow direction. Operation Display AUTO SWING OPERATION SET TEMP Room Temp Operation unit 03 AUTO SWING 07 09 11 15 17 19 21 Cooling Operation 3 Set the temperature. Operation unit On Off Set no.
Care and Maintenance Care and Maintenance CAUTION: Before performing any maintenance, turn off the main power to the system. You can do some of the periodic maintenance for your unit yourself; this includes cleaning air filters, cleaning unit cabinet, clearing the condenser coil, and conducting a general unit inspection on a regular basis. WARNING: Before removing access panels to service unit, disconnect power supply.
Care and Maintenance When the air conditioner is not going to be used for a long time. When air conditioner is not going to be used for a long time. 1. Operate the air conditioner on Air circulation mode for 2 to 3 hours. • This will dry out the internal parts. 2. Turn off the circuit breaker. CAUTION: Turn off the circuit breaker when the air conditioner is not going to be used for a long time. Dirt may collect and may cause a fire. When the air conditioner is to be used again. 1.
Before you call for service... Before you call for service... Check the following points before requesting repairs or service.... If the fault persists, please contact your dealer or service center. Case Does not operate. Explanation See page • Have you made a mistake in timer operation? • Has the fuse blown or has the circuit breaker been tripped? - • Does the Remote controller display " " on the LCD? This means that protective device has been tripped please contact your dealer or service center.
LG LG ( EN61000-3 )
3........... 9......... 18........... 20...
3
4
Gasolin 5
90° 6
x Wa Thinner 7
.1 .2 .3 .4 .1 .2 .3 .1 .2 .
AUTO SWING OPERATION SET TEMP Room Temp AUTO Heater Preheat JET Defrost Humidify Filter Out door ZONE 1 2 3 4 Time Timer Operation unit On Off Set no.
1 1 • 2 2 3 3 4 5 6 10 11 7 4 8 6 5 • 7 • ( 7 ,6 ,5 ,4 ,3 ,2 ,1) (00:0) 8 1 9 10 2 11 3 • • 10 11 9 7 4 8 6 5 • • • 10
1 Hour 23 AUTO SWING OPERATION SET TEMP Room Temp Operation unit On Off Set no. Time 01 03 SUB FUNCTION HI MED LO AUTO Heater Preheat JET Defrost Humidify Filter Out door ZONE 1 2 3 4 Time Timer FAN SPEED 00 Hour Program set 05 07 09 11 13 15 17 19 21 23 2 Min 59 AUTO SWING OPERATION SET TEMP Room Temp Operation unit 03 SUB FUNCTION HI MED LO AUTO Heater Preheat JET Defrost Humidify Filter Out door ZONE 1 2 3 4 Time Timer On Off Set no.
1 Program set AUTO SWING OPERATION SET TEMP FAN SPEED Room Temp AUTO Heater Preheat JET Defrost Humidify Filter Out door ZONE 1 2 3 4 Time Timer Operation unit On Off Set no. Time 01 03 Program SUB FUNCTION HI MED LO Program set 05 07 09 11 13 15 17 19 21 23 Week 2 Week 3 SET/CLR Hour AUTO SWING Min OPERATION SET TEMP Room Temp Operation unit 03 SUB FUNCTION HI MED LO AUTO Heater Preheat JET Defrost Humidify Filter Out door ZONE 1 2 3 4 Time Timer On Off Set no.
Program 1 Week 2 Holiday AUTO SWING OPERATION SET TEMP Room Temp Operation unit 03 3 SUB FUNCTION HI MED LO AUTO Heater Preheat JET Defrost Humidify Filter Out door ZONE 1 2 3 4 Time Timer On Off Set no.
AUTO SWING OPERATION SET TEMP Room Temp Time Timer Operation unit On Off Set no.
1 2 AUTO SWING OPERATION SET TEMP Room Temp Operation unit 03 Program set 05 07 09 11 AUTO SWING OPERATION 15 17 19 21 23 Operation unit 03 AUTO SWING OPERATION 05 07 09 11 19 21 SUB FUNCTION 07 09 11 OPERATION 15 17 19 15 03 OPERATION 07 09 11 AUTO Heater Preheat JET Defrost Humidify Filter Out door ZONE 1 2 3 4 15 11 13 17 19 21 23 15 17 19 SET TEMP 21 SUB FUNCTION HI MED LO AUTO Heater Preheat JET Defrost Humidify Filter Out door ZONE 1 2 3 4 Program
1 2 AUTO SWING OPERATION SET TEMP Room Temp Time Timer Operation unit On Off Set no.
1 2 AUTO SWING OPERATION SET TEMP SUB FUNCTION Room Temp 03 Program set 05 07 09 11 OPERATION 13 15 17 19 21 SET TEMP SUB FUNCTION Room Temp AUTO Heater Preheat JET Defrost Humidify Filter Out door ZONE 1 2 3 4 Time Operation unit Time 01 AUTO SWING HI MED LO Timer Off Set no.
18
1 1 (FILTER ACCESS PANEL) 2 2 OFF OFF 19
? - ? - - ? 18 ? - ? - 5 2