
Owner’s Manual

www.lg.com
• Please do not connect the USB cables by any means other than specified above.
Using the wrong type of cable with this drive can cause it to malfunction.
• The appliance is not intended for use by young children or infirm persons without
supervision. Young Children should be supervised to ensure that they do not play
with appliance.
• If the appliance is supplied from a cord extension set or an electrical portable
outlet device, the cord extension set on electrical portable outlet device must be
positioned so that it is not subject to splashing or ingress of moisture.
®
The drive supports both Windows and Mac . To use it properly, please follow
directions below.
Notes:
• Normal operation is not guaranteed if you use a USB hub or unspecified USB extension cables.
• Due to compatibility issue of some AV devices and disc, may not work.
• 'Surface Pro 3, 4' Compatibility – The drive can work with 'Surface Pro 3, 4' via single USB connection.
Notes:
• When using with Mac
- Click the eject button located on Mac OS menu or toolbar.
• When using with Windows
- Press the eject button in the front of the product.
* Software CD (for Windows only)
- The Software CD includes DVD software for usage for Windows.
How to Eject Disc from the drive
* This product is defaulted to ODD mode when it is powered on.
1.
With the tray open, press and hold the ‘Eject’button for 2 seconds.
(The LED indicator will turn on, switching to TV mode.
Press and hold the button again for 2 seconds with the tray open to return to ODD mode).
2. Insert your supported media into the drive.
The disc file system will be converted to FAT32 and will be recognized as USB flash memory.
3.
Select and play the files from your A/V device to enjoy videos, pictures
and music.
Refer to your A/V device owner’s manual for more information.
How to Use TV Connectivity
TV Connectivity is a function that allows you to enjoy videos, pictures and music
by connecting this product to a compatible A/V device (e.g.DIGITAL TV, DIGITAL
PHOTO FRAME, PC) that supports USB connectivity.
What is TV Connectivity?
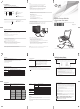
USB
Installation
• Please pay attention to handling Electrostatic Sensitive Devices, you may use
anti-static products such as wrist straps, heel straps, mats to protect your body
from electrostatic.
• Make sure you have a personal computer with any open USB ports
before connecting the drive to your computer.
Disc tray
1
Drive activity indicator(LED)
This connector is used to connect
to the USB cable.
Shut down the power supply when
this eject will be used.
Caution:
Notes:
Connecting to computer or A/V Device.
2
USB Connector (mini)
1
Eject Button
3
Emergency Eject Hole
4
Connect the USB cable (mini plug) to the drive.
Connect the drive to the computer as shown in figure.
When the computer is ready, confirm that the drive is detected. And then,
insert the supplied software CD into the drive and install the software.
1
Connect the other end of the USB cable to your computer.
2
The drive may get its power from the PC USB power. All systems may not
meet USB power requirements and full performance may not be achieved.
In this case, connect to the USB Y type cable (not supplied.).
1 2 3 4
(Front View)
(Rear View)
The drive’s appearance and specifications may change without
prior notice.
This following is the general figure of the design of the drive.
Location and Function of Controls
Hardware Installation
Quick Set-up Guide
Slim Portable DVD Writer
GP55
To install of your product, please read this guide manual carefully and completely.
TM
* Compatibility problem in write/read function may occur with some media depending on the media manufacturing quality.
* To achieve maximum Record & Write speed your system may require data to be copied first to the computer’s hard drive rather
than directly from another source disc or drive.
* Please visit http://www.m-disc.com to learn more about the M-DISC.
Microsoft
®
and Windows
®
are trademarks registered in the United States and other countries by the Microsoft Corporation.
The company names and product names written in this manual are trademarks or registered trademarks of the respective
companies.
256 MB or larger (Recommended: 512 MB).
System Environment
Computer
Recommended discs
This unit can be operated in the system environment explained here.
Pentium IV 2.4 GHz or Higher(with USB 2.0) for basic performance
(Recommended for optimal performance: Pentium IV 3.2 GHz or Higher).
System
requirements
Windows 10/8.1/8/7/Vista/XP(SP3), Mac OS X v.10.7.5 or Higher
Software
Required OS
CPU
Memory
20 GB or more free space. (The free space needed for writing depends
on the quantity of data.)
Hard disk
64 MB (Recommended: 128 MB).
Video Memory
USB 2.0 (3.0 Compatible)
Interface
CD-R : LG, Mitsubishi Kagaku Media, Verbatim, That’s, TDK, Ritek or
HP discs are recommended.
CD-RW : LG, Mitsubishi Kagaku Media, Verbatim are recommended.
DVD-R : Mitsubishi Kagaku Media, Maxell, That’s are recommended.
DVD-RW :
Victor. JVC, Mitsubishi Kagaku Media, TDK are recommended.
DVD+R : Mitsubishi Kagaku Media, That’s, Maxell are recommended.
DVD+RW : TDK, Mitsubishi Kagaku Media,Ricoh are recommended.
DVD-RAM : Maxell, Mitsubishi Kagaku Media are recommended.
M-Disc (DVD+R SL) : Millenniata
DVD±R DL : Mitsubishi Kagaku Media, Verbatim are recommended.
Recommended
media manufacturer
• Universal Serial Bus (USB) 2.0 interface for high-speed data transfer.
• Buffer Under Run error protection technology.
• Emergency eject support.
• Combination of CD-R/RW, DVD-R/RW, DVD+R/RW, DVD+R DL, DVD-R DL, M-Disc (DVD+R SL)
and DVD-RAM drive functions into one drive.
• Supports region playback control Phase II.
• PC USB powered, no AC adapter needed.
• Supports TV Connectivity.
• For Windows Vista or later, 1 GB of RAM or large is recommended.
• Under Windows 8 operating system, a specific mainboard with nVidia GeForce 7025 Chipset
may cause an abnormal operation.
Features
Safety Instructions
CD-ROM : 3,600 kB/s (24 x max)
DVD-ROM : 11.08 MB/s (8 x max)
- The maximum data transfer rate varies according to the performance capabilities of he PC.
- For the sake of periodic improvements, specifications and appearance are subject to change without notice.
- We have taken all possible measures to assure the quality of our products, but we cannot be responsible for the consequences
if defect occurs.
Install the appropriate CD Recording Authoring Software before using this unit.
* Please uninstall any previous CD burning software you may have loaded on your PC in order to prevent possible compatibility
issues.
Once you have installed the application software, you may (if you wish) begin to reinstall previous software, taking note for errors.
We recommend using the drive with the latest software as some problems encountered when using the drive can be solved by
updating the software.
Software
Data transfer
rate
Sustained
0.75 MB
5 V DC
Buffer capacity
60,000 Power On Hours (Duty Cycle 10 %)
MTBF
CD-ROM : 140 ms (Typical)
DVD-ROM : 160 ms (Typical)
DVD-RAM : 200 ms (Typical)
Average Access
Time (
⅓ Stroke)
Power Requirement
5 °C to 40 °C
Operating
Environment
Temperature
15 % to 85 %
Humidity
-30 °C to 60 °C
Storage
Environment
Temperature
10 % to 90 % RH
Humidity
Specifications
DVD-ROM(Single/Dual), DVD-RW, DVD-R, DVD+RW, DVD+R, DVD+R Double layer,
DVD-R Dual layer, DVD- RAM, M-Disc (DVD+R SL), CD-Digital Audio & CD-Extra, CD-Plus,
CD-ROM, CD-ROM XA-Ready, CD-I FMV, CD-TEXT, CD-Bridge, CD-R, CD-RW,
Photo-CD (Single & Multi-Session), Video CD, DVD-VIDEO
DVD-ROM
DVD-R
DVD-R DL
DVD-RW
DVD-RAM (Ver. 2.2)
DVD+R
M-Disc (DVD+R SL)
DVD+R DL
DVD+RW
CD-R
CD-RW
CD-ROM
CD-DA(DAE)
Supported Discs
Read/Write
Speed
Media
-
2 x, 4 x, 8 x
2 x, 4 x, 6 x
2 x, 4 x, 6 x
2 x, 3 x, 5 x
2.4 x, 4 x, 8 x
4 x
2.4 x, 4 x, 6 x
2.4 x, 4 x, 8 x
10 x, 16 x, 24 x
4 x, 10 x, 16 x, 24 x
-
-
Write :
8 x max.
8 x max.
8 x max.
8 x max.
6 x max.
8 x max.
8 x max.
8 x max.
8 x max.
24 x max.
24 x max.
24 x max.
24 x max.
Read :
141 mm x 14 mm x 136.5 mm (5.6” x 0.6” x 5.4”)
Dimensions (W x H x D)
About 200 g
Weight
USB 2.0 (3.0 Compatible)
Interface
CAUTION :
The laser used in the Writer can damage your eyes.
Do not attempt to open the cover. To reduce the risk of electric shock, do not remove the cover (or back).
There are no user-serviceable parts inside. Refer servicing to qualified service personnel. Use of controls or
performance of procedures other than those specified herein may result in hazardous radiation exposure.
WARNING :
To reduce the risk of fire or electric shock, do not expose this appliance to rain or moisture.
CAUTION :
CLASS 3B VISIBLE AND INVISIBLE LASER RADIATION WHEN OPEN AND INTERLOCKS DEFEATED.AVOID EXPOSURE
TO THE BEAM.
ADVARSEL :
KLASSE 3B SYNLIG OG USYNLIG LASERSTRÅLING I ÅBEN TILSTAND OG VED AFBRUDTLÅSEFUNKTION. UNDGÅ
ATBLIVE RAMTAF LASERSTRÅLEN.
VARO! :
LUOKKA 3B AVATTAESSAJAKUMOTTAESSALUKITUS NÄKYVÄÄ JANÄKYMÄTÖNTÄ LASERSÄTEILYÄ. VÄLTÄ
LASERSÄTEILLE ALTISTUMISTA.
ATTENTION :
CLASSE 3B RAYONNEMENTLASER VISIBLE ETINVISIBLE EN CAS D’OUVERTURE ET ENCLENCHEMENTS
DEFECTUEUX, EVITER L'EXPOSITION AU FAISCEAU.
VORSICHT :
SICHTBARE UND UNSICHTBARE LASERSTRAHLUNG DER KLASSE 3B WENN
ABDECKUNG GEÖFFNETUND
SICHERHEITSVERRIEGELUNG ÜBERBRÜCKT VERMEIDEN SIE
ES, SICH DEM STRAHL AUSZUSETZEN.
ADVARSEL :
KLASSE 3B SYNLIG OG USYNLIG LASERSTRÅLING NÅR ÅPNES OG LÅS BRYTES. UNNGÅ EKSPONERING FOR STRÅLEN.
VARNING :
KLASS 3B SYNLIG OCH OSYNLIG LASERSTRÅLNING FÖREKOMMER NÄR OCH MELLANLÅSET FÖRSTÖRS. UNDVIK
EXPONERING UNDER STRÅLEN.
CLASS 1
KLASSE 1
LUOKAN 1
KLASS 1
CLASE 1
CLASSE 1
LASER PRODUCT
LASER PRODUKT
LASER LAITE
LASER APPARAT
PRODUCTO LÁSER
PRODOTTO LASER
FCC COMPLIANCE STATEMENT
This equipment has been tested and found to comply with the limits for a Class B digital device, pursuant to Part
15 of the FCC Rules. These limits are designed to provide reasonable protection against harmful interference in
a residential installation. This equipment generates, uses, and can radiate radio frequency energy and, if not
installed and used in accordance with the instructions, may cause harmful interference to radio communications.
However, there is no guarantee that interference will not occur in a particular installation. If this equipment does
cause harmful interference to radio or television reception, which can be determined by turning the equipment
off and on, the user is encouraged to try to correct the interference by one or more of the following measures:
Note :
- Reorient or relocate the receiving antenna.
- Increase the separation between the equipment and receiver.
- Connect the equipment into an outlet on a circuit different from that to which the receiver is connected.
- Consult the dealer or an Authorized Service Center for help.
• FCC WARNING
Changes or modifications not expressly approved by the party responsible for compliance could void the user’s
authority to operate the equipment.
• This product is for use only with UL listed personal computers that have installation instructions detailing
user-installation of card cage accessory.
1
This device complies with Part 15 of the FCC Rules. Operation is subject to the following two conditions :
(1) this device may not cause harmful interference, and (2) this device must accept any interference
received, including interference that may cause undesired operation.
Model : GP65NB60, GP65NG60, GP65NS60, GP65NW60, GP55EX70,
GP65NB70, GP65NG70, GP65NW70, GP65NS70
Responsible Party : Hitachi-LG Data Storage, Austin FA Center
Address : 11801 Stonehollow Dr. Suite 125 Austin, TX 78758
Telephone Number : (512) 832-8082
Declaration of Conformity
MFL67902524