REFRIGERATORFREEZER OWNER'S MANUAL PLEASE READ THIS OWNER'S MANUAL THOROUGHLY BEFORE OPERATING AND KEEP IT HANDY FOR REFERENCE AT ALL TIMES. INSTALLATION ............................................................ FEATURE CHART OPERATION ........................................................ ................................................................ 2 3 5 Starting Temperature Ice Control Making Tray meat Defrosting F.I.R Lamp(Optional) SUGGESTIONS ON FOOD STORAGE ......................
THIS REFRIGERATOR IS MANUFACTURED WITH GREAT CARE, AND UTILIZES THE LAT- EST IN TECHNOLOGY. WE ARE CONFIDENT THAT YOU WILL BE FULLY SATISFIED WITH IT'S PERFORMANCE AND RELIABILITY. BEFORE USING YOUR REFRIGERATOR, PLEASE READ THIS BOOKLET CAREFULLY. IT PROVIDES EXACT INSTRUCTIONS FOR INSTALLATION, OPERATION AND MAINTENANCE, AND ALSO SUPPLIES SOME USEFUL HINTS. INSTALLATION SELECT A GOOD LOCATION 1. Place your 2.
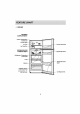
FEATURE CHART " GR-242 FREEZER COMPARTMENT Freezer Temperature Control Dial Freezer Shelf Ice Tray Freezer Door Rack Ice Cube Box REFRIGERATOR COMPARTMENT Egg Storage Rack Refrigerator Door Refrigerator Temperature Control Dial Lamp Rack Shelves Vegetable Drawer Used to keep fruits and vegetables, etc. fresh and crisp.
FEATURES CHART " GR-282 FREEZER COMPARTMENT Freezer Temperature Control Dial Freezer Shelf Ice Tray Freezer Door Rac Ice Cube Box REFRIGERATOR COMPARTMENT Egg Storage Rack Refrigerator Doo Refrigerator Temperature Control Dial Lamp Tray Meat (Optional) Rack Shelves (Option: 2 or 3) Tray meat and 2 shelves or No tray meat and 3 shelves. Leveling Vegetable Drawer Used to keep fruits and vegetables, etc. fresh and crisp.
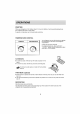
OPERATIONS STARTING When your prior If to refrigerator is filling it with fresh is operation first or interrupted, installed, allow it 2-3 hours to stabilize at normal operating temperatures frozen foods. wait 5 minutes before restarting. TEMPERATURE CONTROL FREEZER Your refrigerator has two dials that let you regulate the temperature in the freezer and refrigerator REFRIGERATOR compartments. Initially, COLD COLDEST dials are set at mid-point.
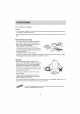
OPERATIONS F.I.R LAMP(OPTIONAL) Feature ? Far Infrared its ? emitted from Far Infrared Rays form without original By increasing Ray Lamp restrains the dryness of the foods and keeps transforming. the nucleic acid, Far Infrared Rays also keeps the taste and the smell of the food long time.
SUGGESTIONS ON FOOD STORAGE STORING FOOD Store fresh food in the in refrigerator compartment. Do not store food which goes bad Allow hot food to cool to higher How food is frozen and thawed is an important factor its freshness and flavor. maintaining prior to easily at low storing. Placing temperatures, such hot food in the as bananas, pineapples, and melons.
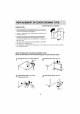
REPLACEMENT OF DOOR OPENING TYPE - PRECAUTION 1. Before replacing the door opening type, first of Converting Door is Optional all, you should or trays, and so take out foodstuffs and accessories like shelves which on are 2. Use the '+' or remove not fixed in the refrigerator. Driver, Bolt Driver, Torque Wrench or Spanner to fix the bolt. 3. Be careful not to fall down the refrigerator in disassembling or assembling the Hinge Lower and the Adjustable Screw Asm.
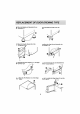
REPLACEMENT OF DOOR OPENING TYPE Move the Position of 5 Assembly (7). Adjustable Screw 6 Assemble the Hinge Lower (6). 7 6 Move the (8), Bracket (9) Cap 7 Refrigerator Door. of the 8 Move the Cap (10) Hinge-C (4). and Assemble the 10 8 4 9 9 Assembe the Door Stopper-F (11) for Right 10 Opening Type. Move the Cap (12) and Assemble the Freezer Door (3). 3 3 12 11 11 Move the Pin Position 5 (13) of the Hinge Assemble the 12 Cap (1). Upper.
CLEANING It is that your important refrigerator be kept clean to INTERIOR PARTS Wash compartment shelves, racks, storage trays and magnetic door seals prevent undesirable odors. Spilled food should be door wiped up immediately, since plastic surfaces if allowed to etc. with the Never use metallic abrasive cleaners it may settle.
LAMP REPLACEMENT 1. Unplug the power cord from the outlet. 2. Remove refrigerator shelves. lamp by turning it 3. Remove the counterclockwise as shown in the figure at right. 4. Assemble in same reverse specification order of as disassembly. Replacement original.
BEFORE CALLING FOR SERVICE SERVICE CALLS CAN OFTEN BE AVOIDED! IF YOU FEEL YOUR REFRIGERATOR IS NOT OPERATING CAUSES FIRST PROPERLY, CHECK THESE POSSIBLE : PROBLEM POSSIBLE CAUSES REFRIGERATOR DOES Has NOT OPERATE Has the power cord plug been removed from the electrical wall outlet? REFRIGERATOR OR FREEZER Temperature control not set on proper position. Appliance is placed close to wall or heat source. Warm weather-frequent door openings. Door left open for a long time.