
Owner's Manual


Installation
7
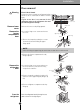
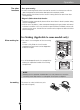
Door replacement
Mount them in the reverse sequence of removal after they pass through the access door.
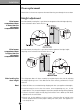
The refrigerator doors will close smoothly by heightening the front side by adjusting
the height adjusting screw. If the doors do not close correctly, performance may be
affected.
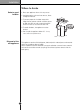
Height adjustment
If the freezer
compartment door
is lower than the
refrigerator
compartment door
If the freezer
compartment door
is higher than the
refrigerator
compartment door
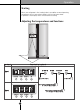
After leveling the
door height
Next
1. Wipe off all dust accumulated during shipping and clean your appliance thoroughly.
2. Install accessories such as the wine corner, cover evaporating tray, etc., in their
proper places. They are packed together to prevent possible damage during shipping.
3. Connect the power supply cord (or plug) to the outlet. Don't double up with other
appliances on the same outlet.
4. Prior to use, let the appliance run for 2-3 hours. Check the flow of cold air in the
freezer compartment to ensure proper cooling has taken place. Your appliance is
now ready for use.
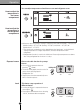
Level the door by inserting flat (
-
type) driver into the groove of the left height adjusting
screw and rotate it to the arrow
direction
( ).
Level the door by inserting flat (
-
type) driver into the groove of the right height
adjusting screw and rotate it to the arrow
direction
().