BOTTOM FREEZER REFRIGERATOR User's Guide Please read this keep it handy guide thoroughly before operating and for reference at all times. P/No.
Version English Instructions 3--4 Parts and Features 5 Safety Installation Refrigerator Glide N Serve 19 Design-A-Door 19 Bin 20 Dairy 6--12 Egg Box (Optional) 20 (Optional) 6 u Freezer section Installation 6 Tilting Base Cover 6 Ice Bin 20 Freezer Door Rack 21 Durabase 21 Durabase Divider 21 Pull out Drawer 21 Water Filter 22 Your Unpacking Refrigerator Removing and Replacing Your Refrigerator Handles 7--11 and Doors Leveling Using and Door Your 13--22 R
2 Version English Instructions 3--4 Parts and Features 5 Safety Installation Refrigerator Glide N Serve 19 Design-A-Door 19 Bin 20 Dairy 6--12 Egg Box (Optional) 20 (Optional) 6 u Freezer section Installation 6 Tilting Base Cover 6 Ice Bin 20 Freezer Door Rack 21 Durabase 21 Durabase Divider 21 Pull out Drawer 21 Water Filter 22 Your Unpacking Refrigerator Removing and Replacing Your Refrigerator Handles 7--11 and Doors Leveling Using and Door Your 13--22 R
This guide contains many This is the that All can important safety messages. Always safety kill or alert symbol. hurt you safety messages or or cause preceded by the safety or seriously injured if you don't follow instructions. can be killed an imminently or hazardous situation moderate ? ? breaker or fuse box in order to avoid contact with live wire filament. (A burned-out light bulb may break when being replaced.) NOTE: position either or not avoided, product damage only.
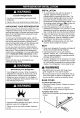
Child entrapment and suffocation are not problems of the past. Junked or abandoned BEFORE YOU THROW AWAY YOUR OLD REFRIGERATOR OR FREEZER refrigerators are still dangerous...even if they will sit for just a few days. If you are getting rid of your old refrigerator, please follow the instructions at right to help prevent accidents. ? Take off the doors. ? Leave the shelves in that children may climb inside. Your old refrigerator may have a cooling system that used CFCs (chlorofluorocarbons).
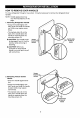
PARTS AND FEATURES A B N O P C C I D J E K F G L H M Use this page to become your convenience. NOTE: This have familiar with the parts and features. Page references covers match your model. A C H Ice Bin Refrigerator Light B Filter (Inside) I Pull out Drawer J Durabase Design-A-Door D Shelves K Divider E L Freezer Door Rack Optibin Crisper (Keeps are included for several different models. The refrigerator you have purchased may all of the items listed below.
INSTALLATION 1. To avoid Excessive Use two Weight to people or more Hazard move result in back so can or other injury. UNPACKING YOUR REFRIGERATOR 2. tape and any temporary labels from your refrigerator before using. Do not remove any any remaining tape or glue, rub the briskly with your thumb. Tape or glue residue use tape or see the abrasive cleaners to Refrigerator position. heat remove 1. Clean your refrigerator thoroughly and all dust accumulated during shipping. wipe 2.
HOW TO REMOVE DOOR HANDLES To move refrigerator through house a door, it maybe necessary to remove the refrigerator door handles. NOTE: Handle appearance may vary from illustrations on this page. 1. Handle Removing Refrigerator ? Grasp the handle tightly with both hands and slide the handle (1)(this force). up ? The may keyhole require slots (2) some on the back of the handle allow the handle to separate from the mounting screws 1 (3).
HOW TO REPLACE DOOR HANDLES NOTE: Handle appearance may vary from illustrations on this page. 1. Replacing Refrigerator ? slots Align keyhole (1) Door Handle on the top and bottom of the back of the handle with the screws (2) mounted on the front of the door. ? Press the handle against the door making sure that the screws (2) the keyhole slots (1). ? Holding the handle with both 1 front, go into 3 hands, press it firmly against the front of the door and slide the handle down (3).
REFRIGERATOR INSTALLATION REMOVING AND REPLACING REFRIGERATOR DOORS 1. Removing Refrigerator Door w CAUTION: CAUTION: Before you begin, unplug the refrigerator. Remove food and bins from doors. u Left Door 1. Disconnect water 2. Open Use flat door. supply tube by pushing back Loosen top hinge cover screw (1). the disconnect on screwdriver to pry back hooks on front underside of 3. Disconnect door switch wire harness (2). Remove cover. tip 4. Attach the tube on ring (4). cover (3).
REFRIGERATOR INSTALLATION 2. Replacing Refrigerator u Right Door Door 1. Lower the door onto middle 2. 3. 4. 5. hinge pin (10). Fit top hinge (8) over hinge lever latch (9) and into place. Insert hinge lever (7) under lever latch. Rotate lever counterclockwise to secure hinge. Install the grounding screw (6) and connect the three wire harnesses (5). Connect door switch wire harness (2). Hook tab on door switch side of cover under edge of wire opening in cabinet top. Position cover (3) into place.
2. HOW TO REMOVE AND INSTALL THE PULLOUT DRAWER ? Drawer Installing Pullout Pull both rails (1) out to full extension. IMPORTANT: To avoid possible injury, product or property damage, you will need two people to perform the following instructions. 1. ? Removing Pullout Drawer Pull the drawer open to full extension. Remove the lower basket (1) by lifting basket from rail system. 1 ? 1 Hook the door as supports (2) into the rail tabs (3), illustrated, and lower the door into final position.
LEVELING AND DOOR ALIGNMENT Door Leveling If the space between your doors is uneven, follow the instructions below to align the doors: Your refrigerator has two front leveling screws--one on the right and one on the left. If your refrigerator seems unsteady or you want the doors to close easier, adjust the refrigerator's tilt using the instructions below: 1. 1. With as lower it. It may take several turns of the leveling screw to adjust the tilt of the refrigerator.
USING YOUR REFRIGERATOR ENSURING PROPER AIR CIRCULATION In order to ensure flow between the proper SETTING THE CONTROLS ? temperatures, air refrigerator must and freezer sections. As shown in the illustration below, air ? top of freezer and circulates down. From bottom of freezer, air is forced up to top of refrigerator.
ADJUSTING CONTROL SETTINGS FOOD STORAGE GUIDE Give the refrigerator time to cool down completely before making final adjustments. It is best to wait 24 hours before doing this. The mid-settings indicated in the previous section should be correct for normal household refrigerator usage. The controls are set correctly when milk or juice is as cold as you like and when ice cream is firm. Wrap or store food in the refrigerator in airtight and moisture-proof material unless otherwise noted.
USING YOUR REFRIGERATOR STORING FROZEN FOOD REFRIGERATOR SECTION NOTE: For further information about food for freezing freezer guide or a Packaging food or preparing storage times, check reliable cookbook. Push up the dispenser switch with you hear click to get cold water. Successful freezing depends packaging. package, it When you close and seal the must not allow air or moisture in out.
USING YOUR REFRIGERATOR w CAUTION: Make REFRIGERATOR SHELVES from The shelves in your refrigerator are adjustable to meet your individual storage needs. Your model may have glass Sliding Out You IMPORTANT: Do not clean they are glass can falling or spilling so food. shelves with Shelves slide refrigerator shelves in and out of your follows. glass as ? To slide the shelf out, shelf toward you. carefully pull ? To slide shelf shelf in until it energy.
USING YOUR REFRIGERATOR u OPTIBIN CRISPERS Crispers with To remove rails crisper: 1. Pull drawer out to full extension. 2 2. Lift the front of basket up and pull straight out. 1 The and Optibin Crispers provide fresher-tasting fruit vegetables by letting you easily control humidity inside the crisper. The Optibin Crispers include: 1) a humidity control knob at the front of the crisper cover and 2) a large lattice on the inner surface of the cover to hold or release moisture.
To remove crisper 1. Raise the door door flap high as as 2. Press the door plastic hinge toward flap with your finger. 3. Lift the door out of its 4. To replace, reverse it will open. CRISPER COVER WITH LATTICE ON INNER SURFACE the center of the To flap: the lattice remove inner surface: on place. above procedure. 1. Remove crisper 2. Hold the glass cover cover (as illustrated and turn the above). crisper cover over. 3.
USING YOUR REFRIGERATOR GLIDE N SERVE The Glide N Serve provides storage space with variable temperature control that keeps the compartment colder than refrigerator temperature. The drawer also features opening lid that pulled open. This drawer items, or a a self- opens whenever the drawer is be used for can deli large party trays, beverages. NOTE: DO NOT store lettuce produce Colder Temp Control other leafy in this drawer.
USING YOUR REFRIGERATOR DAIRY BIN 1. To 2. the remove FREEZER SECTION (Optional) dairy bin, simply lift it and pull TILTING DOOR straight out. To replace the dairy bin, slide it in above the desired location and push down until it stops. The tilting door provides Egg egg box it out. pull (Optional) Box on interior w CAUTION: Do not storage for stored use: Tilt the door down and Store access foods. How to EGG BOX easy shelf, not on door shelf.
USING YOUR REFRIGERATOR FREEZER DOOR RACK DURABASE DIVIDER (GR-F258**) The Durabase divider allows you to Durabase area into sections. To remove 1. Pull one basket of the brackets the organize upward. 2. Remove basket from both brackets. To replace basket 1. Insert bracket into one side. Hook end of basket into bracket. 2. Hook other basket end into other bracket. Push bracket down into 3. Be place. back of basket goes behind retention each bracket. sure tab on 1 1. To remove, 2.
Replace with WATER FILTER 2. It is recommended that you replace the filter when the water filter indicator light turns on or Take the your water decreases dispenser or noticeably. ice maker remove performance a new cartridge. cartridge out of its packaging protective cover from the o-rings. new and With the cartridge knob in the vertical position, push new filter cartridge into the cover until it stops.
DOOR LINERS AND GASKETS Do not use waxes, concentrated cleaning detergents, bleaches, or cleaners containing petroleum on plastic refrigerator parts. PLASTIC PARTS (covers and Do not window sprays, abrasive flammable fluids. These can scratch Explosion or so can result in death, explosion, Remove base on page Use about once a month to clean both sections prevent odors.
To 1. change the freezer Unplug refrigerator 2. Reach behind 3. 4. Replace Plug in light bulb with or disconnect power. shield to a refrigerator WHEN YOU GO ON VACATION light: 40-watt or remove If you choose to leave the refrigerator on while you are away, follow these steps to prepare your refrigerator before you leave. bulb. appliance bulb. 1. Use up any items. reconnect power. 2. and freeze other perishables the ice bin.
NOTE: If the cube size is smaller you expected, you cube size button. Personal Injury Hazard the automatic refrigerator button, the light position, the larger the cubes will be. Pressing at highest position returns indicator to lowest position. element that releases the cubes. DO NOT while the the size with the you press the cube size indicator moves up.
BEFORE YOU BEGIN ? This water line installation is not warranted refrigerator or diameter the compression icemaker manufacturer. Follow these instructions expensive by water carefully damage. to minimize the risk of (sleeves) ? not your refrigerator before connecting the water line, make sure the icemaker power switch ? (off) position. Do not install the icemaker tubing in areas where temperatures fall below freezing.
7. CONNECT THE TUBING TO THE INSTALLATION INSTRUCTIONS VALVE (CONTINUED) Place the compression nut and ferrule (sleeve) for copper tubing onto the end of the tubing and connect it to the shutoff valve. Make sure the tubing is fully inserted into the valve. Tighten the compression nut securely. 4. FASTEN THE SHUTOFF VALVE Fasten the shutoff valve to the cold water with the pipe pipe clamp.
4. Insert the tube into the valve and fasten 9. CONNECT THE TUBING TO THE REFRIGERATOR Removing and Replacing with wrench as shown in the figure below. Valve Cover NOTE: Before Tubing the connection to the making refrigerator, be sure the refrigerator power cord is not plugged into the wall outlet. 1. Loosen screw on top of plastic cover. ? w CAUTION: Check to occurs see if water dripping at water line connections. 5.
CONNECTING THE WATER LINE 10. TURN THE WATER ON AT THE SHUTOFF VALVE Tighten any connections that leak. Reattach the compressor compartment access cover. 11. PLUG IN THE REFRIGERATOR Arrange the coil of tubing so that it does not vibrate against the back of the refrigerator or against the wall. Push the refrigerator back to the wall. 12. START THE ICEMAKER Set the icemaker power switch to the ON position.
UNDERSTANDING SOUNDS YOU ? The defrost timer will click when the automatic defrost cycle begins and ends. The thermostat control (or refrigerator control, depending on the model) will also click when cycling on and off. ? Rattling noises may come from the flow of refrigerant, the water line, or items stored on top of the refrigerator. Your refrigerator is designed to run more efficiently to keep your food items at the desired MAY HEAR Your new refrigerator may make sounds that your old one didn't make.
Check if... COMPRESSOR MOTOR SEEMS TO RUN TOO MUCH Then... The refrigerator that an older model. The room normal. was replaced was temperature is hotter than u Modern refrigerators with more storage space require more operating time. u The motor will run longer under warm conditions. At normal room temperatures, expect your motor to about 40% to 80% of the time. Under warmer conditions, expect it to run even more often.
Check if... ICE HAS OFF- Then... The icemaker recently was installed. TASTE OR ODOR u Discard first few batches of ice to avoid discolored The ice has been stored for too long. off-flavored ice. or u Throw away old ice and make new supply. The food has not been in either as supply contains minerals sulfur. The interior of refrigerator needs THERE IS bin needs refrigerator is cleaning. u See Care and Cleaning section u Empty and wash bin. Discard old cubes.
Check if... Then... The air vents IS TOO WARM circulates from the freezer to the fresh sense OR THERE IS food section and back that block vents and restrict airflow. INTERIOR air vents in the wall Refer to Multi-Flow MOISTURE sections. BUILDUP The doors are blocked. Cold air u Locate air vents by using your hand to TEMPERATURE again through dividing the two airflow and all move on packages page 13 for the location of air vents. are opened u When the door is opened, often.
This guide contains many This is the that All can important safety messages. Always safety kill or alert symbol. hurt you safety messages or or cause preceded by the safety or seriously injured if you don't follow instructions. can be killed an imminently or hazardous situation moderate ? ? breaker or fuse box in order to avoid contact with live wire filament. (A burned-out light bulb may break when being replaced.) NOTE: position either or not avoided, product damage only.
Child entrapment and suffocation are not problems of the past. Junked or abandoned BEFORE YOU THROW AWAY YOUR OLD REFRIGERATOR OR FREEZER refrigerators are still dangerous...even if they will sit for just a few days. If you are getting rid of your old refrigerator, please follow the instructions at right to help prevent accidents. ? Take off the doors. ? Leave the shelves in that children may climb inside. Your old refrigerator may have a cooling system that used CFCs (chlorofluorocarbons).
PARTS AND FEATURES A B N O P C C I D J E K F G L H M Use this page to become your convenience. NOTE: This have familiar with the parts and features. Page references covers match your model. A C H Ice Bin Refrigerator Light B Filter (Inside) I Pull out Drawer J Durabase Design-A-Door D Shelves K Divider E L Freezer Door Rack Optibin Crisper (Keeps are included for several different models. The refrigerator you have purchased may all of the items listed below.
INSTALLATION 1. To avoid Excessive Use two Weight to people or more Hazard move result in back so can or other injury. UNPACKING YOUR REFRIGERATOR 2. tape and any temporary labels from your refrigerator before using. Do not remove any any remaining tape or glue, rub the briskly with your thumb. Tape or glue residue use tape or see the abrasive cleaners to Refrigerator position. heat remove 1. Clean your refrigerator thoroughly and all dust accumulated during shipping. wipe 2.
HOW TO REMOVE DOOR HANDLES To move refrigerator through house a door, it maybe necessary to remove the refrigerator door handles. NOTE: Handle appearance may vary from illustrations on this page. 1. Handle Removing Refrigerator ? Grasp the handle tightly with both hands and slide the handle (1)(this force). up ? The may keyhole require slots (2) some on the back of the handle allow the handle to separate from the mounting screws 1 (3).
HOW TO REPLACE DOOR HANDLES NOTE: Handle appearance may vary from illustrations on this page. 1. Replacing Refrigerator ? slots Align keyhole (1) Door Handle on the top and bottom of the back of the handle with the screws (2) mounted on the front of the door. ? Press the handle against the door making sure that the screws (2) the keyhole slots (1). ? Holding the handle with both 1 front, go into 3 hands, press it firmly against the front of the door and slide the handle down (3).
REFRIGERATOR INSTALLATION REMOVING AND REPLACING REFRIGERATOR DOORS 1. Removing Refrigerator Door w CAUTION: CAUTION: Before you begin, unplug the refrigerator. Remove food and bins from doors. u Left Door 1. Disconnect water 2. Open Use flat door. supply tube by pushing back Loosen top hinge cover screw (1). the disconnect on screwdriver to pry back hooks on front underside of 3. Disconnect door switch wire harness (2). Remove cover. tip 4. Attach the tube on ring (4). cover (3).
REFRIGERATOR INSTALLATION 2. Replacing Refrigerator u Right Door Door 1. Lower the door onto middle 2. 3. 4. 5. hinge pin (10). Fit top hinge (8) over hinge lever latch (9) and into place. Insert hinge lever (7) under lever latch. Rotate lever counterclockwise to secure hinge. Install the grounding screw (6) and connect the three wire harnesses (5). Connect door switch wire harness (2). Hook tab on door switch side of cover under edge of wire opening in cabinet top. Position cover (3) into place.
2. HOW TO REMOVE AND INSTALL THE PULLOUT DRAWER ? Drawer Installing Pullout Pull both rails (1) out to full extension. IMPORTANT: To avoid possible injury, product or property damage, you will need two people to perform the following instructions. 1. ? Removing Pullout Drawer Pull the drawer open to full extension. Remove the lower basket (1) by lifting basket from rail system. 1 ? 1 Hook the door as supports (2) into the rail tabs (3), illustrated, and lower the door into final position.
LEVELING AND DOOR ALIGNMENT Door Leveling If the space between your doors is uneven, follow the instructions below to align the doors: Your refrigerator has two front leveling screws--one on the right and one on the left. If your refrigerator seems unsteady or you want the doors to close easier, adjust the refrigerator's tilt using the instructions below: 1. 1. With as lower it. It may take several turns of the leveling screw to adjust the tilt of the refrigerator.
USING YOUR REFRIGERATOR ENSURING PROPER AIR CIRCULATION In order to ensure flow between the proper SETTING THE CONTROLS ? temperatures, air refrigerator must and freezer sections. As shown in the illustration below, air ? top of freezer and circulates down. From bottom of freezer, air is forced up to top of refrigerator.
ADJUSTING CONTROL SETTINGS FOOD STORAGE GUIDE Give the refrigerator time to cool down completely before making final adjustments. It is best to wait 24 hours before doing this. The mid-settings indicated in the previous section should be correct for normal household refrigerator usage. The controls are set correctly when milk or juice is as cold as you like and when ice cream is firm. Wrap or store food in the refrigerator in airtight and moisture-proof material unless otherwise noted.
USING YOUR REFRIGERATOR STORING FROZEN FOOD REFRIGERATOR SECTION NOTE: For further information about food for freezing freezer guide or a Packaging food or preparing storage times, check reliable cookbook. Push up the dispenser switch with you hear click to get cold water. Successful freezing depends packaging. package, it When you close and seal the must not allow air or moisture in out.
USING YOUR REFRIGERATOR w CAUTION: Make REFRIGERATOR SHELVES from The shelves in your refrigerator are adjustable to meet your individual storage needs. Your model may have glass Sliding Out You IMPORTANT: Do not clean they are glass can falling or spilling so food. shelves with Shelves slide refrigerator shelves in and out of your follows. glass as ? To slide the shelf out, shelf toward you. carefully pull ? To slide shelf shelf in until it energy.
USING YOUR REFRIGERATOR u OPTIBIN CRISPERS Crispers with To remove rails crisper: 1. Pull drawer out to full extension. 2 2. Lift the front of basket up and pull straight out. 1 The and Optibin Crispers provide fresher-tasting fruit vegetables by letting you easily control humidity inside the crisper. The Optibin Crispers include: 1) a humidity control knob at the front of the crisper cover and 2) a large lattice on the inner surface of the cover to hold or release moisture.
To remove crisper 1. Raise the door door flap high as as 2. Press the door plastic hinge toward flap with your finger. 3. Lift the door out of its 4. To replace, reverse it will open. CRISPER COVER WITH LATTICE ON INNER SURFACE the center of the To flap: the lattice remove inner surface: on place. above procedure. 1. Remove crisper 2. Hold the glass cover cover (as illustrated and turn the above). crisper cover over. 3.
USING YOUR REFRIGERATOR GLIDE N SERVE The Glide N Serve provides storage space with variable temperature control that keeps the compartment colder than refrigerator temperature. The drawer also features opening lid that pulled open. This drawer items, or a a self- opens whenever the drawer is be used for can deli large party trays, beverages. NOTE: DO NOT store lettuce produce Colder Temp Control other leafy in this drawer.
USING YOUR REFRIGERATOR DAIRY BIN 1. To 2. the remove FREEZER SECTION (Optional) dairy bin, simply lift it and pull TILTING DOOR straight out. To replace the dairy bin, slide it in above the desired location and push down until it stops. The tilting door provides Egg egg box it out. pull (Optional) Box on interior w CAUTION: Do not storage for stored use: Tilt the door down and Store access foods. How to EGG BOX easy shelf, not on door shelf.
USING YOUR REFRIGERATOR FREEZER DOOR RACK DURABASE DIVIDER (GR-F258**) The Durabase divider allows you to Durabase area into sections. To remove 1. Pull one basket of the brackets the organize upward. 2. Remove basket from both brackets. To replace basket 1. Insert bracket into one side. Hook end of basket into bracket. 2. Hook other basket end into other bracket. Push bracket down into 3. Be place. back of basket goes behind retention each bracket. sure tab on 1 1. To remove, 2.
Replace with WATER FILTER 2. It is recommended that you replace the filter when the water filter indicator light turns on or Take the your water decreases dispenser or noticeably. ice maker remove performance a new cartridge. cartridge out of its packaging protective cover from the o-rings. new and With the cartridge knob in the vertical position, push new filter cartridge into the cover until it stops.
DOOR LINERS AND GASKETS Do not use waxes, concentrated cleaning detergents, bleaches, or cleaners containing petroleum on plastic refrigerator parts. PLASTIC PARTS (covers and Do not window sprays, abrasive flammable fluids. These can scratch Explosion or so can result in death, explosion, Remove base on page Use about once a month to clean both sections prevent odors.
To 1. change the freezer Unplug refrigerator 2. Reach behind 3. 4. Replace Plug in light bulb with or disconnect power. shield to a refrigerator WHEN YOU GO ON VACATION light: 40-watt or remove If you choose to leave the refrigerator on while you are away, follow these steps to prepare your refrigerator before you leave. bulb. appliance bulb. 1. Use up any items. reconnect power. 2. and freeze other perishables the ice bin.
NOTE: If the cube size is smaller you expected, you cube size button. Personal Injury Hazard the automatic refrigerator button, the light position, the larger the cubes will be. Pressing at highest position returns indicator to lowest position. element that releases the cubes. DO NOT while the the size with the you press the cube size indicator moves up.
BEFORE YOU BEGIN ? This water line installation is not warranted refrigerator or diameter the compression icemaker manufacturer. Follow these instructions expensive by water carefully damage. to minimize the risk of (sleeves) ? not your refrigerator before connecting the water line, make sure the icemaker power switch ? (off) position. Do not install the icemaker tubing in areas where temperatures fall below freezing.
7. CONNECT THE TUBING TO THE INSTALLATION INSTRUCTIONS VALVE (CONTINUED) Place the compression nut and ferrule (sleeve) for copper tubing onto the end of the tubing and connect it to the shutoff valve. Make sure the tubing is fully inserted into the valve. Tighten the compression nut securely. 4. FASTEN THE SHUTOFF VALVE Fasten the shutoff valve to the cold water with the pipe pipe clamp.
4. Insert the tube into the valve and fasten 9. CONNECT THE TUBING TO THE REFRIGERATOR Removing and Replacing with wrench as shown in the figure below. Valve Cover NOTE: Before Tubing the connection to the making refrigerator, be sure the refrigerator power cord is not plugged into the wall outlet. 1. Loosen screw on top of plastic cover. ? w CAUTION: Check to occurs see if water dripping at water line connections. 5.
CONNECTING THE WATER LINE 10. TURN THE WATER ON AT THE SHUTOFF VALVE Tighten any connections that leak. Reattach the compressor compartment access cover. 11. PLUG IN THE REFRIGERATOR Arrange the coil of tubing so that it does not vibrate against the back of the refrigerator or against the wall. Push the refrigerator back to the wall. 12. START THE ICEMAKER Set the icemaker power switch to the ON position.
UNDERSTANDING SOUNDS YOU ? The defrost timer will click when the automatic defrost cycle begins and ends. The thermostat control (or refrigerator control, depending on the model) will also click when cycling on and off. ? Rattling noises may come from the flow of refrigerant, the water line, or items stored on top of the refrigerator. Your refrigerator is designed to run more efficiently to keep your food items at the desired MAY HEAR Your new refrigerator may make sounds that your old one didn't make.
Check if... COMPRESSOR MOTOR SEEMS TO RUN TOO MUCH Then... The refrigerator that an older model. The room normal. was replaced was temperature is hotter than u Modern refrigerators with more storage space require more operating time. u The motor will run longer under warm conditions. At normal room temperatures, expect your motor to about 40% to 80% of the time. Under warmer conditions, expect it to run even more often.
Check if... ICE HAS OFF- Then... The icemaker recently was installed. TASTE OR ODOR u Discard first few batches of ice to avoid discolored The ice has been stored for too long. off-flavored ice. or u Throw away old ice and make new supply. The food has not been in either as supply contains minerals sulfur. The interior of refrigerator needs THERE IS bin needs refrigerator is cleaning. u See Care and Cleaning section u Empty and wash bin. Discard old cubes.
Check if... Then... The air vents IS TOO WARM circulates from the freezer to the fresh sense OR THERE IS food section and back that block vents and restrict airflow. INTERIOR air vents in the wall Refer to Multi-Flow MOISTURE sections. BUILDUP The doors are blocked. Cold air u Locate air vents by using your hand to TEMPERATURE again through dividing the two airflow and all move on packages page 13 for the location of air vents. are opened u When the door is opened, often.