BOTTOM FREEZER REFRIGERATOR User’s Guide Please read this guide thoroughly before operating and keep it handy for reference at all times. CONGÉLATEUR INFÉRIEUR RÉFRIGÉRATEUR Guide d’Utilisation et d’Entretien Veuillez lire ce manuel en entier avant de mettre en marche l'unité et conservez-le à portée de la main pour le consulter à tout moment. P/No.
TABLE OF CONTENTS Safety Instructions 3–9 Dairy Bin 24 Parts and Features 10 Utility Bin 24 Refrigerator Installation ❿ Freezer section 11–18 Unpacking Your Refrigerator 11 Tilting Door 24 Installation 11 Ice Bin 24 Base Cover 11 Tilt-Out Door Basket 25 Durabase 25 Durabase Divider 25 Pull out Drawer 25 Filter 26 Removing and Replacing Your Refrigerator Handles and Doors 12–17 Leveling and Door Alignment Using Your Refrigerator 18 19–26 Care and Cleaning 27–28 Ensuring P
SAFETY MESSAGES BASIC SAFETY PRECAUTIONS This guide contains many important safety messages. Always read and obey all safety messages. This is the safety alert symbol. It alerts you to safety messages that inform you of hazards that can kill or hurt you or others, or cause damage to the product. All safety messages will be preceded by the safety alert symbol and the hazard signal word DANGER, WARNING, CAUTION.
GROUNDING REQUIREMENTS Use a receptacle which cannot be turned off with a switch or pull chain. Do not use an extension cord. Where a standard two-prong wall outlet is encountered, it is your personal responsibility and obligation to have it replaced with a properly grounded three-prong wall outlet. Do not, under any circumstances, cut or remove the third (ground) prong from the power cord.
IMPORTANT SAFETY INSTRUCTIONS Don’t use an extension cord • If water pressure does not reach the rating 147 kPa (1.5 kgf/cm2) or below, it is necessary to purchase a separate pressure pump for normal automatic icing and cool water feed. • Keep the total length of the feed water pipe tube within 8 m and be careful for the tube not be bent. If the tube is 8 m or longer it may cause trouble in water feed owing to the drain water pressure.
w WARNING Do not extend or modify the length of the power plug. Unplug the power plug when cleaning, handling or replacing the interior lamp of the refrigerator. It causes electric shock or fire by the electric damage of the power cord or others. • It may cause electric shock or injury. • When replacing the interior lamp of the refrigerator, make sure that the rubber ring for preventing the electric spark within the socket is not taken off.
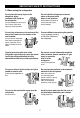
IMPORTANT SAFETY INSTRUCTIONS 2. When using the refrigerator Do not place the heavy object or the dangerous object (container with liquid) on the refrigerator. Do not install the refrigerator in the wet place or the place which water or rain splashes. Deterioration of insulation of electric parts may cause electric leakage. It may be dropped to cause injury, fire or electric shock when opening or closing the door.
IMPORTANT SAFETY INSTRUCTIONS Do not place flower vase, cup, cosmetics, medicine or any container with water on the refrigerator. In case of thunder and lightning, or not in use for a long period of time, detach the power plug. There is a danger of electric shock or fire. It may cause fire, electric shock or injury by dropping down. Use the submerged refrigerator after checking it. Do not spray water at the outside or the inside of the refrigerator or do not clean it with benzene or thinner.
w CAUTION Violating this direction may cause injury or damage house or furniture. Always be careful, please. Do not insert the hands into the ice bucket or the ice dispenser. Do not touch food or containers at the freezer with wet hands. Operating the ice maker may cause injury. It may cause frostbite. Do not put ice in thin crystal cup or ceramic ware. Supply the automatic ice maker with drinkable water only (only for the model with the dispenser). It may break cup or ceramic ware to cause injury.
PARTS AND FEATURES A M B N P C C D I O J E K F G L H Use this page to become more familiar with the parts and features.Page references are included for your convenience. NOTE: This guide covers several different models. The refrigerator you have purchased may have some or all of the items listed below. The locations of the features shown below may not match your model. A Refrigerator Light I Pull out Drawer (p. 25) B Filter (Inside) (p. 26) J Durabase (p. 25) C Modular Door Bins (p.
REFRIGERATOR INSTALLATION INSTALLATION w WARNING • To minimize noise and vibration, the refrigerator MUST be installed on a solidly constructed floor. • Carpeting and soft tile surfaces are not recommended. • Never install the refrigerator on a platform or weakly supported structure. 1. To avoid vibration, the unit must be level. If required, adjust the leveling screws to compensate for unevenness of the floor. The front should be slightly higher than the rear to aid in door closing.
REFRIGERATOR INSTALLATION HOW TO REMOVE DOOR HANDLES To move refrigerator through a house door, it maybe necessary to remove refrigerator and freezer door handles. NOTE: Handle appearance may vary from illustrations on this page. 1. Removing Refrigerator Handle • Loosen the set screws with the 3/32” Allen wrench and remove the handle. NOTE: If the handle mounting fasteners need to be tightened or removed, use a 1/4” Allen wrench. Mounting Fasteners Set Screw Allen Wrench 2.
REFRIGERATOR INSTALLATION HOW TO REPLACE DOOR HANDLES NOTE: Handle appearance may vary from illustrations on this page. 1. Replacing Refrigerator Door Handle • Place the handle on the door by adjusting handle footprints to fit mounting fastners and tighten the set screws with the 3/32” Allen wrench. NOTE: If the handle mounting fasteners need to be tightened or removed use a 1/4” Allen wrench. Mounting Fasteners 2.
REFRIGERATOR INSTALLATION IMPORTANT: When lifting the hinge free of the latch, be careful that the door does not fall forward. REMOVING AND REPLACING REFRIGERATOR DOORS To remove the left refrigerator door: • Lift the door from the middle hinge pin and remove the door. Pull the water tube out of the fitting while pressing the release ring on the fitting.
REFRIGERATOR INSTALLATION Replacing Refrigerator Door: ❿ Right Door • Lower the door onto middle hinge pin (9). • Fit top hinge (7) over hinge lever latch (8) and into place. Rotate lever (6) counterclockwise to secure hinge. • Install the grounding screw (5) and connect wire harnesses (4). • Hook tab on door switch side of cover under edge of wire opening in cabinet top. Position cover (2) into place. lnsert and tighten cover screw (1). ❿ Left Door • Lower the door onto middle hinge pin (9).
REFRIGERATOR INSTALLATION • With both hands, hold both sides of the door and pull it up to separate it from the rails. HOW TO REMOVE AND INSTALL THE PULLOUT DRAWER IMPORTANT: To avoid possible injury or product or property damage, you will need two people to perform the following instructions. 1. Removing Pullout Drawer • Pull the drawer open to full extension. Remove the lower basket (1) by lifting basket from rail system. (If you tilt the door, it will be easier.
REFRIGERATOR INSTALLATION • Make sure you have a right rail cover for each side. HOW TO REMOVE AND INSTALL THE PULLOUT DRAWER Right Rail Cover IMPORTANT: To avoid possible injury or product or property damage, you will need two people to perform the following instructions. Left Rail Cover 2. Installing Pullout Drawer • With both hands, hold the center bar and push it out to let both rails out to full extension simultaneously.
REFRIGERATOR INSTALLATION LEVELING AND DOOR ALIGNMENT Door Alignment Leveling If the space between your doors is uneven, follow the instructions below to align the doors: After installing, secure the product with the LEG not to move left or right. 1. With one hand, lift up the door you want to raise at middle hinge. Your refrigerator has two front leveling screws— one on the right and one on the left.
USING YOUR REFRIGERATOR ENSURING PROPER AIR CIRCULATION In order to ensure proper temperatures, air must flow between the refrigerator and freezer sections. As shown in the illustration below, air enters at top of freezer and circulates down. From bottom of freezer, air is forced up to top of refrigerator. Air enters refrigerator through top vent, then circulates and exists at bottom, where it returns to freezer. EXPRESS FRZ.
USING YOUR REFRIGERATOR ADJUSTING CONTROL SETTINGS FOOD STORAGE GUIDE Give the refrigerator time to cool down completely before making final adjustments. It is best to wait 24 hours before doing this. The mid-settings indicated in the previous section should be correct for normal household refrigerator usage. The controls are set correctly when milk or juice is as cold as you like and when ice cream is firm.
USING YOUR REFRIGERATOR STORING FROZEN FOOD REFRIGERATOR SECTION NOTE: For further information about preparing food for freezing or food storage times, check a freezer guide or a reliable cookbook. WATER DISPENSER Push the dispenser pad with a glass until you hear a click to get cold water. Packaging Successful freezing depends on correct packaging. When you close and seal the package, it must not allow air or moisture in or out.
USING YOUR REFRIGERATOR REFRIGERATOR SHELVES Sliding Out Shelves The shelves in your refrigerator are adjustable to meet your individual storage needs. Your model may have glass or wire shelves. Storing similar food items together in your refrigerator and adjusting the shelves to fit different heights of items will make finding the exact item you want easier; it will also reduce the amount of time the refrigerator door is open, saving energy.
USING YOUR REFRIGERATOR CRISPER HUMIDITY CONTROL GLIDE‘N’SERVE You can control the amount of humidity in the moisture-sealed crispers. Store vegetables or fruits requiring more or less humidity in separate crispers. Adjust the control to any setting between HIGH and LOW. • LOW lets moist air out of the crisper for best storage of fruits. • HIGH keeps moist air in the crisper for best storage of fresh, leafy vegetables.
USING YOUR REFRIGERATOR MODULAR DOOR BIN FREEZER SECTION The door bins are removable for easy cleaning and adjusting. TILTING DOOR The tilting door provides easy access for stored foods. 1. To remove the bin, simply lift the bin up and pull straight out. How to use: 2. To replace the bin, slide it in above the desired support button and push down until it stops. Tilt the door down and pull it out. w WARNING : Somebody can be hurt if door bins are not firmly assembled.
USING YOUR REFRIGERATOR TILT-OUT DOOR BASKET DURABASE DIVIDER You can remove foods easily by tilting out the wire basket in the freezer compartment. The Durabase divider allows you to organize the Durabase area into sections. 1. To remove, pull the bracket upward until you hear a clicking sound and remove the wire rack. 2. To replace, hook the end of the rack in the bracket, and push down until it locks into place.
USING YOUR REFRIGERATOR 2. Replace with a new cartridge. FILTER It is recommended that you replace the filter when the water filter indicator icon turns on or your water dispenser or ice maker performance decreases noticeably. Take the new cartridge out of its packaging and remove protective cover from the o-rings. After changing the water filter cartridge, reset the water filter status display and indicator icon by pressing and holding the Filter Reset button for 3 seconds.
CARE AND CLEANING PLASTIC PARTS (covers and panels) w WARNING Do not use window sprays, abrasive cleansers, or flammable fluids. These can scratch or damage the material. CONDENSER COILS Remove Back cover. Use a vacuum cleaner with an extended attachment to clean condenser coils.Vacuum coils when dusty or dirty.Coils may need to be cleaned as often as every other month. Explosion Hazard Use non-flammable cleaner. Failure to do so can result in death, explosion, or fire.
CARE AND CLEANING To change freezer light WHEN YOU GO ON VACATION 1. Unplug refrigerator power cord form outlet. If you choose to leave the refrigerator on while you are away, follow these steps to prepare your refrigerator before you leave. 2. Using a flat instrument, gently pry the lamp cover loose in the front as shown. Rotate downward to remove the rear tabs. 1. Use up any perishables and freeze other items. 3. Make sure the bulb is cool to the touch. Turn the bulb counterclockwise to remove. 2.
ABOUT THE AUTOMATIC ICEMAKER NOTE: If the cube size is smaller or larger than you expected, you can regulate the size with the cube size button. Every time you press the cube size button, the indicator moves up on light. The higher the light position, the larger the cubes will be. Pressing at highest position returns indicator to lowest position. w WARNING Personal Injury Hazard DO NOT insert your hands in to the Icemaker in operation. It may cause to injure you.
CONNECTING THE WATER LINE BEFORE YOU BEGIN WHAT YOU WILL NEED This water line installation is not warranted by the refrigerator or icemaker manufacturer. Follow these instructions carefully to minimize the risk of expensive water damage. Water hammer (water banging in the pipes) in house plumbing can cause damage to refrigerator parts and lead to water leakage or flooding. Call a qualified plumber to correct water hammer before installing the water supply line to the refrigerator.
CONNECTING THE WATER LINE 5. TIGHTEN THE PIPE CLAMP INSTALLATION INSTRUCTIONS Tighten the clamp screws until the sealing washer begins to swell. NOTE: Do not overtighten or you may crush the tubing. Install the shutoff valve on the nearest frequently used drinking water line. 1. SHUT OFF THE MAIN WATER SUPPLY Turn on the nearest faucet to relieve the pressure on the line. Washer 2. CHOOSE THE VALVE LOCATION Pipe Clamp Choose a location for the valve that is easily accessible.
CONNECTING THE WATER LINE 8. FLUSH OUT THE TUBING 10. TURN THE WATER ON AT THE SHUTOFF VALVE Turn the main water supply on and flush out the tubing until the water is clear. Shut the water off at the water valve after about one quart of water has been flushed through the tubing. Tighten any connections that leak. Reattach the compressor compartment access cover. 9. CONNECT THE TUBING TO THE REFRIGERATOR Removing and Replacing Valve Cover 11.
TROUBLESHOOTING GUIDE • The defrost timer will click when the automatic defrost cycle begins and ends. The thermostat control (or refrigerator control, depending on the model) will also click when cycling on and off. • Rattling noises may come from the flow of refrigerant, the water line, or items stored on top of the refrigerator. • Your refrigerator is designed to run more efficiently to keep your food items at the desired temperature.
TROUBLESHOOTING GUIDE COMPRESSOR MOTOR SEEMS TO RUN TOO MUCH Check if… Then… The refrigerator that was replaced was an older model. The room temperature is hotter than normal. ❿ Modern refrigerators with more storage space require more operating time. ❿ The motor will run longer under warm conditions. At normal room temperatures, expect your motor to run about 40% to 80% of the time. Under warmer conditions, expect it to run even more often. ❿ Adding food and opening the door warms the refrigerator.
TROUBLESHOOTING GUIDE ICE HAS OFFTASTE OR ODOR Check if… Then… The icemaker was recently installed. ❿ Discard first few batches of ice to avoid discolored or off-flavored ice. ❿ Throw away old ice and make new supply. ❿ Rewrap foods since odors may migrate to the ice if food is not wrapped properly. ❿ A filter may need to be installed (or replaced) to eliminate taste and odor problems. ❿ See Care and Cleaning section on pages 27–28. ❿ Empty and wash bin. Discard old cubes.
TROUBLESHOOTING GUIDE TEMPERATURE IS TOO WARM OR THERE IS INTERIOR MOISTURE BUILDUP Check if… Then… The air vents are blocked. Cold air circulates from the freezer to the fresh food section and back again through air vents in the wall dividing the two sections. The doors are opened often. ❿ Locate air vents by using your hand to sense airflow and move all packages that block vents and restrict airflow. Refer to Multi-Flow on page 19 for the location of air vents.