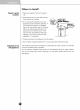
Table of contents Introduction Entry Important safety instruction Identification of parts Installation Where to install Door removal Door replacement Feed water pipe installation Height adjustment Operation Starting Adjusting the temperatures and functions Refreshment center (Applicable Shelf some (Applicable Wine holder to (Applicable Egg box (Applicable Humidity control Convert into a Deodorizer to vegetable or models to some some in the Miracle Zone Suggestion food on mode
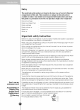
Introduction Entry The model and serial numbers case or back of refrigerator unique to this unit and not available to others. You should record requested information here and retain this guide as a permanent record of your purchase. Staple your receipt here. are found on compartment of this unit. These numbers Date of Dealer purchase : purchased from : Dealer address : Dealer phone : Model no. Serial the inner are no. : no.
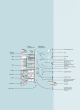
Freezer Compartment Refrigerator Compartment Milk Automatic Icemaker Shelf Lamp product corner Lamp Door Rack Shelf Can Server (Optional) Wine holder (Plastic Shelf or wire) Refreshment center (Optional) (Folding Egg Box Shelf or Normal) Drawer Vegetable Drawer Door Rack Drawer Humidity Switch Miracle Zone (Optional) Fresh compartment (Optional) Door Rack Lower Cover Door Rack Conversion switch (Meats/Vegetables) (Optional)
Installation Where to Install Select a good location 1. Place your appliance where it is easy to use. 2. Avoid direct placing the unit near heat sunlight or moisture. sources, 3. Air must circulate properly around your appliance operation. If in is a recessed your appliance placed to ensure efficient area in the wall, allow at least (30 cm) a 12 Inches greater clearance above the and 2 inches (5 cm) or more or appliance from the wall. The appliance should be elevated 1 inch (2.
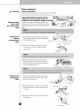
Installation Door removal Electric Shock Hazard Disconnect electrical supply to Warning Failure to do If your so access refrigerator before installing. death or serious injury. could result in door is too narrow for the refrigerator to pass through, remove the refrigerator door and pass the refrigerator laterally. Remove the lower cover by lifting upward, and remove clip, and then pull up the feed water tube while pressing area shown in the figure to the right.
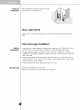
Installation Pass the Pass the door refrigerator as refrigerator laterally through right figure. Door access replacement Mount them in the door. Feed water Before installation the shown in the reverse pipe sequence of removal after they pass through the access installation Automatic ice maker operation needs water pressure of 147~834kPa (1.5~8.5 2 kgf/cm ) (That is, an instant paper cup (180 cc) will be fully filled within 3 sec.). If water pressure does not reach the rating 147 kPa (1.
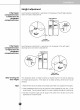
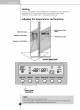
Installation Height adjustment If the freezer Level the door by inserting flat ( type) driver into the groove of the left and rotate it clockwise ( ). - compartment door height adjusting screw is lower than the refrigerator compartment door If the freezer Level the door compartment door is higher than the refrigerator compartment door After adjusting leveling the door height The the by inserting flat ( type) driver into the screw - groove of the right height and rotate it clockwise ( ).
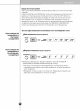
Operation Starting refrigerator is first installed, allow it to stabilize at normal operating temperatures for 2-3 hours prior to filling it with fresh or frozen foods. When your If operation is interrupted, wait 5 minutes before Adjusting the temperatures restarting. and functions NOTE ? ? Your model may not include every option. The control display is operated by touch. Excessive moisture cause a 9 malfunction. Please keep display clean and dty.
Operation Display Power Saving Mode places the display into is opened. This function power saving mode until the Press the FREEZER and EXPRESS FRZ. buttons next time the door simultaneously and hold them for 5 All LEDs will then turn ON, then OFF. When the mode is activated, the display will remain off until the next time the seconds until the Ding sounds. power saving door is opened.
Operation How to Select among crushed ice, water, and cubed ice and press the push switch with glass or other container. use dispenser Crushed Ice Light the crushed ice lamp by pressing the selection button. ? C rushed ice will be Reference : Cubed Ice Light the water lamp by pressing the selection Light the cubed ice lamp by pressing the button. ? dispensed by pressing the push switch with a glass. ? Water selection button. Water will be dispensed by pressing the push switch with a glass.
Operation Ice is When ice maker does not operate lumped together When ice is lumped together, take the ice lumps out of the ice storage bin, break them into small pieces, and then place them into the ice storage bin again. smoothly When the ice maker produces too small water supplied to the ice maker need to If ice is not used frequently, it may or lumped together ice, the amount of adjusted. Contact the service center. lump together. Power failure Ice may drop into the freezer compartment.
Operation Other functions Ambient Temperature Display Window. Temperature is displayed only between -9°C 49°C. Temperature less than -9°C is indicated with LO and ~ temperature than 49°C is indicated with HI. more Diagnosis (failure detection) function Diagnosis function automatically detects failure when failure is found in product during use of refrigerator. If failure occurs at product, it does not operate though pressing any button and normal indication is not done.
Operation Refreshment center How to Open use (Applicable to some models only) the refreshment center door. You can access the refreshment center without opening refrigerator door and thus saving electricity. Inner lamp is lit in refrigerator compartment when the refreshment center door opens. Thus it is easy to identify the contents. Never Use the refreshment center door as a stand use the refreshment center door as chopping board and take with sharp tools.
Operation Shelf Folding Shelf You (Applicable to can store taller items such some as a gallon models container or only) bottles by simply pushing front half of shelf underneath back half of shelf. Pull toward you to return to Wine holder adjustment (Type 1) Wine holder (Applicable to some Bottles laterally with can this wine This In can case be stored models a only) corner. be attached to any shelf.
Operation Humidity control in the vegetable compartment The humidity can be controlled by adjusting the humidity control switch left/right when storing vegetables or fruits.
Operation Miracle Zone models only) (Applicable to some By pressing the button, fruits or store vegetables, other types of food such be defrosted, raw fish, as meat to etc. at Miracle Zone Temperature Change models (Applicable to some Method to Use You can select only) optimum temperature range depending types of foods stored. - Transition Corner Temperature on 3-step of temperature selection including -3°C, -1°C and 4°C is available.
Suggestion Location of foods (Refer Wine holder to identification of parts) Store wine. Snack drawer Store small foods such Freezer as bread, snacks, Store various frozen foods such ice cream, frozen snacks, etc.. compartment as etc.. meat, fish, shelf Store small packed frozen food. Temperature is likely to increase as door opens. So, do not store long-term food such ice cream, etc.. Freezer compartment door rack Store meat, fish, chicken, etc..
Suggestion on food storage Storing foods Store fresh food in the refrigerator compartment. How food is frozen and thawed is important factor in maintaining its freshness and flavor. Do not store food which goes bad melons. easily at low temperatures, such as an bananas, and Allow hot food to cool prior to storing, placing hot food in the refrigerator could spoil higher energy consumption. When storing the food, cover it with vinyl wrap or store in a container with a lid.
Care and maintenance How to dismantle parts NOTE ? Dismantling is done in the reverse sequence of assembly. sure to unplug the power plug before dismantling and assembly. Never apply severe force to dismantle parts. Parts may be damaged. Be Freezer Separate the lamp by pulling it out while slightly pressing and rotating the lamp cover. compartment lamp Turn the bulb counterclockwise. Use (max.) which can be purchased a 40-watt bulb at a service center.
Care and maintenance To remove the lamp cover, press the protrusion under the lamp cover to the front and then pull the lamp cover out. Turn the bulb counterclockwise. Max. 40 W bulb for refrigerator is used and can be purchased at a service center. Lamp in refrigerator compartment Refreshment Separate the bin ( ) to upward. Separate the upper rack of the refreshment center and then pull out the refreshment center center cover ( ). The refreshment center by pulling it can be removed upwards.
Care and maintenance 0 0 Suggestion food on storage General information During average length vacations, you will probably find it best to leave the refrigerator in operation. Place freezable items in freezer for longer life. When you plan not to operate, remove all food, disconnect the power cord, clean the interior thoroughly, and leave each door OPEN to prevent odor formation.
Care and maintenance Trouble shooting Before calling for service, review this list. It may save you both time and expense. common occurrences that are not the result of defective This list includes workmanship Occurrence or materials in this Possible appliance. Solution cause Runing of refrigerator Refrigerator compressor does not run. Refrigerator control is off. Set refrigerator control. See setting the controls. Refrigerator is in defrost This is normal for cycle.
Care and maintenance Occurrence Possible Refrigerator Thermostat is at a constant compressor does not run. Temperatures Solution cause keeping the refrigerator temperature. This is normal. The refrigerator goes on and off to keep the temperature constant. are too cold Temperature in the freezer is too cold but the refrigerator temperature is Set the freezer control to a warmer setting until the freezer temperature is Freezer control is set too cold satisfactory. satisfactory.
Care and maintenance Possible Occurrence Solution cause Sound and noise Louder sound levels when refrigerator is on. Today's refrigerators have increased storage capacity and maintain more Louder sound levels when Refrigerator operates at higher pressures during the start of the ON cycle. even It is normal for sound levels to be higher. temperatures. This is normal. The sound will level off the refrigerator continues to run. as compressor comes on. Vibrating or rattling noise.
Care and maintenance Occurrence Odors in Possible Solution cause refrigerator Clean interior with sponge,warm water and baking soda. Interior needs to be cleaned. Food with strong odor is in the refrigerator. Cover food completely. Some containers and wrapping materials produce odors. different container wrapping materials. Move packages that keep door from closing. Use a or brand of Opening/Closing of doors/Drawers Door(s) will not close. Food Door(s) will not close.
Care and maintenance Occurrence Possible Solution cause Ice has melted and frozen around auger due to infrequent use, temperature fluctuations and/or power outrages. Dispenser will not dispense ice. Remove ice storage bin, and thaw and the contents. Clean bin, wipe dry and replace in proper position. When new ice is made, dispenser should operate. Ice dispenser is jammed. Ice cubes are jammed between the ice maker arm and back of the bin. Ice cubes are frozen together.