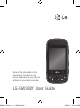
ENGLISH User Guide LG-GW382f P/NO : MMBB0393801 (1.1) G GW382f_Cover_Telstra_1.1_110426.indd 1 www.lg.
Making an Emergency call when there is no USIM card present in the handset: 1. Enter emergency number 000 or 112 2. Press key to activate Emergency call. Bluetooth QD ID B016221 GW382f_Cover_Telstra_1.1_110426.
Some of the information in this manual may not apply to your phone, depending on your phone's software or your service provider. LG-GW382f User Guide W382f_Telstra_1.1_110426.
Congratulations on your purchase of the advanced and compact LG-GW382f phone by LG, designed to operate with the latest digital mobile communication technology. W382f_Telstra_1.1_110426.
Contents Guidelines for safe and efficient use................................................5 Getting to know your phone.......12 Open view...................................14 Getting Started...........................16 Installing the SIM and battery.........16 Touch Calibration..........................20 Dial Pad.......................................20 Qwerty Keypad.............................21 Your Standby Screen..................23 Touch Screen Tips.........................23 The Quick Keys......
Contents Tools...........................................46 Music Player.................................46 Voice Command............................52 Calendar......................................53 Notepad.......................................54 Calculator.....................................54 World Clock..................................54 Tasks...........................................55 Stopwatch....................................55 Tip Calculator...............................56 Unit Converter...
Guidelines for safe and efficient use Please read these simple guidelines. Not following these guidelines may be dangerous or illegal. Exposure to radio frequency energy Radio wave exposure and Specific Absorption Rate (SAR) information This mobile phone model LG-GW382f has been designed to comply with applicable safety requirements for exposure to radio waves.
Guidelines for safe and efficient use Product care and maintenance WARNING: Only use batteries, chargers and accessories approved for use with this particular phone model. The use of any other types may invalidate any approval or warranty applying to the phone, and may be dangerous. • Do not disassemble this unit. Take it to a qualified service technician when repair work is required. • Keep away from electrical appliances such as TVs, radios, and personal computers.
• D o not use the phone or accessories in places with high humidity such as pools, greenhouses, solariums or tropical environments; it may cause damage to the phone and may void your warranty. Efficient phone operation Electronic and medical devices All mobile phones may get interference, which could affect performance. • Do not use your mobile phone near medical equipment. Avoid placing the phone over pacemakers, for example, in your breast pocket. • Mobile phones may interfere with some hearing aids.
Guidelines for safe and efficient use • P ull off the road and park before making or answering a call if driving conditions so require. • RF energy may affect some electronic systems in your vehicle such as car stereos and safety equipment. • If your vehicle is equipped with an airbag, ensure it is not obstructed by your mobile device or accessories. It may fail or cause a serious injury if obstructed when deployed.
Potentially explosive atmospheres • D o not use the phone at a refueling point. • Do not use near fuel or chemicals. • Do not transport or store flammable gas, liquid, or explosives in the same compartment of your vehicle as your mobile phone and accessories. In aircraft Wireless devices can cause interference in aircraft. • Turn your mobile phone off before boarding any aircraft. • Do not use it on the ground without permission from the crew.
Guidelines for safe and efficient use Battery information and care • Y ou do not need to completely discharge the battery before recharging. Unlike other battery systems, there is no memory effect that could compromise the battery’s performance. • Use only LG batteries and chargers. LG chargers are designed to maximize the battery life. • Do not disassemble or shortcircuit the battery pack. • Keep the metal contacts of the battery pack clean.
Driver Safety Tips When driving a car, driving is your first responsibility. When using your wireless phone behind the wheel of a car, practice good common sense and remember the following tips: • Use a hands free device. If possible, add an additional layer of convenience and safety to your wireless phone with one of the many hands free accessories available today. • Let the person you are speaking with know you are driving; if necessary, suspend the call in heavy traffic or hazardous weather conditions.
Getting to know your phone Charger/USB Port Inner camera lens Inner camera is applicable only during video call Earpiece Lets you hear the caller and automated prompts. Main LCD screen Soft keys Touch the left or right soft key to select available menu or options. SEND key Press this key in standby mode to quickly access your most recently missed, dialed, and received calls. Dial pad Press to open the dial touch key pad. OK key + 4-way navigation key Use for quick access to phone functions.
Headset Port Side volume keys • When on the Standby screen: Allows you to set the Ringtone volume. Hold the Down key to toggle the Vibration Mode On and Off. • During a call: Allows you to change the Earpiece volume. • When playing music: Allows you to change the music volume. W382f_Telstra_1.1_110426.indd 13 microSD™ memory card slot Multitasking key Camera key Press to start the Camera function. Press and hold to start the Video record function.
Open view Text Msg Sensis and Widget My Place Email Shift Press to change between Uppercase and Lowercase. Fn Press to type the symbols and numbers that appear on the qwerty keypad. Del Deletes digits and letters. Space Press to enter a space between words. Sym Press to open the Symbol menu. Press to input "@" and ".com". Up Right Down Left Press to move to the "next row" and act as "OK" key.
Battery cover Mirror Battery External camera lens W382f_Telstra_1.1_110426.
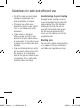
Getting Started Installing the SIM and battery 1 Remove the battery cover Slide the battery cover down away from the camera lens to remove. 2 Remove the battery Lever the bottom edge of the battery and remove it carefully from the battery compartment. WARNING: Do not remove the battery when the phone is switched on, as this may damage the phone. 16 W382f_Telstra_1.1_110426.
3 Install the SIM card Slide the SIM card into the SIM cardholder. Make sure that the gold contact area on the card is facing downward towards the gold contact pins on the phone. To remove the SIM card, pull it gently in the opposite direction. W382f_Telstra_1.1_110426.indd 17 4 Install the battery First, insert the top of the battery into the top edge of the battery compartment. Make sure that the battery contacts align with the terminals on the phone.
Getting Started 5 Charging your phone Lift the charger port cover on the top of your LG-GW382f. Insert the charger connector into the phone (the "B" side of the connector must face up when connecting to the phone), and then insert the plug into the wall socket. Your LG-GW382f must be charged until a message that says "Battery full. Please unplug charger to save energy" appears on the screen. WARNING: Use of unauthorized accessories could damage your phone and void your warranty.
Installing a Memory Card You can expand the memory available on your phone using a microSD™ memory card. The LG-GW382f supports microSD™ memory cards with up to 16 GB of memory. NOTE: A memory card is an optional accessory. 1 Lift the memory card cover, and then insert a microSD™ card with the gold contact area facing downwards. Close the memory card cover so that it clicks shut. W382f_Telstra_1.1_110426.
Getting Started Touch Calibration Signal Strength After you install SIM card and battery, and turn on the LG-GW382f, you will be prompted to calibrate the touch screen on your LG-GW382f. Touch the "+" markers as they appear to calibrate the screen. • Once you've finished calibrating your screen, Save the settings. If you are inside a building, you may get better reception close to a window. The signal indicator on your phone's display screen shows you the strength of the signal.
Using the T9 Dictionary The T9 Dictionary is a feature that allows the user to add any unique or personal words to the T9 standard language database. The T9 Dictionary function can be selected from the Text Entry Settings by using Options. Within the T9 Dictionary function, the user can add, modify, delete or reset personal words. NOTE: You can select a different T9 language from the same Options menu. The default setting on the phone is the T9 disabled mode. W382f_Telstra_1.1_110426.
Getting Started To enter a symbol in the text entry field, press the key, and then select a symbol on qwerty keypad. Or, to enter a symbol using the qwerty keys, just press , and then press the corresponding key. To return to ABC mode, press again. Complete each word with a . To space by pressing delete a character, press the key. When entering an accented letter When you select French or Spanish as the text entry language, you can enter special French or Spanish characters (e.g.: é).
Your Standby Screen From here, you can access all the menu options, make a quick call as well as many other actions. Touch Screen Tips Touch screen is only available on Dial pad. To select a number, touch the icon accurately. You can set your LG-GW382f to vibrate slightly when it recognizes you've touched an option. • There's no need to press hard; the touch screen is sensitive enough to detect a light yet sure touch.
Your Standby Screen The Quick Keys The quick keys on your standby screen provide easy, one-touch access to your most used functions. Left soft key: Press to open the Shortcuts menu. You can use the browser more quickly and conveniently. Right soft key: Press to access the Internet by launching the WAP browser. Center Key: Press to open the full Top menu, which is divided into twelve submenus. to make Dail pad: Press a call using the touch Dialing Keypad.
Screen Icons The table below describes various indicators and icons that appear on the phone's display screen. Icon Description Multitasking Network signal strength (number of bars will vary) No network signal Battery empty Icon Description The browser is active Speakerphone Call in Progress Voicemail Battery Full Battery Charging Flight Mode New text message New email An alarm is set Sound mode Vibration mode Sound&Vibration mode 3G available Bluetooth® is active W382f_Telstra_1.1_110426.
Menu Tree 1. BigPond 1.1 BigPond Home 1.2 Enter Address 1.3 Bookmarks 1.4 RSS Reader 1.5 Saved Pages 1.6 History 1.7 Settings 2. My Place 2.1 BigPond 2.2 FOXTEL 2.3 Sensis Search 2.4 Music 2.5 Scan Code 2.6 MyEmail 2.7 MySync 2.8 Yellow Pages 2.9 White Pages 2.0 Whereis Maps 2.* Downloads 2.# My Account 3. Social Web 3.1 SNS 3.2 TRIBE 3.3 Diva Chat 3.4 Sports Chat 3.5 Gamer Chat 3.6 RSVP 3.7 MOKO 3.8 OzChat 3.9 Fast Flirting 3.0 Flickr 3.* YouTube 4. Game&App 4.1 Games 4.2 Applications 5. Messaging 5.
Calls Making a Call 1 Make sure your phone is on. 2 Press , and then enter a phone number using the touch pad. Or slide open the qwerty keypad, and enter a phone number using the qwerty keys. To edit a number on the display screen, simply press key briefly to delete the one digit at a time. key – Press and hold the to delete the whole number. [SEND] key to 3 Press the call the number.
Calls NOTE: You can answer a call while using the Address Book or other menu features. Ending a Call When you have finished a call, press the [END] key. Adjusting the Volume If you want to adjust volume during a call, use the side volume keys. When on the Standby screen, you can adjust the ring volume using the side volume keys. Making a Second Call To make a second call, just select the number you want to dial. 1 During a call, an In-Call menu will be available.
Answering an Incoming Call Muting the Microphone To answer an incoming call when your handset is ringing, simply press the [SEND] key, or press left soft key. Your handset also alerts you an incoming call while you are already on a call. A tone will sound in the earpiece, and the display will show that a second call is waiting. This feature, known as Call Waiting, is only available if your network provider supports it.
Calls Make Video Call Conference Calls You can make or answer a Video call with other 3G video phones. In order to start a Video call, both sides must have a 3G Video calling capable phone and both must be in a 3G coverage area. The conference call service allows you to have a conversation with more than one party at a time. This feature is only available if your network service provider supports it.
Setting Up a Conference Call To set up a conference call, place the first call. Once that call is connected, follow the above steps to make a second call. You can then join the two separate calls by selecting options and selecting Join Calls from the Conference Call menu. Activate the Conference Call on Hold To activate a conference call on hold, press the key. Removing Calls from the Conference Call To remove a call from an existing conference call, press options and then choose Conference Call.
Messaging This menu includes functions related to SMS (Short Message Service), MMS (Multimedia Message Service), voicemail, and your network's service messages. Create Message 1 On the standby screen, press center key and choose Messaging. 2 Select Create Message. NOTE: If you attach a graphic or an audio file while writing a multimedia message, file loading can take up to 5 seconds. You will not be able to activate any key during file loading.
NOTE: Refer to page 61 for camera options. • Record New Audio: Record a new audio clip by Pressing Record button. - Quality: Set the audio quality to Fine, Normal, or Economy. - Select Default Storage: Set the default storage to Phone Memory or Memory Card. • Record New Video: Record a new video. The options are similar to those for inserting a New Picture. • Template - Text: You can easily insert frequently used sentences into your text message.
Messaging • Text Entry Settings - Text entry language: Allows you to set the text entry language to English, French (Francais), Spanish (Espanol), Korean. - Word correction: On/Off - Next Word Prediction: On/Off - T9 Dictionary: Here, you can add, delete, reset, or modify words in the T9 Dictionary. • Delivery Options - Delivery Receipt: Set this to On or Off. - Reply via Same Message Center: Set this to On or Off. • Save to Drafts: Saves the selected message to Drafts.
- Edit Message: Return to message in editing mode. - Save to Drafts: Saves the selected message to Drafts. - Text Entry Mode: Select an appropriate text entry mode. a bc Abc ABC 123 - Text Entry Settings: This menu allows you to set the Text Entry Language. It also gives you the following options: Word correction, Next Word Prediction and T9 Dictionary. - Cancel Message: Cancel your message. W382f_Telstra_1.1_110426.indd 35 Send-A-Card You can send a greeting card by SMS or MMS.
Messaging Standard View The following options are available in standard view: • Add to Address Book: Save the sender's phone number in the Contact List. • Delete: Select a message to delete. • Forward: Forwards a message. • Video Call: You can make Video call with other 3G video phones. • Copy to Phone/Move to SIM: You can copy to Phone or SIM depending on where the text message is stored. • Select Multiple: Select all messages.
After the maximum number of Send attempts has been reached, the Send function has failed. If you were trying to send a text message, open the message and check that the Sending options are correct. Press left soft key to use options available in Outbox list. • View Status: Shows message status as failed, sent, or error. • Edit: Allows you to edit the selected message. • Delete: Deletes the message you select.
Messaging Message Settings To configure Messaging settings, press center key and choose Messaging. Select Message Settings. • Message Alert: Set the Sounds and Alert Type here. • Save to: Set where to save the message. • Signature: This feature allows you to create your own Text signature. You can use symbols, a Text Template, and contacts as part of the signature. • Multimedia Msg - Template: You can create multimedia templates. - Priority: Set the priority of the message.
- Message Center: The details for the Multimedia gateway are preloaded into your handset and should not be changed. • Videomail Number: This menu allows you to set the videomail center number if this feature is supported by Telstra. Please check with Telstra for details of their service in order to configure the handset correctly. • Voicemail Number: This menu allows you to set the voicemail center number if this feature is supported by Telstra.
My Place This Menu contains WAP links to useful Telstra services. 1. BigPond 2. FOXTEL 3. Sensis Search 4. Music 5. Scan Code 6. MyEmail 7. MySync 8. Yellow Pages 9. White Pages 0. Whereis Maps *. Downloads #. My Account 40 W382f_Telstra_1.1_110426.
Contacts On the standby screen, choose Menu and Contacts. The following Contacts submenus will appear. Contact List This menu allows you to save and manage contact address information. With Contact List, you can add new addresses or search for existing contacts by name. When on the standby screen, you can directly search for a contact by pressing down navigation key. New Contact Use this menu to add a new contact address.
Contacts Speed Dial Lists SIM Management You can assign a frequently called contact to a speed dial list. Select a number from 4 to 9 as a speed dial. You can configure any of the 6 speed dial numbers for a specific contact. • Your Voicemail, Videomail and USSD is already set to 1, 2, 3 respectively. These default settings cannot be changed. Choose the speed dial number you want to assign a contact to, and then press Assign key. • This will open your address book.
Games&App Games Access Games on your LG-GW382f, or download new ones by browsing the catalog of games available for purchase. To launch Games press center key, select Games & Apps and then Games. NOTE: The JAR file is a compressed format of the Java program, and the JAD file is a description file that includes detailed information. Prior to download, you can view all the detailed file descriptions in the JAD file on the network.
Email Mobile Email allows you to access your MyEmail, Windows Live Hotmail, Yahoo! Mail, Gmail, and other accounts on your phone. Now, you can quickly and easily check your email while you are away from your computer. Create Email 1 Press center key and choose Create Email. 2 In the To field and CC filed, enter an email address. 3 Tap the Subject field, enter the subject. 4 Tap the message box, type the text. To edit your email, such as adding files or Message Options and then select press the left button.
Retrieve Interval: Select how often your phone checks for new email messages. Retrieve Amount: Choose the number of emails to be retrieved at one time. Include message in Fwd & Reply: Select whether to include the original message in your reply. Include attachment: Select whether to include the original attachment in any reply. Auto Retrieval in Roaming: Choose whether to retrieve messages automatically when abroad (roaming).
Tools Music Player • Download Music: Download music over the Telstra network directly to your device via the Shop Music link in the Telstra Music Folder or the Ringtones link in the Telstra Media Mail folder. • All Songs: View all the songs in your music library. • Playlists: Make your own playlists. • Artists: Lists all the artists in your music library, and displays all the songs of a selected artist. • Albums: Lists all the albums in your music library, and displays all the songs on a selected album.
Playing Music To listen to music saved on your phone or in the external memory, follow these quick and easy steps: 1 On the Standby screen, press center key, choose Tools and then select Music Player. 2 You can select from All Songs, Playlists, Artists, Albums, Genres and Shuffle Songs. The Now Playing menu will only be available when music is playing. • Choose the song you want to play. • Press the [OK] key to Play/ Pause a selected song.
Tools Transferring Music using your PC Before You Get Started To transfer music from your PC to your device, you need the following: • Windows Media® Player 10 (or above) or other digital music management software, such as Napster or eMusic • A microSD™ card* (supports up to 16-GB cards) • USB data cable* NOTE: This device is not compatible with iTunes and/or iTunes files. Transferring Music from the Digital Music Service 1 Using your computer, open your preferred PC music management application.
Transferring Music using Windows Media Player 1 Open Windows Media® Player on your computer (version 10.0 or higher). 2 Use the USB adapter cable to connect your handset to the PC. When you try to connect the handset to your PC, the handset displays "Connecting as Music Sync...". 3 Once the USB connection has been established, the handset displays "Connected as Music Sync Mode. Do not disconnect during transfer". The computer screen then displays the LG-GW382f device.
Tools Drag and Drop Music Using LG-GW382f As a Mass Storage Device 1 Make sure the microSD™ card is inserted properly into the headset. 2 Connect the device to a PC using a LG-GW382f USB data cable. 3 A bubble may appear on the PC saying "Found New Hardware LG USB Mass Storage Device". 4 Access My Computer on the PC. 5 The phone's memory card will be listed under Devices with Removable Storage in the same location as optical drives. NOTE: The PC will automatically assign a drive letter.
Deleting Music Files The following three options are available to delete Music from your Phone: 1 Delete a file using Mass Storage, but not using the Music sync function. 2 Delete a file by directly inserting the microSD™ external memory into the PC. 3 Delete a file using the delete function on the phone. NOTE: If you delete a playlist from the phone, the songs in the playlist will not be removed. They remain in the All Songs folder. Use Music Sync to perform operations like Delete, Move, and Copy.
Tools Voice Command Voice command is the function whereby your phone's voice recognition engine identifies the voice of the user and carries out the requested commands. When the user operates the voice command function, there are five possible commands, call , Listen to voicemail, missed calls, messages and time & date. NOTE: You can access the Voice Command by long pressing key.
4 Messages: This command activates when you say the word "Messages". The phone then displays the details of unread SMS or MMS messages. • Available commands - Yes: Make the phone call. - No: Move to the next unread message. - Cancel: Go back to the main voice command menu. - Exit: Terminate voice command. 5 Time&Date: This command activates when the user says the words "time and date". The phone then displays the current local time and date. W382f_Telstra_1.1_110426.
Tools • Week View: Allows you to change the Calendar view from Monthly View to Week View. • Go to Date: Allows you to jump to a specific date. • Selective Delete: Allows you to delete Old Schedules or All Schedules selectively. • Settings: Allows you set the Default View, Daily begin and Weekly Begin day. Notepad You can create up to 30 memos. 1 To create a new Note, press left soft key, enter the memo, and then press center key to save.
Tasks This feature allows you to save and manage tasks. 1 Press left soft key. 2 Enter the Due Date, a Note, and a Priority and Status for the new Task. 3 Press right soft key save the Task item. The following options are available by pressing right or left soft key. • New: Create a new task. • Edit: Edit the contents of the task. • Delete: Lists all available tasks so you can select the ones you want to delete. • Selective Delete: Delete all completed tasks or all past tasks.
Tools Tip Calculator This feature allows you to calculate the tip amount quickly and easily based on the total bill as well as the split of the total bill according to the number of people. Unit Converter This feature converts measurements into the unit you want. You can convert six types of units: Area, Length, Weight, Temperature, Volume, and Velocity. To enter a decimal, press . 56 W382f_Telstra_1.1_110426.
BigPond This menu shows how to access the Internet by launching the WAP browser. NOTE: Check the availability of WAP services, pricing and tariffs with your network operator and/ or the service provider whose service you wish to use. Service providers will also give you instructions on how to use their services. Please contact your service provider to open an Internet account. On the standby screen, press center key and BigPond. • BigPond Home: Moves to the initial homepage.
Social Web To access Social Web, from the Home screen, select Menu and then Social Web. Your mobile phone now keeps you connected to SNS, TRIBE, RSVP, MOKO, Diva Chat, Sports Chat, Gamer Chat, OzChat, Fast Flirting, Flickr and YouTube. 58 W382f_Telstra_1.1_110426.
My Stuff Audio Press center key, choose My Stuff and then select Audio. • Download Music: This menu option connects to the music download site. • Download Ringtones: This menu option connects to the music download site. • Record Voice: Record your own audio by pressing center key. Press left soft key [Options] to use following options: - Record Mode: MMS record mode shortens the time so that the recording can fit in an MMS message; General mode provides longer recording time.
My Stuff Picture Camera Press center key, choose My Stuff and then select Picture. This allows you to view pictures when browsing. • Download Wallpapers: Connects to Telstra's graphic download site. • Take Picture: It takes you to the camera mode. • Make Animated GIF: You can make an animation file with the selected images in the list. • You can view the graphic files in the list. Take Photo Using your phone's built-in camera module, take pictures of people or events while on the move.
Getting to know the viewfinder Capture Mode: This icon indicates video or image capture mode. Image Size Exit: Touch here to return to the previous screen. Album Video: Change between camera and video camera modes. Capture: Take the picture Image Size Brightness Settings: Touch this icon to open the settings menu. NOTE: The shortcut options will automatically disappear after a few seconds. W382f_Telstra_1.1_110426.
My Stuff • Album: You can see saved image files. • Video: Go to the video application, enabling you to record a video clip. • Capture: You can capture the image. • Image Size: The resolution of the image can be captured in 2048x1536 / 1600x1200 / 1280x960 / 640x480 / 320x240 / 160x120. • Brightness: Adjust brightness with a slider by using the navigation key.
The following options will appear (as icons) on the right side of the screen. • Album: You can see saved video files. • Photo: Switches to the Camera function, allowing you to take a picture. • Record: Begins recording the video. • Video Size: Allows you to select a vide size between 320x240 or 176x144. • Brightness: Adjust brightness with a slider by using the navigation key.
My Stuff Camera Album You can view the pictures and videos that are captured with the camera. When a file is highlighted, the following options are available when you press the left soft key [Options] (fewer options are available for video files). Send Via/Use As/Print/ Delete/Slide Show/Edit/Display Date/Information. Record Voice You can record an audio clip in this menu. The recorded audio file is saved automatically in the Audio menu. The left soft key [Options] will bring up the following options.
Alarms Alarm Clock You can set up multiple alarms. You can also set the time, repetition interval, and alarm sound. Select the alarm you want to configure from the alarm list. If there is no alarm, press left soft key. • Time: Select the time you want the alarm to go off. Enter the desired time, specifying the hour and minutes. If the time is in the 12-hour format, you must press center key to input am or pm. • Repeat: Select the desired repeat mode. • Alarm Tone: Select the alarm sound you prefer.
Call log Viewing your call logs On the standby screen, press center key and choose Call log. Choose to view: • All calls: View a complete list of all dialled, received and missed calls. • Dialled calls: View a list of all the numbers you have called. • Received calls: View a list of all the numbers that have called you. • Missed calls: View a list of all the calls you have missed. • Call durations • Data Counter 66 W382f_Telstra_1.1_110426.
PC Suite You can synchronise your PC with your phone. This will ensure all your important details and dates match, and also act as a back up to help put your mind at ease. TIP! You will need to install the application PC Suite provided on the CD-ROM or available for download from http://www. lg.com/common/index.jsp > Select your model > Select country > product > Manual & Software > Go to Manual & S/W Download Section. Connecting your phone and PC 1 Connect the USB cable to your phone and your PC.
PC Suite TIP! Viewing the contents of your phone on your PC helps you to arrange files, organise documents and remove contents you no longer need. Synchronising your contacts 1 Attach the USB cable to the device and select the PC Suite on the phone screen. 2 Click on the Manage Contacts icon. Synchronising your messages 1 Attach the USB cable to the device and select the PC Suite on the screen. 2 Click on the Messages icon. 3 All of your PC and phone messages will be displayed in folders on your screen.
Using your phone as a modem Your LG-GW382f can double as a modem for your PC, giving you email and internet access on the go. 1 Connect your phone to your PC as outlined above. 2 Click on the "Internet Kit" icon. 3 If you have not set up an internet connection with this program before, the program will automatically prompt you to create a new internet profile. Otherwise click the "New" button. 4 All settings should be automatically entered for you.
PC Suite Uninstalling Driver When you have uninstalled the PC Suite, some LG Drivers may be left installed. Follow the below instructions to uninstall them: 1 Open the "Start" menu. 2 Click on "Control Panel". 3 If you are running Windows Vista or Windows 7, doubleclick "Programs and Features". If you are running Windows XP, double-click "Add or Remove Programs".
Settings Audio & Ringtones Download Ringtones Connects to Bigpond's Ringtone Shops. Ringtone • Sounds: Shows and plays ring tones. You can select your preferred Ringtone. • Volume: This menu controls Ringtone sound volume. • Alert Type: Supports 3 ring alert types. Ring, Ring and Vibration and Ring after Vibration. • Increasing Ringtone: Allows you to select an Increasing Ringtone type which is played when you receive an incoming call. You can select to turn this On or Off. W382f_Telstra_1.1_110426.
Settings Keypad Tone This menu option allows you to select a tone that the phone sounds when a key is pressed on the dialpad screen. You can select an option from Beep and Voice. Multimedia This menu controls Multimedia sound volume. Call This menu controls Call sound volume. Power On/Off Tones You can select to turn Power On/ Off Tones to Ring or Silent. Phone Settings Date & Time • Set Date: Enter the day, month, and year. You can change the date format using the Date Format menu option.
Languages Set Flight Mode Change the language of the display text on your phone. This change will also affect the Language Input mode. This allows you to use only the phone's features that do not require the use of a wireless network when you are in an airplane or other places where wireless networks are prohibited. If you set the phone to flight mode On, you will be prompted to confirm your selection. After you confirm, the Flight mode icon will appear on the screen in place of the network signal icon.
Settings Security Various codes and passwords protect the features and settings of your phone. They are described in the following sections. • Phone Lock: You can use a security code to avoid unauthorized use of the phone. If you set phone lock to When Power On, the phone will request a security code whenever you switch the phone on. The default code for phone lock is "0000". If you set the phone lock to When SIM Changed, your phone will request a security code only when you change your SIM Card.
NOTE: Not all SIM Cards have a PIN2. If your SIM Card does not, this menu option is not displayed. • Change Codes: The Change codes feature allows you to change your current password. You must enter the current password before you can specify a new one. You can change the access codes for the following: Security Code, PIN1, PIN2. Reset Settings This function allows you to restore your phone to its factory settings. To do this, you need the security code. • Master Reset: Restores the settings (e.g.
Settings Display Download Wallpapers Connects to the Telstra Bigpond graphics download site. Wallpapers From this menu you can choose to have an image and solid colors for a wallpaper. Fonts Backlight Timer Use this to set the duration of the display backlight and keypad & Thumb Pad. Color Schemes You can change the color of the menu, soft key area, title bar area and cursor by changing the Color Schemes. You can select Black or White Schemes.
Call Call Forwarding When this network service is activated, you can direct your incoming calls to another number, for example, to your voicemail number. For details, contact network provider. Select one of the call forwarding options. For example, select If Busy to divert voice calls when your number is busy or when you reject an incoming call. The following options are available: • All Voice Calls: Forwards all voice calls unconditionally. • If Busy: Forwards voice calls when the phone is in use.
Settings NOTE: There will be no alert indicating that the call has connected. You must stay on the line to hear when the call connects. Answer Mode Choose how to answer the phone. • Any Key: If Any Key has been set as the Answer Mode, any key press will answer a call [END] key, except for the , . • Send Key Only: Only answer an incoming call by pressing the key. Minute Minder This option allows you to set the phone to beep every minute during a call to keep you informed of the call length.
• Call Reject List: After pressing left soft key, you can add to the call reject list by selecting [Contact List] or [New Number]. You can add numbers to the Call Reject list by entering numbers directly or copying the numbers from the Contact List. Send DTMF Tones Select from On/Off. TTY Select TTY Full, TTY Talk, TTY Hear, or TTY Off. Video calls You can check Mirror, Use Substitute Image and select Substitute Image.
Settings Hands-free profile This icon appears when the phone's hands-free profile is used between it and a handsfree device. This allows you to call using a Bluetooth® connection. A2DP profile This icon appears when the A2DP profile is used between the stereo headset device and the phone. This allows you to listen to an audio clip.
• My Devices: This function allows you to view the list of all devices that are paired with your phone. - 1. Select the [New] key to search for the device that can be connected, and which is also within range. - 2. If you want to stop searching, press the right soft key [Cancel]. - 3. All of the devices found are displayed. Select the desired device by pressing the [OK] key and entering the password. • My Bluetooth® Info: This menu allows you to configure the profile for Bluetooth®.
Settings Access Points Network Mode This menu shows the Access Points. You can register, delete and edit by using the Options Menu. However, you cannot delete or edit default configurations provided by Bigpond. Select Radio Access Technologies. "Dual Mode" is recommended. Network Selection Memory • Automatic: This function automatically searches for a network and registers the handset to that network.
• Memory Card: If your phone has a multimedia memory card in the card slot, you can save images, sounds, and videos on the memory card. Check the current status of the external memory card in the Memory status menu. • SIM Card: This function shows the status of the SIM Card memory. Set Default Storage You can assign the default storage to Phone Memory or Memory Card.
Settings • Sensitivity - High: Operation and performance of the voice recognition engine is rarely affected by the user's voice command and surrounding sound. - Medium: Operation of the voice recognition engine is normally affected by user's voice command and surrounding sound. - Low: Operation of the voice recognition engine is strongly affected by user's voice command and surrounding sound. • Spk.
Phone Information This menu is used to view My Numbers, Manufacturer, Model Name, Device ID, Hardware Version, Software Version, Language, and DM Client Version. Software Upgrade LG Mobile Phone Software Upgrade Program For more information on installing and using this program, please visit http://update.lgmobile.com or http://www.lg.com/common/ index.
Accessories There are various accessories for your mobile phone. These are some of the Genuine LG accessories available for your LG-GW382f. Charger Data cable and CD Connect and synchronise your LG-GW382f and PC. Battery Standard battery is available. Stereo headset NOTE: • Always use genuine LG accessories. • Failure to do this may void your warranty. • Accessories may be vary between different regions; please check with our regional service company or agent for further inquiries.
Technical data Ambient Temperatures Max: +55°C (discharging), +45°C (charging) Min: -10°C Declaration of Conformity Suppliers Details Name LG Electronics Inc Address LG Electronics Inc. LG Twin Towers 20, Yeouido-dong, Yeongdeungpo-gu, Seoul, Korea 150-721 Product Details Product Name GSM 850 / E-GSM 900 / DCS 1800 / PCS 1900 Quad Band and WCDMA Terminal Equipment Model Name LG-GW382f Trade Name LG Applicable Standards Details R&TTE Directive 1999/5/EC EN 301 489-01 V1.8.1, EN 301 489-07 V1.3.
Trouble Shooting This chapter lists some problems that you might encounter while using your phone. Some problems require that you call your service provider, but most of problems you encounter are easy to correct yourself. Possible Corrective measures Message Possible causes SIM error There is no SIM card in the phone or you may have inserted it incorrectly. Make sure that the SIM card is correctly inserted.
Message Phone cannot be switched on Possible causes On/Off key pressed too briefly Battery empty Battery contacts dirty Battery totally empty Temperature out of range Contact problem Charging error No mains voltage Charger defective Wrong charger Battery defective Possible Corrective measures Press On/Off key for at least two seconds. Charge battery. Check charging indicator in the display. Clean contacts. Charge battery.
W382f_Telstra_1.1_110426.
W382f_Telstra_1.1_110426.
W382f_Telstra_1.1_110426.
W382f_Telstra_1.1_110426.
W382f_Telstra_1.1_110426.
W382f_Telstra_1.1_110426.
W382f_Telstra_1.1_110426.