ENGLISH OWNER’S MANUAL Blu-ray Disc™/ DVD Player with built-in HDD & HD Tuner Please read this manual carefully before operating your set and retain it for future reference. HR945T HR949T www.lg.
Getting Started 3 Safety Information CAUTION CAUTION: TO REDUCE THE RISK OF ELECTRIC SHOCK DO NOT REMOVE COVER (OR BACK) NO USER-SERVICEABLE PARTS INSIDE REFER SERVICING TO QUALIFIED SERVICE PERSONNEL. This lightning flash with arrowhead symbol within an equilateral triangle is intended to alert the user to the presence of uninsulated dangerous voltage within the product’s enclosure that may be of sufficient magnitude to constitute a risk of electric shock to persons.
Getting Started This device is equipped with a portable battery or accumulator. 1 Getting Started Safety way to remove the battery or the battery from the equipment: Remove the old battery or battery pack, follow the steps in reverse order than the assembly. To prevent contamination of the environment and bring on possible threat to human and animal health, the old battery or the battery put it in the appropriate container at designated collection points.
Getting Started Notes on Copyrights yy This product incorporates copyright protection technology that is protected by U.S. patents and other intellectual property rights. Use of this copyright protection technology must be authorized by Rovi Corporation, and is intended for home and other limited viewing uses only unless otherwise authorized by Rovi Corporation. Reverse engineering or disassembly is prohibited.
Table of Contents Table of Contents 1 Getting Started 3 8 8 11 11 11 12 13 Safety Information Introduction – Playable discs and symbols used in this manual – About the “7” symbol display – Compatibility notes – File compatibility – Regional Code – AVCHD (Advanced Video Codec High Definition) – System Requirements – Compatibility Notes – LG AV Remote Remote control Main Unit 2 Connecting 14 14 Connections to Your TV – Antenna connection to your TV and this unit – HDMI Connection – Resolution Sett
Table of Contents 45 45 45 46 46 47 47 47 48 48 49 50 50 50 51 51 51 52 52 52 53 54 54 54 54 55 55 55 57 58 59 59 60 61 63 64 64 65 66 67 67 68 69 71 – Instant Timer Recording General Playback – Playing Discs – Using the disc menu – Resume playback – Playing the recorded titles – Searching the recorded titles – Sorting the recorded titles – Playing content contained in the internal hard disk drive – Searching content in the hard disk drive by entering file name – Playing Blu-ray 3D disc Advanced Playback
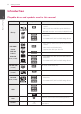
Getting Started Introduction 1 Playable discs and symbols used in this manual Getting Started Media/Term Logo Symbol e yy Discs such as movies that can be purchased or rented. yy “Blu-ray 3D” discs and “Blu-ray 3D ONLY” discs. yy BD-R/RE discs that are recorded in BDAV format. Blu-ray y u i r DVD-ROM DVD-R yy BD-R/RE discs that contain Video, Audio or Photo files. yy ISO 9660+JOLIET, UDF and UDF Bridge format yy Discs such as movies that can be purchased or rented.
Getting Started ,,Note yy Depending on the recording software & the finalization, some of recorded discs (CD-R/ RW or DVD±R/RW) may not be playable. yy BD-R/RE, DVD±R/RW and CD-R/RW discs recorded using a personal computer or a DVD or CD Recorder may not play if the disc is damaged or dirty, or if there is dirt or condensation on the player’s lens.
Getting Started File compatibility Overall 1 Getting Started Available File extensions: “.jpg”, “.jpeg”, “.png”, “.avi”, “.divx”, “.mpg”, “.mpeg”, “.mkv”, “.mp4”, “.mp3”, “.wav” “.wma”, “.ts” yy There could be a variance on the available file extensions depending on DLNA server. yy The file name is limited to 180 characters. yy Depending on the size and number of the files, it may take several minutes to read the contents on the media. ,,Note yy HD movie files contained on the CD or USB 1.0/1.
Getting Started 11 Compatibility Notes This unit has a regional code printed on the rear of the unit. This unit can play only BD-ROM or DVD discs labelled same as the rear of the unit or “ALL”. yy Because BD-ROM is a new format, the can be issues regarding certain disc, digital connection and other compatibility issues. If you experience compatibility problems, please contact an authorized Customer Service Center.
Getting Started Remote control • • • • • • a • • • • • • 1 Getting Started 1 (POWER): Switches the player ON or OFF. B (OPEN/CLOSE): Opens and closes the disc tray. MUTE (@): Mutes the sound. EXIT: Exits a menu or hides onscreen information. SUBTITLE: Selects a subtitle language. TEXT: Switches between teletext mode and normal TV viewing. 0-9 numerical buttons: Selects numbered options in a menu. CLEAR: Removes a mark on the search menu or a number when setting the password.
Getting Started 13 Main Unit 1 Getting Started a 1/I (Power) f T (Play/Pause) b Disc Tray g I (Stop) c Display window h USB Port d Remote Sensor e R (Open/Close) This port is not for recording with USB HDD. To record the TV program, use the USB port on the rear panel of the unit. a ANTENNA IN e OPTICAL (DIGITAL AUDIO OUT) b USB Port If you want to record on external HDD, connect external HDD to unit. f AC IN connector Connect the supplied power cord.
Connecting Connections to Your TV Make one of the following connections, depending on the capabilities of your existing equipment. yy Antenna connection (page 14) yy HDMI connection (page 15) 2 ,,Note Connecting yy Depending on your TV and other equipment you wish to connect, there are various ways you could connect the unit. Use only one of the connections described in this manual.
Connecting 15 ,,Note HDMI Connection If you have a HDMI TV or monitor, you can connect it to this unit using a HDMI cable (Type A, High Speed HDMI™ Cable). Connect the HDMI jack on the unit to the HDMI jack on a HDMI compatible TV or monitor. yy If a connected HDMI device does not accept the audio output of the unit, the HDMI device’s audio sound may be distorted or may not output. yy When you use HDMI connection, you can change the resolution for the HDMI output.
Connecting Resolution Setting The player provides several output resolutions for HDMI OUT jacks. You can change the resolution using [Setup] menu. 1. Press HOME (n). 2. Use A/D to select the [Setup] and press ENTER (b). The [Setup] menu appears. Connecting to an Amplifier Make one of the following connections, depending on the capabilities of your existing equipment.
Connecting 17 Connecting to an Amplifier via HDMI Output Connecting to an Amplifier via Digital Audio Output Connect the player’s HDMI OUT jack to the corresponding in jack on your amplifier using a HDMI cable. You will need to activate the player’s digital output. (See “[AUDIO] Menu” on pages 3233.) Connect the player’s OPTICAL (DIGITAL AUDIO OUT) jack to the corresponding in jack (OPTICAL) on your amplifier. Use an optional digital (optical) audio cable.
Connecting Connecting to your Home Network 2 Connecting This unit can be connected to a local area network (LAN) via the LAN port on the rear panel or the internal wireless module. By connecting the unit to a broadband home network, you have access to services such as software updates, BD-Live interactivity and streaming services.
Connecting Wired Network Setup If there is a DHCP server on the local area network (LAN) via wired connection, this unit will automatically be allocated an IP address. After making the physical connection, a small number of home networks may require the player’s network setting to be adjusted. Adjust the [NETWORK] setting as follow. Before setting the wired network, you need to connect the broadband internet to your home network. 1.
Connecting Wireless network connection Wireless Network Setup Another connection option is to use an Access Point or a wireless router. The network configuration and connection method may vary depending on the equipment in use and the network environment. For the wireless network connection, the player needs to be set up for network communication. This adjustment can be done from the [Setup] menu. Adjust the [NETWORK] setting as follows.
Connecting 4. The player scans all available access points or wireless routers within range and displays them as a list. Use W/S to select an access point or wireless router on the list, and then press ENTER (b). ,,Note yy WEP security mode generally have 4 keys available on an access point or wireless router’s setting. If your access point or wireless router uses WEP security, enter the security code of the key “No.1” to connect on your home network.
Connecting Notes on Network Connection: yy Many network connection problems during set up can often be fixed by re-setting the router or modem. After connecting the player to the home network, quickly power off and/ or disconnect the power cable of the home network router or cable modem. Then power on and/or connect the power cable again.
Connecting 23 USB device connection This unit can play movie, music and photo files contained on a USB device. Playback content in the USB device 1. Insert a USB device into the USB port until it fits into place. yy Please use the Internal HDD or USB flash memory/external HDD formatted in either FAT16 or FAT32 when using BD-Live. yy This unit can support up to 4 partitions of the USB device. yy Do not extract the USB device during operation (play, recording, etc.).
System Setting Auto Set UP You can reset the recorder to all its factory settings. Some options cannot be reset (Rating and Password). The [Auto Setup] menu appears on the screen after the factory settings. Step 3. Time Setting 1. Use A/D to select an option among [Manual] or [Auto], and press ENTER (b). Step 1. Language Setting 1. Use W/S/A/D to select a language for the on-screen display, and press ENTER (b). 3 System Setting Step 2. Channel Setting 1.
System Setting 25 Home Menu Overview Settings To access numerous functions of the unit, press HOME on the remote. Adjust the Setup Settings Basic button operations You can change the settings of the unit in the [Setup] menu. HOME: Accesses or removes the Home Menu. 1. Press HOME (n). W/S/A/D: Used to navigate on-screen displays. ENTER (b): Acknowledges menu selection. BACK (1): Exits the menu. Favorite Apps [DTV] - You can watch digital broadcasts. (pages 38-45) [Movie] - Plays video contents. 3.
System Setting Settings for Digital TV To use DTV functions, this recorder needs some settings in advance. Scanning programmes automatically (Auto Tuning) All available digital TV or radio programmes are searched for and stored automatically based on the selected country. 1. Press HOME (n). Scanning programmes manually (Manual Tuning) Scans digital TV or radio programmes and adds the detected programmes to the programme list. 1. Display [Setup] menu. 2. Use W/S to select [DTV], and press ENTER (b). 3.
System Setting Editing Programme List (Channel Edit) You can remove any digital TV or radio programs stored on this recorder using the [Channel Edit] menu. 1. Display [Setup] menu. 2. Use W/S to select [DTV], and press ENTER (b). 3. Use W/S/A/D to select [Channel Edit] and press ENTER (b). 4. Press W to select [DTV] and use A/D to select [DTV] or [Radio] programme list. 27 Setting the DTV Lock Allows you to activate or deactivate all of the lock schemes previously set.
System Setting Adjusting DTV Rating Setting the antenna power Viewing of some digital TV programmes can be limited according to the age limit you set. If you are using indoor antenna with a signal amplifier rated at DC 5V, 100mA, the recorder can supply power through ANTENNA IN jack. 1. Display [Setup] menu. 2. Use W/S to select [LOCK] and press ENTER (b). 3. Use W/S to select [DTV Rating] and press ENTER (b). 4. Input the password using numerical buttons.
System Setting 29 [DTV] Menu Default Recording Device Auto Tuning This option sets the storage where your TV recording will be stored. Select an option between [USB HDD] or [Internal HDD]. This option scans a programme and sets the available programmes. Refer to page 26 for more information. Manual Tuning Scans digital TV or radio programmes and adds the found programmes to the programme list.
System Setting [DISPLAY] Menu Resolution TV Aspect Ratio Sets the output resolution of the HDMI video signal. Refer to page 16 and 88 for details about the resolution setting. Select a TV aspect ratio option according to your TV type. 3 [Auto] Select when a standard 4:3 TV is connected. Displays theatrical images with masking bars above and below the picture.
System Setting HDMI Color Setting [LANGUAGE] Menu Select the type of output from the HDMI OUT jack. For this setting, please refer to the manuals of your display device. Display Menu [YCbCr] Select when connecting to a HDMI display device. [RGB] Select when connecting to a DVI display device. 3D Mode [Off] Blu-ray 3D disc playback will output as 2D mode like a normal BD-ROM disc playback. [On] Blu-ray 3D disc playback will output as 3D mode.
System Setting [AUDIO] Menu Each disc has a variety of audio output options. Set the player’s Audio options according to the type of audio system you use. ,,Note Since many factors affect the type of audio output, see “Audio Output Specifications” on pages 86-87 for details. HDMI / Digital Output 3 Select the output sound format when a device equipped with a HDMI or Digital Audio input jack is connected to the HDMI OUT or OPTICAL (DIGITAL AUDIO OUT) jack on this player.
System Setting 33 DTS Neo:6 [LOCK] Menu If the player is connected to the multi-channel Audio Receiver by HDMI connection, set this option to enjoy the multi-channel surround sound with the 2-channel audio source. To access any features in the [LOCK] settings, you must enter the 4-digit security code you have created. If you have not entered a password yet, you are prompted to do so. Enter a 4-digit password twice, and press ENTER (b) to create a new password.
System Setting DVD Rating [NETWORK] Menu Blocks playback of rated DVD based on their content. (Not all discs are rated.) The [NETWORK] settings are needed to use the software update, BD-Live and online content services. [Rating 1-8] Rating one (1) has the most restrictions and rating eight (8) is the least restrictive. [Unlock] If you select [Unlock], parental control is not active and the disc plays in full. Blu-ray Disc Rating 3 Sets an age limit for BD-ROM playback.
System Setting 35 Device Name You can enter a network name using virtual keyboard. This player will not be recognized by the same name you are entering on your home network. [OTHERS] Menu Time Setting The clock must be set in order to use timer recording. Wi-Fi Direct [Auto] This player is a Wi-Fi Direct™ certified device. Wi-Fi Direct™ is the technology that devices to connect each other without connecting to an Access point or a router. Set this option to [On] for activating the Wi-Fi Direct™ mode.
System Setting DivX® VOD ABOUT DIVX VIDEO: DivX® is a digital video format created by DivX, LCC, a subsidiary of Rovi Corporation. This is an official DivX Certified® device that has passed rigorous testing to verify that is plays DivX video. Visit divx.com for more information and software tools to convert your files into DivX videos. 3 ABOUT DIVX VIDEO-ON-DEMAND: This DivX Certified® device must be registered in order to play purchased DivX Video-on-Demand (VOD) movies.
System Setting 37 Software [Information] Displays the current software version. [Update] You can update the software by connecting the unit directly to the software update server (see pages 82-83). Disclaimer Notice Press ENTER (b) to view the notice of Network Service Disclaimer. Auto Power Off 3 System Setting The screen saver appears when you leave the player in Stop mode for about five minutes.
Operating Using the Digital TV functions Press red (R) coloured button to sort the programmes into alphabetical order. Press yellow (Y) coloured button to sort the programmes into number order. You can watch and record the digital TV programmes or playback the recorded TV programmes you want to watch using this unit. 3. Press BACK (1) to exit the channel list. Viewing the Digital TV Setting favourite programmes Viewing the Digital TV broadcasting on the TV screen. 1.
Operating 39 Viewing the programme information You can view a description of the programme being broadcast. Selecting DTV audio language Some digital programmes may broadcast several audio languages or encoding methods. You can select an audio languages or an encoding method when it is available. 1. While watching DTV, press INFO/MENU (m). 1. While watching DTV, press TITLE/POPUP to display the programme information. 2. Press TITLE/POPUP or (BACK or EXIT) again to close the programme information.
Operating Programme Guide (Digital program only) To exit the detail information window, select [Close] then press ENTER (b). The Program Guide contains schedule and program information for digital programs. They also provide local over-the-air programs information including conventional digital programs. Use the Program Guide to find programs easily and conveniently and to view schedule and descriptive program information for the programs.
Operating [Single] – Records only the selected program. [Series] – Records the programs in a series. ,,Note yy If there is no network connection, the exact series of the recording function may not work. yy Using Gracenote server and broadcasting information, with checking the series, the series information which is undesired may be recorded. 3. Select an option then press ENTER (b). The red timer icon will be displayed and the program will be memorized by the recorder.
Operating Using the teletext (Viewing Teletext) Many Digital TV programmes broadcast information via their text service, and this recorder has access to dedicated text programmes transmitted by the broadcasters. Recording TV programmes You can record Digital TV programmes and store them on the HDD. For a record on external USB HDD, connect external USB HDD to USB port on rear panel. The external USB HDD for record has to be formatted in NTFS.
Operating 43 Dual Programme Recording You can record two Digital TV programme at the same time. 3. Select an item using A/D and adjust it using W/S. You can use numbered buttons to change the setting. The adjustable items are listed below. 1. Use CH (W/S) to select a programme you want to record. Start time Sets the start time. 2. Press X REC to start recording. End time Sets the end time. 3. Use CH (W/S) to select another programme you want to record. Channel Sets the programme position.
Operating Timer Recording (EPG) You can also set the timer based on the information provided by the EPG. 6. Press TIMER REC, and check whether the schedule is registered properly or not. 1. While watching TV, press GUIDE. Canceling a timer recording 2. Use A/D to select programme field, and select a programme you want to record using W/S. 3. Select a program then press (R) color button. The options for timer recording will appear. [Single] – Records only the selected program.
Operating 45 Instant Timer Recording You can set the recording time instantly to stop the recording automatically. 1. Use CH (W/S) to select a programme you want to record. 2. Press X REC. to start recording. 3. While recording, press A/D repeatedly to set the recording duration on recording OSD to confirm modification. 4. Press ENTER (b). General Playback Playing Discs 1. Press B (OPEN/CLOSE), and place a disc on the disc tray. 2. Press B (OPEN/CLOSE) to close the disc tray.
Operating To stop playback Press Z (STOP) during playback. To pause playback Press M (PAUSE) during playback. Press d (PLAY) to resume playback. To play frame-by-frame Press M (PAUSE) while movie playback. Press M (PAUSE) repeatedly to playback Frame-byFrame. To scan forward or backward Press c or v to play fast forward or fast reverse during playback. You can change the various playback speeds by pressing c or v repeatedly.
Operating 47 Playing the recorded titles REC 1. While watching TV, press REC LIST to display the options menu or press REC LIST in Home menu. [Clear] – Clear all entered characters. [Space] – Inserts a space at the cursor position. [<–] – Deletes the previous character at the cursor position. 2. Use W/S/A/D to select recording title. 3. Press d (PLAY) or ENTER (b) to play the recording title. ,,Note yy N Mark is displayed next to recorded files that have not been viewed yet.
Operating Playing content contained in the internal hard disk drive 1. Press HOME (n). Searching content in the hard disk drive by entering file name If you are having difficulties finding content in the hard disk drive, you can search for the content by entering keyword with the virtual keyboard 1. On the [Movie], [Photo], [Music] or Home menu, press yellow (Y) coloured button to display the virtual keyboard. 2. Select [Movie], [Photo] or [Music] using A/D, and press ENTER (b). 3.
Operating 49 Playing Blu-ray 3D disc This player can play the Blu-ray 3D discs which contains separate views for the left and right eyes. Preparation In order to playback Blu-ray 3D title in stereoscopic 3D mode, you need to: a b 3. Refer to the owner’s manual of your 3D-ready TV for the further instruction. You may need to adjust the display settings and focus on your TV’s setting for the improved 3D effect. >>Caution yy Watching a 3D content for a long period time may cause dizziness or tiredness.
Operating Advanced Playback DVD AVCHD ACD MUSIC MUSIC-N During playback, press REPEAT (h) repeatedly to select a desired repeat mode. BDs/DVDs A- – Selected portion will be repeated continually. DVD AVCHD ACD 1. During playback, press REPEAT (h) to select [A-] at the beginning of the portion you wish to repeat. 2. Press ENTER (b) at the end of the portion. Your selected portion will be repeated continually. 3. To return to normal playback, press REPEAT repeatedly to select [Off ].
Operating Changing content list view MOVIE MOVIE-N MUSIC MUSIC-N PHOTO REC On the [Movie], [Music] or [Photo] menu, you can change the content list view. Method 1 Press red (R) coloured button repeatedly. 51 Viewing content information MOVIE MOVIE-N REC The player can display the content information. 1. Select a file using W/S/A/D. 2. Press INFO/MENU (m) to display the option menu. 3. Select the [Information] option using W/S, and press ENTER (b).
Operating Last Scene Memory BD DVD This unit memorizes the last scene from the last disc that is viewed. The last scene remains in memory even if you remove the disc from the unit or switch off the unit. If you load a disc that has the scene memorized, the scene is automatically recalled. ,,Note yy Last Scene Memory function for a previous disc is erased once a different disc is played. yy This function may not work depending on the disc.
Operating 53 2. Select an option using W/S. 3. Use A/D to adjust the selected option value. 4. Press BACK (1) to exit the On-Screen display. ,,Note yy If no button is pressed for a few seconds, the on-screen display disappears. yy A title number cannot be selected on some discs. yy Available items may differ depending on discs or titles. yy If BD interactive title is playing back, some setting information is displayed on the screen but prohibited to be changed.
Operating Hearing different audio BD DVD AVCHD MOVIE MOVIE-N REC BD 1. During playback, press INFO/MENU (m) to display the On-Screen display. DVD 2. Use W/S to select the [Audio] option. If the disc contains scenes recorded at different camera angles, you can change to a different camera angle during playback. 3. Use A/D to select desired audio language, audio track or audio channel. 1. During playback, press INFO/MENU (m) to display the On-Screen display. ,,Note 2.
Operating 55 Changing the Picture Mode BD DVD AVCHD MOVIE MOVIE-N REC You can change the [Picture mode] option during playback. 1. During playback, press INFO/MENU (m) to display the On-Screen display. Copying Copying file(s)/folder(s) to the internal hard disk drive 2. Use W/S to select the [Picture Mode] option. You can copy music, photo, video file(s)/folder(s) from disc/USB storage device to the internal hard disk drive. 3. Use A/D to select desired option. 1. Press HOME (n). 4.
Operating 7. Use W/S to select a file or a folder you wish to copy on the menu, and press ENTER (b). 11. Use W/S/A/D to select [OK], and press ENTER (b) to start copying. ,,Note Repeat this step to select files and folders as many as you can. Select all the files and folders on the current directory. Shows all type of files on the screen. (Movie, Photo and Music) Cancels the copying and returns to the previous screen. 4 Operating 8. Use W/S/A/D to select [Start], and press ENTER (b). 9.
Operating Copying file(s)/folder(s) from the internal hard disk drive to a USB storage device 57 8. Use W/S to select a file or a folder you wish to copy on the menu, and press ENTER (b). You can copy music, photo, video file(s)/folder(s) from the internal hard disk drive to a USB storage device. 1. Insert a USB device to the USB port until it fits into place. 2. Press HOME (n). Repeat this step to select files and folders as many as you can. Select all the files and folders on the current directory.
Operating 12. Use W/S/A/D to select [OK], and press ENTER (b) to start copying. Deleting a file(s)/folder(s) You can delete file(s)/folder(s) from the internal hard disk drive. 1. Use W/S/A/D to select a directory that files or a folders you want to delete are located. 2. Press INFO/MENU (m) to display the option menu. ,,Note yy Copying speed may vary depending on the file size, number of files. yy It is unable to do copy during the recording. 3.
Operating 59 Naming a file/folder You can re-name a file or a folder in the internal hard disk drive. 1. Select a file or a folder contained in the internal hard disk drive. 2. Press INFO/MENU (m) to display the option menu. 3. Use W/S to select [Rename] option, and press ENTER (b) to display the virtual keyboard. Enjoying BD-LIVE This unit allows you to enjoy functions such as picture-in-picture, secondary audio and Virtual packages, etc.
Operating ,,Note yy Some BD-LIVE contents may be restrictively accessed in some territories by contents provider’s own decision. yy It may take up to several minutes to load and start enjoying BD-LIVE contents. Playing a file on a network server yui This player can play movie, music and photo files located in a PC or a DLNA server through your home network. 1. Check the network connection and settings (page 18). 2. Press HOME (n). 4 3.
Operating Wi-Fi Direct™ Connection Connecting to a Wi-Fi Direct™ certified device 61 6. Select a server that shared from the connected Wi-Fi Direct™ device using W/S, and press ENTER (b) to navigate the server. yui This player can play movie, music and photo files located in a Wi-Fi Direct™ certified device. The Wi-Fi Direct™ technology make the player to be directely connected to a Wi-Fi Direct™ certified device without connecting to a network device such as an access point. 1.
Operating Connecting to a Wi-Fi available devices yui 8. Select a server that shared from the connected Wi-Fi device using W/S, and press ENTER (b) to navigate the server. This player can connect to a general Wi-Fi device using Wi-Fi Direct™ function. 1. Set the [Wi-Fi Direct] option on the [Setup] menu to [On] (page 35). 2. Press HOME (n). 3. Select [Movie], [Photo] or [Music] using A/D, and press ENTER (b). 4. Select [Wi-Fi Direct] option using W/S, and press ENTER (b).
Operating 63 ,,Note Playing movie file and VR discs yy The file requirements are described on page 10. You can play DVD-RW discs that are recorded in Video Recording (VR) format and movie files contained on a disc/HDD/USB device. yy Unfinalized DVD VR format discs may not be played in this player. 1. Press HOME (n). yy You can use various playback functions. Refer to pages 45-55. yy Some DVD-VR discs are made with CPRM data by DVD RECORDER. This unit cannot support these kinds of discs.
Operating Changing subtitle code page MOVIE MOVIE-N If the subtitle is not displayed properly, you can change the subtitle code page to view the subtitle file properly. Viewing a photo You can view photo files using this player. 1. Press HOME (n). 1. During playback, press INFO/MENU (m) to display the On-Screen display. 2. Use W/S to select the [Code Page] option. 3. Use A/D to select desired code option. 2. Select [Photo] using A/D, and press ENTER (b). 3.
Operating 65 To play a slide show Options while viewing a photo Press d (PLAY) to start the slide show. You can use various options while viewing a photo in full screen. To stop a slide show Press Z (STOP) during slide show. To pause a slide show 1. While viewing a photo in full screen, press INFO/ MENU (m) to display the option menu. 2. Select an option using W/S. Press M (PAUSE) during slide show. Press d (PLAY) to re-start the slide show.
Operating Listening to music during a slide show 8. Use W/S to select a file or a folder you wish to play. You can display photo files while listening to music files. 1. Press HOME (n). Select a folder and press ENTER (b) to display the lower directory. 2. Select [Photo] using A/D, and press ENTER (b). 3. Select [Disc], [USB] or [HDD] option using W/ S, and press ENTER (b). 4 Select g and press ENTER (b) to display the upper directory.
Operating Listening to music This player can play Audio CDs and music files. 1. Press HOME (n). 67 Audio CD Recording You can record one desired track or all of the tracks in Audio CD to the internal hard disk drive or a USB storage device. 1. Press OPEN/CLOSE(B), and place an Audio CD on the disc tray. Press OPEN/CLOSE(B) to close the disc tray. The playback starts automatically. 2. Press INFO/MENU (m) to display the option menu. 2. Select [Music] using A/D, and press ENTER (b). 3.
Operating Enter folder name using virtual keyboard, and press ENTER (b) while [OK] is selected. 8. Use W/S/A/D to select [OK], and press ENTER (b) to start CD Recording. If you want to stop in progressing CD Recording, press ENTER (b) while [Cancel] is highlighted. 9. A message appears when CD Recording is completed. Press ENTER (b) to check the audio file created in the destination folder.
Operating ,,Note yy The player must be connected to the broadband internet for accessing the Gracenote Media Database. yy If the music information is not in the Gracenote Media Database, message appears on the screen. yy If the information from the Gracenote Media Database is either not correct or does not exist, please contact www.gracenote.com for support. yy Depending on the cases, it will takes a few minutes to load music information from the Gracenote Media Database.
Operating Songs – All audio files stored in the internal hard disk drive are sorted by name in alphabetical order. Genres – Audio files stored in the internal hard disk drive are sorted by genre information from Gracenote Media Database. Artists – Music stored in the internal hard disk drive are sorted by artist name from Gracenote Media Database in alphabetical order. Albums - All music stored in the internal hard disk drive are sorted by album title from Gracenote Media Database in alphabetical order.
Operating Deleting an audio file from your playlist 1. On the Music Library menu, use W/S to select [PlayList], and press ENTER (b). 71 Using the Photo Library The player offers Photo Library menu for the photos stored in the internal hard disk drive. 1. Press HOME (n). 2. Use W/S to select [My Playlist] option, and press ENTER (b) to display your playlist. 2. Select [Photo] using A/D, and press ENTER (b). 3. Press INFO/MENU (m) to display the option menu. 3.
Operating Using the Premium Using the LG Apps You can use various content services via Internet with the Premium feature. You can use the LG application services on this player via Internet. You can easily find and download various applications from LG App store. 1. Check the network connection and settings (page 18-22). 2. Press HOME (n). 3. Select the [Premium] using A/D, and press ENTER (b). ,,Note Depending on the region, the LG Apps service may not be available.
Operating 73 Signing in Searching LG Apps To use the [LG Apps] feature, you need to sign in with your account. If you are having difficulties finding specific content LG Apps, you can use the all-in-one search function by entering keywords in the [Search] menu. 1. On the [LG Apps] or [My Apps] screen, press red (R) coloured button. 2. Fill the [ID] and [Password] field using the virtual keyboard. If you do not have an account, press red (R) coloured button to register. 3.
Troubleshooting Troubleshooting General Symptoms Cause & Solution The Power does not turn on. yy Plug the power cord into the wall outlet securely. The unit does not start playback. yy Insert a playable disc. (Check the disc type, color system, and regional code.) yy Insert the disc with the playback side down. yy Place the disc on the disc tray correctly inside the guide. yy Clean the disc. yy Cancel the Rating function or change the rating level. The angle cannot be changed.
Troubleshooting 75 Sound Symptom Cause & Solution There is no sound or the sound is distorted. yy Connect the audio connection securely. yy The input source setting on the amplifier or the connection to the amplifier is incorrect. yy The unit is in scan, slow motion, or pause mode. yy The sound volume is low. yy Check that the connected amplifier is compatible with the audio format output from the player. yy The player’s HDMI OUT jack is connected to a DVI device.
Troubleshooting Recording Symptom Cause & Solution Cannot record or does not record successfully. yy Check the remaining space on the HDD. yy If your source is copy-protected, you cannot record it using this recorder. yy If you set a DTV rating for the recorder and higher rated digital programs are received, the programme cannot be recorded. Change the DTV rating level in order to record it. Timer record does not record successfully. yy Clock is not set to correct time.
Appendix Controlling a TV with the Supplied Remote Control You can control your TV using the buttons below. By pressing You can 1 (TV POWER) Turn the TV on or off. AV/INPUT Switch the TV’s input source between the TV and other input sources. PR/CH W/S Scan up or down through memorized channels. VOL +/– Adjust the volume of the TV ,,Note Setting up the remote to control your TV You can operate your TV with the supplied remote control.
Appendix Area Code List Choose an area code from this list.
Appendix 79 Language code List Use this list to input your desired language for the following initial settings: [Disc Audio], [Disc Subtitle] and [Disc Menu].
Appendix Trademarks and Licenses “AVCHD” and the “AVCHD” logo are trademarks of Panasonic Corporation and Sony Corporation. Blu-ray Disc™, Blu-ray™, Blu-ray 3D™, BD-Live™, BONUSVIEW™ and the logos are trademarks of the Blu-ray Disc Association. For DTS patents, see http://patents.dts.com. Manufactured under license from DTS Licensing Limited. DTS, DTS-HD, the Symbol, & DTS and the Symbol together are registered trademarks, and DTS-HD Master Audio is a trademark of DTS, Inc. © DTS, Inc.
Appendix Gracenote®, Gracenote logo and logotype, and the “Powered by Gracenote” logo are either registered trademarks or trademarks of Gracenote, Inc. in the United States and/or other countries. Music recognition technology and related data are provided by Gracenote®. Portions of the content is copyright © Gracenote or its providers. Gracenote® End User License Agreement This application or device contains software from Gracenote, Inc. of Emeryville, California (“Gracenote”).
Appendix Cinavia Notice This product uses Cinavia technology to limit the use of unauthorized copies of some commerciallyproduced film and videos and their soundtracks. When a prohibited use of an unauthorized copy is detected, a message will be displayed and playback or copying will be interrupted. 6 Network Software Update Network update notification More information about Cinavia technology is provided at the Cinavia Online Consumer Information Center at http://www.cinavia.com.
Appendix 83 Software Update You can update the player using the latest software to enhance the products operation and/or add new features. You can update the software by connecting the unit directly to the software update server. ,,Note yy Before updating the software in your player, remove any disc and USB Device from the unit. yy Before updating the software in your player, turn the player off and then turn it back on.
Appendix MediaHome 4 Essentials Nero MediaHome 4 Essentials is a software for sharing video, audio and photo files stored on your computer to this player as a DLNA-compatiable digital media server. ,,Note yy 1.
Appendix 85 8. Click [Typical] and click [Next]. The installation process is started. 9. If you want to take part in the anonymous collection of data, select the check box and click the [Next] button. 10. Click the [Exit] button to complete the installation. MAC OS X 1. Start up your computer, and insert the supplied CD-ROM disc into your computer’s CD-ROM drive. 2. Browse the CD-ROM drive and open the “MediaHome_4_Essentials_MAC” folder. 3. Double-click the “Nero MediaHome.dmg” image file.
Appendix Audio Output Specifications Digital Output (DIGITAL AUDIO OUT) *4 Jack/Setting Source PCM Stereo DTS Re-Encode*3 *5 Primary Pass-Thru Dolby Digital PCM 2ch DTS Dolby Digital Dolby Digital Plus PCM 2ch DTS Dolby Digital Dolby TrueHD PCM 2ch DTS Dolby Digital DTS PCM 2ch DTS DTS DTS-HD PCM 2ch DTS DTS Linear PCM 2ch PCM 2ch DTS PCM 2ch Linear PCM 5.1ch PCM 2ch DTS PCM 2ch Linear PCM 7.
Appendix *5 If the [HDMI] or [Digital Output] option is set to [DTS re-encode], the audio output is limited to 48 kHz and 5.1Ch. If the [HDMI] or [Digital Output] option is set to [DTS re-encode], the DTS Re-encode audio is output for BD-ROM discs, and the original audio is output for the other discs (like [Primary Pass-Thru]).
Appendix Video Output Resolution When the non-copy protected media is playing back Video Out Resolution HDMI OUT 576i 576p 576p 576p 720p 720p 1080i 1080i 1080p/24 Hz 1080p / 24 Hz 1080p / 50 Hz 1080p / 50 Hz When the copy protected media is playing back Video Out Resolution 576i 576p 576p 576p 720p 720p 1080i 1080i 1080p/24 Hz 1080p / 24 Hz 1080p / 50 Hz 1080p / 50 Hz HDMI OUT connection 6 HDMI OUT Appendix yy For the 576i resolution setting, real output resolution of HDMI
Appendix 89 Specifications General Power requirements AC 200-240 V, 50/60 Hz Power consumption 40 W Dimensions (W x H x D) Approx. 430 x 57 x 300 mm without foot Net Weight (Approx.) 3.22 kg Operating temperature 5 °C to 35 °C Operating humidity 5 % to 90 % Television system: DVB-T Standard Compliant TV Recording Recording format TS (Transport Stream format) Recordable media Hard Disk Drive (500 GB / 1 TB), USB 2.
Appendix Maintenance Handling the Unit When shipping the unit Notes on Discs Handling Discs Do not touch the playback side of the disc. Hold the disc by the edges so that fingerprints do not get on the surface. Never stick paper or tape on the disc. Storing Discs After playing, store the disc in its case. Do not expose the disc to direct sunlight or sources of heat and never leave it in a parked car exposed to direct sunlight.
Appendix 91 Important Information Relating to Network Services All information, data, documents, communications, downloads, files, text, images, photographs, graphics, videos, webcasts, publications, tools, resources, software, code, programs, applets, widgets, applications, products and other content (“Content”) and all services and offerings (“Services”) provided or made available by or through any third party (each a “Service Provider”) is the sole responsibility of the Service Provider from whom it or