Model number Serial number : : LG DLP PROJECTOR Please read this manual carefully before operating your set. Retain it for future reference. Record model number and serial number of the set. See the label attached on the bottom of the set and quote this information to your dealer when you require service.
DLP PROJECTOR Warning This is a class A product. In a domestic environment this product may cause radio interference, in which case the user may be required to take adequate measures.
Contents Contents Safety Instructions ....................................4 Names of parts Main Body .......................................................7 Connecting Part ..............................................7 Control Panel ..................................................8 Remote Control ...............................................9 Installing Batteries...........................................9 Accessories.....................................................10 Optional Extras ...........
Safety Instructions Safety Instructions Please take note of the safety instructions to prevent any potential accident or misuse of the projector. ➟ Safety Instructions are given in two forms as detailed below. WARNING : The violation of this instruction may cause serious injuries and even death. NOTES : The violation of this instruction may cause light injuries or damage to the projector. ➟ After reading this manual, keep it in the place that the user always can contact easily.
Safety Instructions Power WARNING Do not use too many plugs on the Mains multi-outlet. It may result in overheating of the outlet and causes a fire hazard ! Power Never touch the power plug with a wet hand This may cause an electric shock hazard ! NOTES Hold the plug firmly when unplugging. If you pull the cord, it may be damaged. Prevent dust collecting on the power plug pins or outlet.
Safety Instructions Using WARNING Never touch the wall outlet when there is leakage of gas, open the windows and ventilate. It can cause a fire or a burn by a spark. Using Do not drop the projector or allow impact shock. Don’t look at laser beam directly as it can cause eye damage! This may cause mechanical failure or personal injury ! NOTES Do not place heavy objects on top of projector.
Names of parts Names of parts Main Body * The projector is manufactured using high-precision technology. You may, however, see on the Projector screen tiny black points and/or bright points (red, blue, or green). This can be a normal result of the manufacturing process and does not always indicate a malfunction.
Names of parts Control Panel SOURCE Button Switches to RGB, Video mode. SOURCE OK Button Checks present mode and saves the change of functions. POWER Button MENU Button Turn ON/OFF the projector. Selects or closes menus. / / / Button Adjusts functions of menus.
Names of parts Remote Control MUTE Button POWER Button SOURCE Button KEYSTONE +, - Button VOLUME +, - Button RETURN Button OK, / / / MENU Button Button BLANK Button AUTO Button RATIO Button USB Button USB control Buttons FAV Button SUBTITLE Button PAGE E Button PAGE D Button Installing Batteries CAUTION RISK OF EXPLOSION IF BATTERY IS REPLACED WITH AN INCORRECT TYPE. DISPOSE OF USED BATTERIES ACCORDING TO THE INSTRUCTIONS. (A) (B) 1.
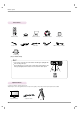
Names of parts Accessories 3V Battery Remote Control Power Cord Computer Cable Owner’s manual Polishing Cloth CD Owner’s manual Adapter A/V Cable RGB to Component Cable Portable bag (*Only for HS102G model) ● ● Use a remote control up to 6 meters distance and 30 degree (left/right) within the receiving unit scope. We recommend you to use the remote control under 3 meters distance and 30 degree (left/right) when the cables are connected in the back outputs.
Installing and Composition Installing and Composition Installation Instructions * Don’t place the projector in the following conditions. It may cause malfunction or product damage. Provide proper ventilation for this projector. ●The projector is equipped with ventilation holes(intake) ●Do not place the projector on a carpet, rug or other ●Never push projector or spill any kind of liquid into the ●Leave an adequate distance(30cm/12 inches or on the bottom and ventilation holes(exhaust) on the front.
Installing and Composition How to install the projector using the tripod * You can install this projector using a tripod for the camera. You can assemble the projector instead of the camera on camera tripod.
Installing and Composition Basic Operation of the Projector 1.Place the projector on a sturdy and horizontal surface with the PC or AV source. 2.Place the projector with the desired distance from the screen. The distance between the projector and the screen determines the actual size of the image. 3.Position the projector so that the lens is set at a right angle to the screen. If the projector is not set at a right angle, the screen image will be crooked.
Installing and Composition Using Kensington Security System ● The projector has a ‘Kensington’ Security System Connector on the side panel. Connect the ‘Kensington’ Security System cable as below. ● For the detailed installation and use of the Kensington Security System, refer to the user’s guide attached to the Kensington Security System set. And for further information, contact http://www.kensington.
Installing and Composition Turning on the Projector 1. Connect power cord correctly. 2. Press the button on the top cover or the POWER button on the remote control. (The light on the control panel will be turned on.) ● Press the SOURCE button on the remote control or the SOURCE button on the control panel to select the input signal you want.
Installing and Composition Focus and Position of the Screen Image When an image appears on the screen, check if it is in focus and fits well to the screen. Focus ring ● To adjust the focus of the image, rotate the focus ring which is the outer ring on the lens. Selecting source mode 1. Press the SOURCE button on the top cover or remote control. Select OK RGB 2. Each press of the RGB , button changes the display as below.
Connection Connection Connecting to a Desktop PC * You can connect the projector to a computer of VGA, SVGA, XGA and SXGA output. * Refer to page 39 for the supported monitor displays of the projector. < How to connect > Connect computer cable to RGB IN (PC/DTV) of the projector. Connecting to a Notebook PC < How to connect > Connect computer cable to RGB IN (PC/DTV) of the projector.
Connection Connecting to a DVD * The output jacks (Y, PB, PR) of the DVD might be labelled as Y, Pb, Pr / Y, B-Y, R-Y / Y, Cb, Cr according to the equipment. < How to connect > RGB to Component Cable a. After connecting the Component cable of DVD to the RGB to Component cable, connect it to the RGB IN(PC/DTV) terminal of the projector. Component cable * When connecting the component cable, match the jack colors with the component cable.
Function Function * In this manual, the OSD(On Screen Display) may be different from your Projector’s because it is just an example to help with the Projector operation. * This operating guide explains operation of RGB(PC) mode mainly. Video Menu Options Adjusting Video < RGB mode > 1. Press the MENU button and then use , button to select the 2. Press the , button to select a video item you want to adjust. 3. Press the , button to adjust the screen condition as you want.
Function Picture mode * Use Picture mode function to set the projector for the best picture appearance. * This function does not work in RGB or DivX mode. 1. Press the MENU button and then use 2. Press the 3. Press the ● , ● button to select the menu. button to select Picture mode item. button to adjust the screen condition as you want. , Each press of the , Clear ● , MENU Prev. button changes the screen as shown below.
Function Smart picture Function 1. Press the MENU button and then use 2. Press the 3. Press the ● , ● button to select the menu. Color temp. Smart picture Black level Keypad Sound Keypad LED Screen Capture button to select Smart picture item. button to make desired adjustments. , Each press of the Sports ● , , button changes the screen as shown below. Normal Film MENU Prev. Normal Normal High On On Move Select You can use this function through the button on the control panel.
Function Keypad Sound Function 1. Press the MENU button and then use , button to select the 2. Press the , button to select Keypad Sound item. 3. Press the , button to select On or Off. menu. ● You can use this function through the button on the control panel. ● Press the MENU button twice or the RETURN button to exit the menu screen. Color temp. Smart picture Black level Keypad Sound Keypad LED Screen Capture MENU Prev. Normal Normal High On On Move Select Keypad LED Function 1.
Function Screen Capture Function 1. Press the MENU button and then use , button to select the menu. button to select Screen Capture item. 2. Press the , 3. Press the OK button to capture actual screen image. Confirm Screen Capture Color temp. Smart picture Black level Keypad Sound Keypad LED Screen Capture MENU Prev. OK 4. Press the Normal Normal High On On To set Move OK Cancel OK button again to save Screen capture image. ● You can use the captured image as a Blank image.
Function Special Menu Options Selecting Language 1. Press the MENU button and then use , button to select the 2. Press the , button to select Language item. 3. Press the , button to select the language you want to use. menu. ● On-Screen-Display (OSD) is displayed in the selected language. You can use this function through the button on the control panel. ● Press the MENU button twice or the RETURN button to exit the menu screen.
Function Flip horizontal Function * This function reverses the projected image horizontally. Use this function when rear projecting an image. 1. Press the MENU button and then use 2. Press the 3. Press the , button to select the menu. button to select Flip horizontal item. , OK button to see reversed image. ● Each time you press the OK button, the image will be reversed. ● You can use this function through the button on the control panel.
Function Sleep time Function * The sleep timer turns the projector off at the preset time. 1. Press the MENU button and then use , button to select the 2. Press the , button to select Sleep time item. 3. Press the , button to select the desired preset time. menu. ● You can use this function through the button on the control panel. ● Press the MENU button twice or the RETURN button to exit the menu screen.
Function Presentation timer Function 1. Press the MENU button and then use 2. Press the button. button to select Presentation timer item and press , 3. Press the , Time alarm Time Keeper MENU Exit 4. Press the , button to select the , menu. OK button to select Time alarm or Time keeper item. F Off G F Off G Move Select English Language Aspect Ratio Overscan Flip horizontal Flip vertical Sleep time Auto sleep Presentation timer 4:3 Off Off Off To set MENU Prev.
Function Using Blank Function * This function may be effective if you need to get the attention of the audience during presentations, meetings or briefings. 1. Press the BLANK button on the remote control. ● ● The screen turns off to a background image. You can choose the background image. (Refer to ‘Selecting blank image’) 2. Press any button to cancel the blank function. ● To temporarily turn off the image, press BLANK on the remote control.
Function LED mode Function 1. Press the MENU button and then use 2. Press the 3. Press the , , , button to select the menu. button to select LED mode item. button to select Normal or Dark. Keystone Blank Image LED mode DivX Reg. Code MENU Prev. 0 Black Normal Move Select ● You can use this function through the button on the control panel. ● Press the MENU button twice or the RETURN button to exit the menu screen. ● Refer to the page 38 for DivX Reg. Code.
Function Screen Menu Options Auto configure Function * This function assures you of getting the best video quality by automatically adjusting the horizontal size and synchronization of the image. * Auto Tracking function works in RGB PC input only. 1. Press the AUTO button of the remote controller. ● Image positioning and synchronization are automatically adjusted. 2.
Function Using Horizontal Function 1. Press the MENU button and then use menu. , button to select the 2. Press the , button to select Horizontal item. 3. Press the , button to make desired adjustments. ● Auto Configure Phase Clock Horizontal Vertical 8 0 0 0 MENU Store Horizontal adjustment range is -50 ~ 50. Move Adjust Move Adjust ● The variable range can be different depends on input resolutions. ● You can use this function through the button on the control panel.
USB USB * Image shown may differ from your projector. To use the USB device Connecting the USB device * When you connect a USB device, this screen is displayed, automatically. In USB device, you can not add a new folder or delete the existing folder. 1. Connect the USB device to the USB jack on the back of the set. 2. It turns automatically to DivX Home Menu. USB memory stick PHOTO MUSIC MOVIE Precautions when using the USB device G Only a USB storage device is recognizable.
USB Photo List * It is available to playback the photo file(*.jpg) in the USB device. The On Screen Display may be different from your set. Images are an example to assist with the projector operation. Screen Components 1. Slide show the selected item. 2. Set the time interval of the slide show. Photo List List Preview Up folder 3. Listen to music while viewing photos in full size. 4. Moves to upper level file. 5.
USB Viewing the Slide show 1. Use the or button to select the desired photos. Photo List Preview 2. Press the 3. Press the ● button to select List Up folder . OK button. Stop : Stop the viewing the slide show. Hide : Hide the menu on the full-sized screen. Move OK P Move Page RETURN Exit To see the menu again on the full-sized screen, press OK button. 4. Press the button to select 5. Use show. button to control the time interval of the slide or . Showing 6. Press the 7.
USB Music List * Purchased music files(*.MP3) may contain copyright restrictions. Playback of these files may not be supported by this model. Music file on your USB device can be played by this unit. The On Screen Display may be different from your set. Images are an example to assist with the projector operation. Screen Components 1. Moves to upper level file Music List 2. Delete All : Delete all selected List Programme Up folder music. ● It is impossible to delete only one music in music list.
USB ● If you don't press any button for a while during the playing, the play information box (as shown in the below) will float as a screen saver. ● The ‘Screen Saver’? Screen saver is to prevent screen pixel damage due to an fixed image remaining on the screen for a extended period ● of time. If you press OK , A, RETURN buttons, screen saver is stopped.
USB Movie List * The movie list is activated once USB is detected. It is used when playing movie files on PROJECTOR. Displays the movies in the USB folder and supports play. Allows playback of all movies in the folder and user desired files. Editing such as delete and add is not allowed. It is a movie list that displays folder information and DivX file. Screen Components 1. Moves to upper level file Movie List List 2. Corresponding buttons on the Up foder remote control Move 1. Use the or 2.
USB DivX Audio Language & Subtitle Language ● When DivX is playing, if you press the Subtitle Language Group OK button and then select language, this message is displayed. Press the option. Latin1 Subtitle Language 0 0 Audio Language 1 1 AC3 button to select the desired Supports up to Mpeg, Mp3, PCM, Dolby D file. DivX registration code Confirm the DivX registration code number of the projector. Using the registration number, movies can be rented or purchased at www.divx.com/vod.
Information Supported Monitor Display * The following table lists the display formats supported by the projector. Sources Format Vertical Freq.(Hz) Horizontal Freq.(kHz) * If the projector does not support the input signal, “Out of Range” message appears on the screen. * The projector supports DDC1/2B type as Plug & Play function. (Auto recognition of PC monitor) * The Synchronization input form for horizontal and vertical frequencies are Separate.
Information Maintenance * The projector needs little maintenance. You should keep the lens clean because any dirt or stains may appear on the screen. If any parts need to be replaced, contact your dealer. When cleaning any part of the projector, always turn the power off and unplug the projector first. Cleaning the lens If there is any dust or stain on the surface of the lens, you must always clean the lens.
Information Specifications MODEL HS102 (HS102-JE) / HS102G (HS102G-JE) Resolution 800(Horizontal) x 600(Vertical)pixel Horizontal / Vertical Ratio 4:3(horizontal:vertical) DLP panel size 0.55 inches Screen size (Projection distance) 0.40 ~ 2.23m(15 ~ 80 inches) Projection OFF SET 100% Remote control distance 6m Video compatibility NTSC/PAL/SECAM/NTSC4.43/PAL-M/PAL-N Power 19V , 6.3A AC-DC Adapter LG, PA-1121-04 Height(mm/inches) 50/2.0 Breadth(mm/inches) 154/6.
Model number Serial number : : LG DLP PROJECTOR Please read this manual carefully before operating your set. Retain it for future reference. Record model number and serial number of the set. See the label attached on the bottom of the set and quote this information to your dealer when you require service.