SMART Hi-Fi AUDIO Wireless Multi-room Sound Bar Model : LAS650M ENGLISH | SIMPLE MANUAL To view the instructions of advanced features, visit http://www.lg.com and then download Owner’s Manual. Some of the content in this manual may differ from your unit. The actual product may differ from the image.
1 Getting Started Getting Started Safety Information CAUTION CAUTION: TO REDUCE THE RISK OF ELECTRIC SHOCK DO NOT REMOVE COVER (OR BACK) NO USER-SERVICEABLE PARTS INSIDE REFER SERVICING TO QUALIFIED SERVICE PERSONNEL. This lightning flash with arrowhead symbol within an equilateral triangle is intended to alert the user to the presence of uninsulated dangerous voltage within the product’s enclosure that may be of sufficient magnitude to constitute a risk of electric shock to persons.
Getting Started This device is equipped with a portable battery or accumulator. 1 Getting Started Safe way to remove the battery from this equipment: To remove the old battery, follow the steps in reverse order from assembly. To prevent contamination of the environment or possibly bring threat to human and/or animal health, the old battery or must be put in an appropriate container at designated collection points. Do not dispose of batteries together with other waste.
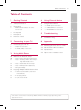
Table of Contents 5 Table of Contents 1 Getting Started 4 3 Safety Information 17 Using External device 6 Unpacking 6 – Additional Information for some accessories 17 17 17 – 1. HDMI Input connection – 2. P ORTABLE IN connection – 3. BLUETOOTH® connection 7 Front panel 7 Rear panel 5 Troubleshooting 8 Remote control 18 Troubleshooting 2 Connecting to your TV 6 Appendix 9 Connecting to your TV 9 9 – 1. O ptical connection – 2.
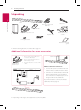
Getting Started Unpacking 1 Getting Started Unit Remote Control and Batteries Cable ties Simple Manual Subwoofer Adapter and power cord LG Tag On Sticker Optical cable Wall brackets and screws LAN cable Wall bracket install guide yy When mounting this unit on a wall, refer to page 22. Additional Information for some accessories Adapter and power cord Subwoofer 1. Connect the supplied AC power cord to the AC adapter. 2. Connect the AC adapter cable to DC. IN adapter input. 3.
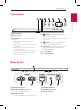
Getting Started 7 Front panel 1 Getting Started A Display window B Remote sensor C LED indicator: Shows connection status. (Page 23) yy White (blinking): waiting for network connection yy White (staying on): network connection is completed. yy White (Dimmed): standby mode with network connection. yy Green (staying on): the first group was set. yy Red (staying on): standby mode without network connection D (Add): Adds additional MUSICflow products to your network.
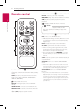
Getting Started Remote control • • • • • • • • • • b • • • • • • • • • • REPEAT : Listen to your music repeatedly. C/V (Skip) : Skips Fast backward or Forward. 1 dM (Play/Pause) : Starts playback or pauses playback. Getting Started (Shuffle) : Shuffles the music on the list. ,,Note You can use these playback buttons after play music by “Music Flow Player” App or PC software. • • • • • • • • • • c • • • • • • • • • • DRC : Turns on or off DRC function.
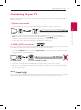
2 Connecting to your TV Connecting to your TV 9 Connecting to your TV Make one of the following connections, depending on the capabilities of your TV among Optical, HDMI or Wireless connection. 1. O ptical connection 1. Connect the OPT. IN jack on the unit to OPTICAL OUT jack on the TV using an optical cable. 2 3. Set the input source of this unit to OPTICAL using OPTICAL or FUNC button. 2.
3 10 Using Multi-Room Using Multi-Room Multi-Room Network Setup Step 1. Home Network Requirement d c a b a Make sure that a wireless network environment using a router is installed at your home. The home router should be connected to the internet. 3 b Connect your smart device to your home network. Using Multi-Room c Connect the speaker to the power supply. d If you want to enjoy the music on media server (PC, Mac or Network Storage), connect the media server to your home network. .
Using Multi-Room 11 Step 2. Installing “Music Flow Player” App and Media Server Installing “Music Flow Player” App Download “Music Flow Player” on the Apps Store or Google Play Store. A B B Scan the QR code using the scanning application. , Note for “Music Flow Player” App yy Depending on the device, “Music Flow Player” app may not work. yy Music Flow Player app will be available in version of the software as follow; Android O/S : Ver 2.3.3 (or later) iOS O/S : Ver 5.1.
Using Multi-Room Step 3. Initial Multi-Room Setup When installing the MUSICflow product for the first time, you can choose two types of connection as below. Option 1. Wired connection (MUSICflow Mesh Network Connection) Connect the one of MUSICflow products (sound bar, speaker or bridge) to the home router using LAN cable. Then you can connect the additional MUSICflow products (Optional) to your home network wirelessly (MUSICflow Mesh Network). Refer to “Step 4. Add Speakers (Optional)” on page 14.
Using Multi-Room 13 Option 2. Wireless connection (Standard Wireless Connection) When the wired connection is unavailable between MUSICflow products and home router, MUSICflow products offer music streaming service within home router’s Wi-Fi coverage. Connect one of the MUSICflow products (sound bar, speaker) to the home router wirelessly. (Option) Then you can connect the additional MUSICflow products to your home Wi-Fi network wirelessly. Refer to “Step 4. Add Speakers (Optional)” on page 14.
Using Multi-Room m Tip Offers music streaming service in MUSICflow system within home router’s Wi-Fi coverage. In the below case, Standard wireless connection is recommended. 1. When all speakers are within the home router’s Wi-Fi coverage. (If case that your home router supports 802.11n 2.4/5 GHz ) 2. When the wired connection is unavailable between MUSICflow products and home router. 3. When you want to use in below mode. 1) when you use single speaker MUSICflow system.
Using Multi-Room 15 , Note for Multi-Room Setup yy You can make all wireless/wired connection according to the location of the router. But we recommend that you connect the first speaker or bridge to the router using LAN cable and connect additional speakers for network stability. yy When the “Firmware update”pop-up appears on Music Flow Player App, touch to start updating.
Using Multi-Room Enjoying Multiple MUSICflow Product 1. Home Cinema Mode (Surround Sound Mode) Simply add a LG MUSICflow sound bar to your network and synchronize it with your LG MUSICflow speakers to enjoy a home cinema system experience.
4 Using External device Using External device 17 Using External device 1. H DMI Input connection To the Blu-ray disc player, DVD player, game console, etc. 1. Connect HDMI IN jack on the unit to HDMI OUT jack on the audio & video device such as Blu-ray disc player, DVD player, game console, etc. 2. Select the input source of this unit to HDMI IN using FUNC button. 2. PORTABLE IN connection 4 ) to the PORTABLE IN connector of the unit by using 2.
5 18 Troubleshooting Troubleshooting Troubleshooting 4. Disconnect the power cord of the main unit and the wireless subwoofer. No woofer sound You can set up wireless connection manually, when your connection is not completed. 1. Adjust volume level of the main unit to minimum. -- ”VOL MIN” appears on the display window. YRO#PLQ VOL 2. Press and hold (MUTE) on the remote control YRO#PLQ for about 3 seconds. VOL -- “W RESET” / “WL RESET” appears on the display Z#UHVHW window briefly.
Troubleshooting Software Update When the MUSICflow device is connected to your home network, check whether the firmware version is the latest on all speakers and the Music Flow Player application. Your MUSICflow device might require a more recent firmware to be installed for optimal operation. [Settings à Version Info]: you can check if your speaker has the latest firmware. How can I initialize speaker? If you press down “ (Add)” button until Beep sounds once, the network related settings are initialized.
Troubleshooting Music sound breaks and unstable MUSICflow system 1. If speaker with breaking sound is connected through wireless connection mode, yy If the distance between the speaker and home router is not close enough, the corresponding condition may occur. Move the speaker closer to the home router and try again. yy If the device playing the source sound (Ex. phone or laptop) is at a place without fluent home router signal, move the corresponding device closer to the home router and try again.
Troubleshooting 21 No TV sound in HDMI (ARC) conneection What is the type of music file that can be played? The ARC function enables an HDMI capable TV to send the audio streaming to HDMI OUT of the unit. yy You can play the files with extension mp3, wma, flac, m4a, aac, ogg, and wav. To use this function : yy For mp3 and wma, sampling frequency is 32- 48 kHz, and for flac, it supports up to 192 kHz, 24 bit.
6 Appendix 22 Appendix Mounting the main unit on a wall 2. When you mount it on a wall (concrete), use the wall plugs. You should drill some holes. A guide sheet (Wall bracket install guide) is supplied to drill. Use the sheet to check the point to drill. Preparation materials Unit Wall bracket install guide Wall bracket 3. Remove the Wall bracket install guide. Screws 4. Fix the brackets with screws (A) as shown in the illustration below.
Appendix 23 About Status LED’s Condition Color (Off) Status The unit is waiting for network connection (White) The initial unit is being connected to the network (Off) ( (Red) button is pressed) Network Status The unit is connected to the network (White) The additional unit is being connected to the network (Off) ( (Red) button is pressed) Network standby mode (Dimmed Whtie) Standby Mode Status Standby mode (Red) , Note for Status LED’s Condition yy When you set the group at first, Netwo