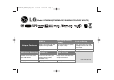
HT903WA-DP_DDEULL_ENG_1130 6/27/08 10:10 PM Page 1 Model: HT903WA(HT903WA-DP, SH93WA-F/C/L/R/W, W93-T2) Unique Features HDMI In Full HD up-scaling (1080p) Simple connection with Set Top Box through HDMI. View Full HD picture quality with simple setup. Listen sound from TV, DVD and Digital Device with vivid 5.1ch mode. Go to page 9 Go to page 13 Go to page 18 USB Direct Recording Portable In Made for iPod Record music from CD to your USB device.
HT903WA-DP_DDEULL_ENG_1130 6/27/08 10:10 PM Page 2 Safety Precaution CAUTION RISK OF ELECTRIC SHOCK DO NOT OPEN CAUTION: TO REDUCE THE RISK OF ELECTRIC SHOCK DO NOT REMOVE COVER (OR BACK) NO USER-SERVICEABLE PARTS INSIDE REFER SERVICING TO QUALIFIED SERVICE PERSONNEL.
HT903WA-DP_DDEULL_ENG_1130 6/27/08 10:10 PM Page 3 Welcome to your new DVD Receiver Contents Setting up . . . . . . . . . . . . . . . . . . . . . . . . . . . . . . . .4-5 To fix the power cable of wireless speakers . . . . . . . .6 LED indicator of Wireless Transmitter . . . . . . . . . . . . .7 Initial setting an ID of Transmitter . . . . . . . . . . . . . . . .7 Setting an ID of Wireless Transmitter . . . . . . . . . . . . .7 Hooking up the unit . . . . . . . . . . . . . . . . . . . . . . . . .
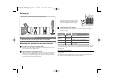
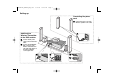
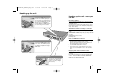
HT903WA-DP_DDEULL_ENG_1130 6/27/08 10:10 PM Page 4 Setting up The speakers are detached from the speaker stands. Connect the red end of each wire to the terminals marked +(plus) and the black end to the terminals marked - (minus). c Connect the wires to the speakers. Connect the other end of each wire to the correct speaker according to the colour coding: Assembling the Speakers 1 Draw the speaker cord through the hole on the speaker.
HT903WA-DP_DDEULL_ENG_1130 6/27/08 10:10 PM Page 5 Setting up Connecting the power cord a Attaching the Wireless Transmitter to the DVD receiver a Connect the DC power cable to the unit and transmitter. b Connect the SOUND SIGNAL connector of the Wireless Transmitter and rear (right, left) speaker of the main set with the sound signal cable. a Connect the power cord of the Wireless speakers to the outlet.
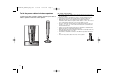
HT903WA-DP_DDEULL_ENG_1130 6/27/08 10:10 PM Page 6 To fix the power cable of wireless speakers To fix the power cable of wireless speakers, insert the power cable of wireless speakers in to the hole on the speakers. 6 Be careful of the following • Be careful to make sure children do not put their hands or any objects into the *speaker duct. *Speaker duct: A hall for plentiful bass sound on speaker cabinet(enclosure). • Set the distance between this unit and Wireless Speakers within 10m.
HT903WA-DP_DDEULL_ENG_1130 6/27/08 10:10 PM Page 7 LED indicator of Wireless Transmitter Setting an ID of Wireless Transmitter Operation LED color BLUE The main set is turned on, everything is connected and transmitting. RED The wireless transmitter is in standby mode. OFF (No display) The DC cable is disconnected to the unit.
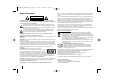
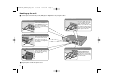
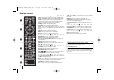
HT903WA-DP_DDEULL_ENG_1130 6/27/08 10:10 PM Page 8 Hooking up the unit a Connect jacks on the unit and your TV (DVD player or Digital Device etc.) using the cables. Audio In connection Video Out connection Connect the VIDEO OUTPUT (MONITOR) jack on the unit to the corresponding input jack on your TV using a Video cable. The unit’s Audio jacks are colour coded (red for right audio and white for left audio).
HT903WA-DP_DDEULL_ENG_1130 6/27/08 10:10 PM Page 9 Hooking up the unit HDMI In connection Connect the HDMI INPUT jack on the unit to the HDMI output jack on your Set-Top box (or Digital Device etc.) using an HDMI cable. Set the external source to HDMI IN by pressing INPUT. In HDMI IN mode, you can’t change the resolution. Hooking up the unit - more you can do Resolution Setting You can change the resolution for component video and HDMI output.
HT903WA-DP_DDEULL_ENG_1130 6/27/08 10:10 PM Page 10 Remote control a b c d a INPUT : Changes the input source ( AUX, AUX OPT, TVAUDIO, PORTABLE, HDMI IN, USB, OSD IPOD, IPOD) SLEEP : Sets the System to turn off automatically at a specified time. (Dimmer : Dims the LED (Light-emitting diode) of front panel by half in power-on status.) POWER: Switches the unit ON or OFF.
HT903WA-DP_DDEULL_ENG_1130 6/27/08 10:10 PM Page 11 Main Unit Open/Close DVD/CD Disc Drawer PORT. IN port The PORT. In port means you can connect an audio device to play trough the surround sound speakers. USB port The USB port allows you can connect a memory device to your DVD player. Power Turn the unit on and off. Play/Pause, Function Press and hold down this button for about 3 seconds then press repeatedly to select other function.
HT903WA-DP_DDEULL_ENG_1130 6/27/08 10:10 PM Page 12 Adjust the settings OSD Initial language settings Before using the unit for the first time, you have to adjust OSD initial language ON REMOTE 1 Turn the power on: Appear the language list display window POWER 2 Select the language: vV b B 3 Press: ENTER 4 To confirm press: b B and ENTER ON REMOTE 1 Display setup menu : SETUP 2 Select a desired option on the first level: vV 3 Move to second level: B 4 Select a desired option on the secon
HT903WA-DP_DDEULL_ENG_1130 6/27/08 10:10 PM Page 13 Adjust the display settings TV Aspect – Select which screen aspect to use based on the shape of your TV screen. [4:3]: Select when a standard 4:3 TV is connected. [16:9]: Select when a 16:9 wide TV is connected. Display Mode – If you selected 4:3, you’ll need to define how you would like widescreen programs and films to be displayed on your TV screen. [Letterbox]: This displays a widescreen picture with black bands at the top and bottom of the screen.
HT903WA-DP_DDEULL_ENG_1130 6/27/08 10:10 PM Page 14 Adjust the lock settings To access the lock options, you must enter the 4-digit password. If you have not yet entered a password you are prompted to do so. Enter a 4-digit password. Enter it again to verify. If you make a mistake while entering number, press CLEAR to delete numbers. If you forget your password you can reset it. Press SETUP to display the Setup menu. Input ‘210499’ and press ENTER. The password has now been cleared.
HT903WA-DP_DDEULL_ENG_1130 6/27/08 10:10 PM Page 15 Displaying Disc Information Playing a Disc or file ON REMOTE ON REMOTE 1 Press DISPLAY: DISPLAY 1 Open the disc tray: (On unit: Z) 2 Select a item: vV 2 Insert a Disc: (On unit) 3 Adjust the Display menu settings: bB 3 Close the disc tray: (On unit: Z) - 4 To return the exit: DISPLAY 4 Adjust the menu settings: or Select a file from the menu: vV b B 5 Start the Disc playing: B PLAY 6 To stop the Disc playing: x STOP Displaying Di
HT903WA-DP_DDEULL_ENG_1130 Fast forward or fast reverse 6/27/08 10:10 PM Page 16 Mixed disc or USB Flash Drive – DivX, MP3/WMA and JPEG ALL Press SCAN (m or M) to play fast forward or fast reverse during playback. You can change the playback speed by pressing SCAN (m or M) repeatedly. Press PLAY (B) to continue play at normal speed.
HT903WA-DP_DDEULL_ENG_1130 6/27/08 Creating your own program ACD 10:10 PM MP3 Page 17 WMA Viewing photo files You can play the contents of a disc in the order you want by arranging the order of the music files on the disc. The program is cleared when the disc is removed. Select a desired music file then press PROG./MEMO. or select “ “ and then press ENTER to add the music file to the program list. To add all music files on the disc, select “ ” and then press ENTER.
HT903WA-DP_DDEULL_ENG_1130 6/27/08 10:10 PM Page 18 See information about a radio station Listening to the radio Be sure that both FM aerials are connected. ON REMOTE 1 Turn the power on: PS (Programme Service Name) The name of the channel will appear in the display PTY (Programme Type Recognition) The programme type (e.g. Jazz or News) will appear in the display. RT (Radio Text) A text message contains special information from the broadcast station. This text may scroll across the display.
HT903WA-DP_DDEULL_ENG_1130 6/27/08 10:10 PM Page 19 Listening to music from your USB device more you can do Listening to music from your USB device The advantage of connecting your portable USB player through the system’s USB port is that the USB device can be controlled from the system. Compatible USB Devices • Devices which require additional program installation when you have connected it to a computer, are not supported. • MP3 Player : Flash type MP3 player.
HT903WA-DP_DDEULL_ENG_1130 6/27/08 10:10 PM Page 20 Recording music from CD to your USB device ON REMOTE 1 Connect the USB device to the unit: - 2 Select a mode (DVD/CD) in which you want to record: FUNCTION 3 Start the recording: If you want to record desired music file in Disc to USB.
HT903WA-DP_DDEULL_ENG_1130 6/27/08 10:10 PM Page 21 Listening to music from your iPod - more you can do Listening to music from your iPod iPod mode: You can operate your iPod by using the supplied remote control and controls on your iPod. TV screen is turned off. iPod will not be charged when selecting the iPod mode. But you can enjoy better sound quality. OSD iPod mode: You can operate your iPod by controlling OSD menu on the TV screen with supplied remote control.
HT903WA-DP_DDEULL_ENG_1130 6/27/08 10:10 PM Page 22 Language Codes Use this list to input your desired language for the following initial settings: Disc Audio, Disc Subtitle, Disc Menu.
HT903WA-DP_DDEULL_ENG_1130 6/27/08 10:10 PM Page 23 Troubleshooting PROBLEM No power No picture CAUSE CORRECTION The power cord is disconnected. The TV is not set to receive the DVD signal. Plug the power cord into the wall outlet securely. Select the appropriate video input mode on the TV so the picture from the DVD Receiver appears on the TV screen. Connect the video cables securely to both the TV and DVD Receiver.
HT903WA-DP_DDEULL_ENG_1130 6/27/08 10:10 PM Page 24 Types of Playable Discs Type About the Logo DVD-VIDEO: Discs such as movies that can be purchased or rented. DVD-R: Video mode and finalized only DVD-RW: Video mode and finalized only DVD VR format that have been finalized can not be played in this unit DVD+R: Video mode only Supports the double layer disc also DVD+RW: Video mode only Audio CD: This unit plays DVD±R/RW and CD-R/RW that contains audio titles, DivX, MP3,WMA and/or JPEG files.
HT903WA-DP_DDEULL_ENG_1130 6/27/08 10:10 PM Page 25 Specifications Specifications Speakers General Power supply Power consumption Net Weight External dimensions (W x H x D) Operating conditions Temperature Operating humidity Laser Refer to main label. Refer to main label. 3.9 kg 430 x 73 x 305 mm 5°C to 35°C, Operation status: Horizontal 5% to 85% Semiconductor laser, wavelength 650 nm 87.5 - 108.0 MHz or 65.0 - 74.0 MHz, 87.5 - 108.0 MHz 10.
HT903WA-DP_DDEULL_ENG_1130 26 6/27/08 10:10 PM Page 26