ENGLISH FRANÇAIS ESPAÑOL OWNER’S MANUAL AIR CONDITIONER Please read this manual carefully before operating your set and retain it for future reference. TYPE : Ceiling Cassette http://www.lghvac.com www.lg.
Multi-Type Air Conditioner Ownerʼs Manual TABLE OF CONTENTS A. Safety Precautions ..........................3 B. Electrical Safety...............................6 Temporary Use of an Adapter...........6 Symbols used in this Manual ............6 C. Product Introduction.......................7 Indoor Units.......................................7 Outdoor Unit......................................7 D. Operating Instructions....................8 How to insert the Batteries ................
Safety Precautions This symbol indicates the possibility of death or serious injury. This symbol indicates the possibility of injury or damage. n Meanings of symbols used in this manual are as shown below. Be sure not to do. Be sure to follow the instruction. Always use a power plug and socket with a ground terminal. • There is a risk of electric shock. For electrical work, contact the dealer, seller, a qualified electrician, or an Authorized Service Center.
Safety Precautions Indoor/outdoor wiring connections must be secured tightly and the cable should be routed properly so that there is no force pulling the cable from the connection terminals. Safely dispose off the packing materials. Like screws, nails, batteries, broken things etc after installation or svc and then tear away and thraw away the plastic packaging bags. • Improper or loose connections can cause heat generation or fire. • Children may play with them and cause injury.
Safety Precautions • There is risk of damage or loss of property. • There is risk of personal injury. Do not insert hands or other objects through the air inlet or outlet while the product is operating. • There are sharp and moving parts that could cause personal injury. Do not tilt the unit when removing or uninstalling it. • The condensed water inside can spill . Dismantling the unit, treatment of the refrigerant oil and eventual parts should be done in accordance with local and national standards.
Electrical Safety Electrical Safety • This appliance must be properly grounded. To minimize the risk of electric shock, you must alway plug into a grounded oulet. • Do not cut or remove the grounding prong from the power plug. • Attaching the adapter ground terminal to the wall receptacle cover screw does not ground the appliance unless the cover screw is metal and not insulated, and the wall receptacle is grounded through the house wiring.
Product Introduction ENGLISH Product Introduction Indoor Unit [Ceiling Cassette Type] Cabinet Air Discharge Front Panel Signal receiver Air Inlet Outdoor Unit Air intake vents Control cover Connecting wire Connection pipe Drain hose Air outlet vents Base plate h The figure can be changed according to model.
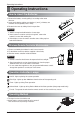
Operating Instructions Operating Instructions How to insert the Batteries 1. Remove the battery cover by pulling it according to the arrow direction. 2. Insert new batteries making sure that the (+) and (-) of battery are installed correctly.(Battery Size = AAA) 3. Reattach the cover by sliding it back into position. NOTE 1. Always use/replace both batteries of same type. 2. If the system is not to be used for a long time, remove the batteries to save their working life. 3.
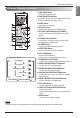
Operating Instructions ENGLISH Wireless Remote Controller 1. VANE ANGLE Button Used to set each vane angle. 2. FUNCTION SETTING Button Used to set or clear Auto Clean, Smart Clean, Electric heater or Individual vane angle control. 3. ON/OFF Button Used to turn on/off the unit. 1 2 3 10 11 12 4. JET COOL Button Speed cooling operates super high fan speed. 4 13 5 6 5. LEFT/RIGHT AIRFLOW Button (OPTIONAL) Used to set the desired left/right(horizontal) airflow direction. 14 7 8 6.
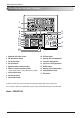
Operating Instructions Wired Remote Controller (Optional) 1 10 9 8 7 11 12 13 14 15 2 3 4 5 6 16 17 1 Operation indication screen 10 Air flow button 2 Set temperature button 11 Cooling desired temperature 3 Fan Speed button 12 Function setting button 4 Set back button 13 Up, Down, Left, Right button 5 Operation mode selection button 14 On/Off button 6 Wireless remote controller receiver • Some product donʼt receive the wireless signals.
Operating Instructions ENGLISH Operation Mode 1 2 Press the ON/OFF BUTTON to turn the unit on. The unit will respond with a beep. Open the door of the remote controller and press the operation mode button. Each time the button is pressed, the operation mode is shifted in the direction of the arrow. Cooling Mode 3 4 Auto Operation Dehumidification mode For cooling or heating operation set the desired indoor temperature by pressing the ROOM TEMPERATURE SETTING BUTTONS.
Operating Instructions Dehumidification mode During Healthy Dehumidification Operation o If you select the dehumidification mode on the OPERATION MODE SELECTION BUTTON, the product starts to run the dehumidification function. It automatically sets the room temperature and airflow volume to the best condition for dehumidification, based on the sensed current room temperature.
Operating Instructions Plasma filter is a technology developed by LG to get rid of microscopic contaminants in the intake air by generating a plasma of high charge electrons. This plasma kills and destroys the contaminants completely to provide clean and hygienic air. Plasma purification can be started by pressing the PLASMA BUTTON on the remote controller. Repressing it will deactivate the operation.
Operating Instructions Sleep Timer Setting 1. Press the TIMER button to turn timer on or off. Timer Sleep 2. Press TIME SETTING buttons until the desired time is set. (7 hours is the maximum setting) 3. Press the SET / CLEAR button. On Timer Setting 1. Press the ON button to turn timer on or off. Timer ON 2. Press TIME SETTING buttons until the desired time is set. 3. Press the SET / CLEAR button. Off Timer Setting 1. Press the OFF button to turn timer on or off. Timer OFF 2.
Operating Instructions ENGLISH To cancel the Timer Setting • If you wish to cancel all timer setting, press the SET/CLEAR button. • If you wish to cancel each timer setting, press the each timer button to turn timer sleep or on or off as you want. And then press the SET/CLEAR button aiming the remote controller at the signal receptor. (The timer lamp on the air conditioner and the display will go off.
Operating Instructions Individual vane angle control (Optional) It is the function that can control 4 vane angles individually in the ceiling type 4Way cassette product group. 1 Press the VANE ANGLE button. Individual vane angle control symbol will blink. • If you press the VANE ANGLE button for 3 seconds, all vanes are set to standard angle. 2 Set each vane angle by pressing VANE ANGLE button. • Every time TEMPERATURE SETTING button is pressed, corresponding vane angle and set values are displayed.
Operating Instructions Forced operation is used when the remote controller can't be used. The operation will be started if the ON/OFF button is pressed. If you want to stop the operation, re-press the button. [Ceiling Cassette Type] Forced Operation Button Heat pump Model Room Temp. ≥ 24°C(75.2°F) 21°C(69.8°F) ≤ Room Temp. < 24°C(75.2°F) Room Temp. < 21°C(69.8°F) Heating Operating mode Cooling Healthy Dehumidification Indoor FAN Speed High High High Setting Temperature 22°C(71.6°F) 23°C(73.
Operating Instructions Maintenance and Service Before performing any maintenance, turn off the main power to the system, disconnect the circuit breaker and unplug the power cord. Ceiling Cassette Type Grille, Case and Remote Control p Turn the system off before cleanining, To clean, wipe with a soft, dry cloth. Do not use bleach or abrasives. NOTE Supply power must be disconnected before cleaning the indoor unit.
Maintenance and Service Do not overcool the room. This is not good for the health and wastes electricity. Make sure that the doors and windows are shut thight. Avoid opening doors and windows as much as possible to keep the cool air in the room. Keep blinds or curtains closed. Do not let direct sunshine enter the room when the air conditioner is in operation. Clean the air filter regularly. Blockages in the air filter reduce the airflow and lower cooling and dehumidifying effects.
Multi Air Conditioner
FRANÇAIS MANUEL D’UTILISATION CLIMATISEUR Veuillez lire attentivement ce manuel avant d’utiliser votre appareil, et le conserver pour toute consultation ultérieure. TYPE : Casete Plafond http://www.lghvac.com www.lg.
Climatiseur type multi-unités TABLE DES MATIÈRES A. Précautions de sécurité.........................3 B. Sécurité électrique .................................6 Utilisation temporaire d'un adaptateur......6 Symboles utilisés dans ce manuel ...........6 C. Description du produit...........................7 Unité intérieure.........................................7 Unité extérieure........................................7 D. Instructions dʼutilisation .......................8 D. Comment insérer les piles ....
Précautions de sécurité Précautions de sécurité AVERTISSEMENT Ce symbole indique un risque de blessure grave, voire mortelle. ATTENTION Ce symbole indique un risque de blessure ou des dommages matériels. FRANÇAIS Les instructions ci-après doivent être observées dans le but de prévenir tout risque de dommages corporels ou matériels.
Précautions de sécurité Les connexions électriques des unités intérieure et extérieure doivent être bien solides et les câbles doivent être acheminés correctement, de sorte quʼil nʼy ait aucune force qui tire le cordon vis-à-vis des bornes de connexion. Veillez à la mise au rebut sûre des matériaux dʼemballage. Par exemple, des vis, des clous, des piles, des objets cassés, etc., après installation ou service. Puis déchirez et jetez les sacs dʼemballage en plastique.
Précautions de sécurité Utilisez un chiffon doux pour le nettoyage. Nʼutilisez pas de détergents agressifs, de dissolvants, ni n'aspergez de l'eau, etc. • Autrement, il y a risque de dommages à la propriété ou de pertes matérielles. • Ceci peut provoquer un mauvais fonctionnement de lʼappareil. • Ceci risquerait de provoquer un incendie, un choc électrique ou des dommages aux pièces plastiques de lʼappareil. Ne touchez pas les pièces métalliques du climatiseur lorsque vous enlevez le filtre à air.
Sécurité électrique Sécurité électrique AVERTISSEMENT • Cet appareil doit être correctement mis à la terre. Pour réduire au minimum le risque de choc électrique, vous devez toujours brancher lʼappareil sur une prise de courant mise à la terre. • Ne coupez ni n'enlevez la broche de mise à la terre de la fiche dʼalimentation.
Description du produit Description du produit Unité intérieure FRANÇAIS [Type cassette plafond] Évacuation d'air Panneau avant Récepteur de signaux Entrée d'air Unité extérieure Grilles d’entrée d’air Couvercle du tableau de commande Câble de connexion Tuyau de raccordement Raccord de drainage Grilles de sortie d’air Plaque de base h La imagen pueden variar según el modelo.
Instructions dʼutilisation Instructions dʼutilisation Comment insérer les piles 1. Enlevez le couvercle du réceptacle à piles suivant le sens de la flèche. 2. Insérez des piles neuves en veillant à bien placer les pôles (+) et (-). (Type de pile = AAA) 3. Replacez le couvercle en le poussant de nouveau dans sa position. REMARQUE 1. Utilisez/remplacez toujours les deux piles par des piles du même type. 2.
Instructions dʼutilisation Fonctionnement de la Télécommande 2 3 10 11 12 4 13 5 6 14 7 8 15 16 9 17 Mode de fonctionnement Fonction refroidissement Fonctionnement automatique Fonction déshumidification saine Fonction chauffage Mode ventilateur • Modèle refroidissement ( modèle pompe à chaleur ( ), ) REMARQUE h Sur certains produits, certaines fonctions ne sont pas disponibles. Manuel du propriétaire 9 FRANÇAIS 1 1.
Instructions dʼutilisation Dénominations et fonctions (en option) 1 10 9 8 7 11 12 13 14 15 2 3 4 5 6 16 17 1 Écran d'indication du fonctionnement 9 Touche de programmation 2 Touche de réglage de la température 10 Touche du débit d'air 3 Touche de réglage de la vitesse du ventilateur 11 Température de refroidissement souhaitée 4 Touche du mode d'abaissement de la température 12 Touche de réglage des fonctions 13 5 Touche de sélection du mode de fonctionnement 14 6 Récepteur de la télécommande sa
Instructions dʼutilisation Mode de fonctionnement Appuyez sur la TOUCHE ON/OFF pour mettre lʼappareil en marche. Lʼunité émettra un bip sonore. 2 Ouvrez le couvercle basculant de la télécommande et appuyez sur la touche de mode de fonctionnement. Chaque fois que vous appuyez sur cette touche, le mode de fonctionnement change dans le sens de la flèche.
Instructions dʼutilisation Fonction déshumidificationsaine Pendant le fonctionnement en mode déshumidification saine o Si vous sélectionnez le mode de fonctionnement déshumidification à lʼaide de la TOUCHE DE SÉLECTION DU MODE DE FONCTIONNEMENT, la fonction de déshumidification se met en marche.
Instructions dʼutilisation Fonctionnement du purificateur dʼair PLASMA (en option) La fonction de purification par plasma peut être activée en appuyant sur la TOUCHE PLASMA de la télécommande. Appuyez-y de nouveau annuler cette fonction. REMARQUE Cette fonction peut être activée en n'importe quel mode de fonctionnement et le ventilateur peut marcher à n'importe quelle vitesse lorsque le filtre de plasma est actionné.
Instructions dʼutilisation Réglage de la veille programmée 1. Appuyez sur la touche SLEEP pour activer ou désactiver la veille programmée. Veille programmée 2. Utilisez les touches de réglage de l'heure jusqu'à ce que le délai souhaité soit affiché. (7 heures est le réglage maximal.) 3. Appuyez sur la touche SET/CLEAR. Réglage de la mise en marche programmée 1. Appuyez sur la touche ON pour régler la mise en marche programmée. Heure de mise en marche programmée 2.
Instructions dʼutilisation Annulation des réglages programmés • Si vous voulez annuler tous les réglages programmés, appuyez sur la touche SET/CLEAR. Commande verticale de direction du débit d'air (selon les modèles) Vous pouvez ajuster le débit d'air vers le haut/bas (commande verticale) à l'aide de la télécommande. 1. Appuyez sur la touche marche/arrêt pour démarrer l'unité. 2. Appuyez sur la touche de contrôle du débit d'air haut/bas. Les volets se mettent à osciller de haut en bas.
Instructions dʼutilisation Réglage individuel de l'angle des volets (selon les modèles) Cette fonction permet de contrôler l'angle des quatre volets individuellement sur les climatiseurs de type cassette 4 voies. 1 Appuyez sur la touche VANE ANGLE. Le symbole de réglage individuel de l'angle des volets se met à clignoter. • Si vous appuyez pendant trois secondes sur la touche VANE ANGLE, tous les volets sont réglés sur un angle standard.
Instructions dʼutilisation Funzionamento Manuale Le fonctionnement forcé est employé lorsquʼil est impossible dʼutiliser la télécommande. Ce mode démarre lorsque vous appuyez sur le bouton ON/OFF. Pour lʼarrêter, appuyez à nouveau sur le bouton. FRANÇAIS [Type Casete Rlafond] Touche de marche forcée Modèle réversible Température de la pièce ≥24°C(75.2°F) 21°C(69.8°F) ≤_Température de la pièce < 24°C(75.2°F) Température de la pièce < 21°C(69.
Entretien et service Entretien et service ATTENTION Avant dʼeffectuer toute opération dʼentretien, veuillez placer lʼinterrupteur principal du système sur la position arrêt, puis débranchez lʼinterrupteur et le cordon dʼalimentation. Type cassette plafond Grille, logement et télécommande p Éteindre lʼappareil avant de le nettoyer. Pour le nettoyer, lʼessuyer avec un chiffon doux et sec. Ne pas utiliser de produits blanchissants ou abrasifs.
Entretien et service Conseils dʼutilisation Ne refroidissez pas à lʼexcès la pièce. Veillez à ce que le soleil nʼentre pas directement dans la pièce lorsque le climatiseur est en fonctionnement. Veillez à ce que les portes et les fenêtres soient bien fermées. Nettoyez régulièrement les filtres à air. Évitez autant que possible dʼouvrir les portes et les fenêtres afin de conserver l'air froid dans la pièce.
20 Climatiseur Mural
ESPAÑOL MANUAL DEL PROPIETARIO AIRE ACONDICIONADO Por favor lea este manual detenidamente antes de utilizar su equipo y guárdelo para consultas futuras. TIPO: Casete de Techo http://www.lghvac.com www.lg.
Manual de usuario para varios tipos de sistemas de aire acondicionado CONTENIDO A. Precauciones de seguridad ..........................3 B. Seguridad eléctrica .........................................6 Uso temporal de un adaptador ..........................6 Símbolos utilizados en este manual ..................6 C. Presentación del producto.............................
Precauciones de seguridad Precauciones de seguridad Para evitar lesiones al usuario u otras personas o daños a la propiedad, deberá seguir las instrucciones a continuación. n El funcionamiento incorrecto debido a la omisión de las instrucciones causará lesiones o daños. La seriedad se clasificará mediante las siguientes indicaciones: Este símbolo indica la posibilidad de muerte o lesión seria. Este símbolo sólo indica la posibilidad de lesión o daños a la propiedad. Asegúrese de no hacer esto.
Precauciones de seguridad Las conexiones del cableado interior/exterior deben estar firmemente aseguradas, y el cable deberá tenderse correctamente a fin de evitar tensiones no deseadas en los terminales de conexión. • Las conexiones flojas o inadecuadas pueden ser causa de una generación excesiva de calor o incluso incendio. Deseche los materiales de embalaje de forma segura. Como tornillos, clavos, pilas, piezas rotas, etc.
Precauciones de seguridad No utilice el producto con propósitos especiales, como la preservación de alimentos, obras de arte, etc. Este es un aire acondicionado de consumidor, no un sistema de refrigeración de precisión. • Existe el riesgo de daños o pérdidas de propiedad. No toque las piezas metálicas del producto al desmontar el filtro de aire. No introduzca las manos u otros objetos en la entrada o la salida de aire mientras el producto esté en funcionamiento.
Seguridad eléctrica Seguridad eléctrica • Este pequeño electrodoméstico debe estar correctamente puesto a tierra. Para reducir al mínimo el riesgo de descargas eléctricas, siempre deberá enchufar la unidad en una toma con puesta a tierra. • No corte ni quite la clavija de puesta a tierra del enchufe de alimentación.
Presentación del producto Presentación del producto A continuación encontrará una breve presentación de las unidades de interior y exterior. Por favor, consulte la información específica relativa al tipo de su unidad interior.
Instrucciones de funcionamiento Instrucciones de funcionamiento Inserción de pilas 1. Desmonte la tapa de la batería tirando de ella en la dirección de la flecha. 2. Inserte las nuevas pilas asegurándose de que los signos (+) y (-) de la pila están instalados correctamente.(Tamaño de las baterías = AAA) 3. Monte de nuevo la tapa deslizándola nuevamente en posición. NOTA 1. Utilice/Sustituya siempre ambas pilas por otras del mismo tipo. 2.
Instrucciones de funcionamiento Operación del mando a distancia 1 3 10 11 12 4 13 5 6 14 7 8 15 16 9 17 Modo funcionamiento Modo funcionamiento Funcionamiento automático Funcionamiento de deshumidificación sana Funcionamiento de calefacción Modo Ventilador • Modelo enfriamiento ( ), Modelo bomba de calor ( ) NOTA h Dependiendo del producto, algunas funciones pueden no estar operativas o no mostrarse. Manual del propietario 9 ESPAÑOL 2 1.
Instrucciones de funcionamiento Nombre y función de los botones del controlador remoto (Opcional) 1 10 9 8 7 11 12 13 14 15 2 3 4 5 6 16 17 1 Pantalla de indicación de operación 10 Botón de flujo de aire 2 Botón para establecer temperatura 11 Botón de temperatura deseada 3 Botón de velocidad de ventilador 12 Botón para establecer función 4 Botón SET BACK 13 Botón Arriba, Abajo, Izquierda, Derecha 5 Botón de selección de modo de operación 14 Botón Encendido/Apagado (ON/OFF) 6 Receptor de contro
Instrucciones de funcionamiento Modo funcionamiento Presione el botón ON/OFF para encender la unidad. La unidad responderá con una señal sonora 2 Abra la puerta del mando a distancia y presione el botón modo de funcionamiento. Cada vez que presione el botón, el modo de funcionamiento cambiará en la dirección de la flecha.
Instrucciones de funcionamiento Funcionamiento de deshumidificación sana Durante el funcionamiento de la deshumidificación sana o Si selecciona el modo deshumidificación mediante el BOTÓN DE SELECCIÓN DEL MODO DE FUNCIONAMIENTO, el producto activará la función de deshumidificación. Establece automáticamente la temperatura ambiente y el volumen del flujo de aire a las mejores condiciones para la deshumidificación, basándose en la temperatura ambiente actual detectada.
Instrucciones de funcionamiento Funcionamiento de purificación PLASMA (opcional) El filtro de plasma es una tecnología desarrollada por LG a fin de lograr eliminar los contaminantes microscópicos presentes en el aire de entrada mediante la generación de un plasma con electrones de altas cargas. Este plasma elimina y destroza completamente los contaminantes para proporcionar un aire limpio e higiénico.
Instrucciones de funcionamiento Ajuste del temporizador de apagado automático 1. Pulse el botón TIMER para activar o apagar el temporizador. Apagado automático 2. Pulse los botones TIME SETTING hasta ajustar la hora deseada. (7 horas es el ajuste máximo) 3. Pulse el botón SET / CLEAR. Ajuste del temporizador de encendido 1. Pulse el botón ON para activar o apagar el temporizador. Temporizador encendido 2. Pulse los botones TIME SETTING hasta ajustar la hora deseada. 3. Pulse el botón SET / CLEAR.
Instrucciones de funcionamiento Para cancelar el ajuste del temporizador • Si desea cancelar los ajustes del temporizador, pulse SET/CLEAR . • Si desea cancelar cada ajuste del temporizador, pulse cada botón del temporizador para encender o apagar el temporizador según lo desee. Y pulse SET/CLEAR con el mando a distancia orientado al receptor de señal. (Se apagará la luz del temporizador en el aparato de aire acondicionado y la pantalla.
Instrucciones de funcionamiento Control de ángulo de aletas individual (opcional) Es la función que permite controlar 4 ángulos de aleta individualmente en el grupo de productos de cassette de 4 direcciones para techo. 1 Pulse el botón VANE ANGLE. Parpadeará el símbolo de control individual del ángulo de las aletas. • Si pulsa el botón VANE ANGLE durante 2 segundos, todas las aletas se moverán a su ángulo estándar. 2 Ajuste el ángulo de cada aleta pulsando el botón VANE ANGLE.
Instrucciones de funcionamiento Funcionamiento Forzado La operación forzada se usa cuando no puede usarse el control remoto. La operación comenzará cuando se pulse el botón ON/OFF (ENCENDIDO/APAGADO). Si desea detener la operación, vuelva a pulsar el botón. [Tipo casete de techo] ESPAÑOL Botón de funcionamiento forzado Modelo con bomba de calor Temp. de sala ≥24°C(75.2°F) 21°C(69.8°F) ≤_Temp. de sala < 24°C(75.2°F) Temp. de sala < 21°C(69.
Mantenimiento y servicio Mantenimiento y servicio Antes de realizar labores de mantenimiento, desconecte la alimentación del sistema, cierre el interruptor y desenchufe el cable de alimentación. Tipo casete de techo Parilla, carcasa y mando a distancia p Apague el sistema antes de limpiar. Para limpiar, utilice un paño suave y seco. No utilice lejía ni productos abrasivos. NOTA La alimentación debe estar desconectada antes de limpiar la unidad interior.
Mantenimiento y servicio Sugerencias No enfríe demasiado el habitáculo. Esto no es sano para su salud y además representa un derroche de electricidad. Mantenga cerradas cortinas y persianas. Mantenga uniforme la temperatura del habitáculo. No permita que la luz directa del sol entre en el habitáculo mientras el aire acondicionado se encuentre en funcionamiento. Ajuste la dirección del flujo de aire vertical y horizontal para asegurar una temperatura uniforme en todo el habitáculo.
LG Customer Information Center 888-865-3026 USA, press #2 for PTAC, TTW 888-865-3026 USA, press #3 for DFS, Multi V 1-888-LG-Canada CANADA Register your product Online! LGEUS LG Electronics, Air conditioning Division 1000 Sylvan Ave., Englewood Cliffs, NJ 07632 www.lge.com LGECI LG ELECTRONICS CANADA INC. 20 NORELCO DRIVE. NORTH YORK, ONTARIO M9L 2X6. US CANADA 1. Please call the installing contractor of your product, as warranty service will be provided by them. 2.