
Wall Mount Owner's Manual


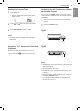
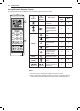
Table Of Contents
- TABLE OF CONTENTS
- SAFETY INSTRUCTIONS
- OPERATION
- Notes for Operation
- Parts and Functions
- Wireless Remote Control
- Restarting the Air Conditioner Automatically
- Using the Mode Function
- Using the Jet Mode Function
- Using the Fan Speed Function
- Using the Air Flow Direction Function
- Setting the On/Off Timer
- Using the Sleep Function (Optional)
- Using the Simple Timer Function (Optional)
- Using the Energy Display Function (Optional)
- Using the Light Off Function (Optional)
- Using the Comfort Air Function (Optional)
- Using the Energy Saving Function (Optional)
- Using the Energy Control Function (Optional)
- Using Special Functions
- SMART FUNCTIONS
- MAINTENANCE
- TROUBLESHOOTING
- WARRANTY (USA)
- WARRANTY (CANADA)

9OPERATION
ENGLISH
Setting the Current Time
1
Insert batteries.
• The icon below blinks at the bottom of the
display screen.
2
Press or button to select the minutes.
3
Press SET/CANCEL button to nish.
NOTE
• The On/O Timer is available after setting the
current time.
Using the °C/°F Conversion Function
(Optional)
This function changes unit between °C and °F
• Press and hold
℃↔℉ [5 s]
SWING
button about 5 seconds.
Operating the Air Conditioner without
the Remote Control
You can use the ON/OFF button of the indoor unit to
operate the air conditioner when the remote control is
unavailable.
1
Open the front cover (Type2) or horizontal vane
(Type1).
2
Press the ON/OFF button.
Type1
ON/OFF
Type2
ON/OFF
NOTE
• The epping motor may be broken, if the horizontal
vane opens rapidly.
• The fan speed is set to high.
• The feature may be changed according to the type
of model.
• The temperature cannot be altered when using this
emergency ON/OFF button.
• For cooling & heating models, the temperature is
set from 22 °C to 24 °C