
Multi F LMU540HV Installation Manual
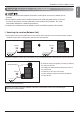
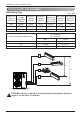
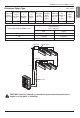
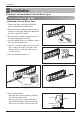
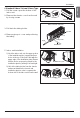
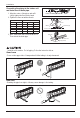
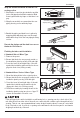
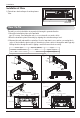
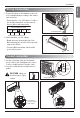
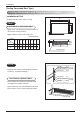
Table Of Contents

18 Multi Air Conditioner
Installation
The wall you select should be strong and solid enough to prevent vibration
1. Mount the installation plate on the wall with
type "A" screws. If mounting the unit on a concrete wall, use anchor bolts.
• Mount the installation plate horizontally by aligning the centerline using a level.
2. Measure the wall and mark the centerline. It is also important to use caution concerning the lo-
cation of the installation plate-routing of the wiring to power outlets is through the walls typically.
Drilling the hole through the wall for piping connections must be done safely.
How To Fix
Installation of filters
1) Detach two attached tapes from the plasma
filter.
Plasma Filter
Ø70
(2 3/4)
Ø70
(2 3/4)
110(4 11/32)
110
(4 11/32)
90
(3 17/32)
70
(2 3/4)
Chassis
Hook
Installation Plate
Type “A”
Left rear piping Right rear piping
Ø70
(2 3/4)
133(5 1/4)
Ø70
(2 3/4)
100(3 15/16)
Chassis
Hook
Installation Plate
Type “A”
Left rear piping Right rear piping
Ø70
(2 3/4)
133(5 1/4)
95(5 3/4)
217(8 17/32)
175(6 7/8)
442(17 13/32) 442(17 13/32)
Ø70
(2 3/4)
Installation Plate
Enganche
del chasis
Type "A" Screws
Right rear piping
Left rear piping
Installation Plate
Place a level on raised tab
Unit Outline
Ø70
(2 3/4)
Ø70
(2 3/4)
69(2 23/32)
56(2 7/32)
207(8 5/32)
105(4 1/8)
460(18 1/8) 570(22 7/16)
Installation Plate
Enganche
del chasis
Type "A" Screws
Left rear piping
Installation Plate
Place a level on raised tab
Unit Outline
Right
rear
piping
Measuring Tape
Hanger
Measuring Tape
<Type 1> <Type 2>
<Type 3> <Type 4>
Indoor Type
Capacity (kBtu/h)
Type
Standard / Standard Libero /
Artcool Mirror / Artcool Libero
9/12
Type 1 / Type 3
18
Type 2 / Type 4