LAC2800.
Table of Contents 2 3 4 5 Table of Contents Safety Note Front Panel About Detachable Control Panel 9 10 Pause or restart a CD Search for a section within a track / file Skip to another track / file Intro scan Repeat Shuffle MP3/WMA TRACK -10 / +10 MP3/WMA Folder UP/DOWN See information about your music Attaching the control panel Detaching the control panel 6 Installation Basic installation Removing the existing receiver unit ISO-DIN installation 7 8 Connection Basic operation Mute Changing the gene
Safety Note CAUTION RISK OF ELECTRIC SHOCK DO NOT OPEN CAUTION : This product uses a Laser System. To ensure proper use of this product, please read this owner’s manual carefully and retain it for future reference. Should the unit require maintenance, contact an authorized service center. Performing controls, adjustments, or carrying out procedures other than those specified herein may result in hazardous radiation exposure. To prevent direct exposure to laser beam, do not try to open the enclosure.
Front Panel 1 2 3 [PWR]/[MUTE] Volume UP/DOWN [+/-] i • Skip / Search I/i i • Seek/ Tune I/i U/AS] • Auto Store [U u/PS] • Preset Scan [u u • MP3/WMA Track +10/-10 U/u u • Folder Up/Down U/u 4 5 6 7 8 Disc slot Display Window Eject Z Release • [MENU] • Display [DISP] 4 CAR CD/MP3/WMA Receiver 9 10 11 12 13 14 15 AUX In [AUX] Preset Station [1-6] Shuffle [SHF] Repeat [RPT] Intro Scan [INT] Play/Pause B/X • Equalizer [EQ] • Extreme Dynamic Sound System [XDSS] 16 [BAND] 17 Source [SRC] 18 Select [SEL]
About Detachable Control Panel Attaching the control panel 1 2 Detaching the control panel Align the left side of the panel with the stopper. Push the right side or panel into the unit until it clicks. 1 1 2 2 3 4 Press the “ ” (RELEASE) to open the control panel. Hold the right part of the control panel. Pull out the control panel. Place the control panel in the supplied protective case. 2 3 1 Caution • The control buttons may not work properly if the control panel is not attached properly.
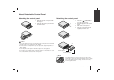
Installation ISO-DIN Installation Basic Installation 1 2 3 4 Remove the existing receiver unit. Make the necessary connections. Install the installation sleeve. Install the unit into the installation sleeve. Control panel If there is already an installation sleeve for the receiver unit in the dashboard, it must be removed.
Connection Before connecting, make sure that the ignition switch is set to OFF, and remove the battery # terminal to avoid short circuits.
Basic Operation ON PLAYER 1. Turn the unit on. 2. Select a source. 3. Adjust the volume. PWR/MUTE SRC VOLUME + or - Basic operation - more you can do Using the EQ EQ is to increase or decrease the signal strength of audio frequencies. The function helps you to enjoy sound more plentifully. Press XDSS/EQ repeatedly. The indicator lights up in the following order. POP t CLASSIC t ROCK t OFF(Not displayed.) Note When XDSS+ is set to “Off”, you can adjust the EQ settings.
Listening to the radio Connecting an Auxiliary Equipment ON PLAYER 1. Select a source to tuner. SRC 2. Select a band. BAND 3. Auto seek. Manual seek. < / > (Press and hold) Auxiliary input Listening to the radio - more you can do MP3 Player, etc ON PLAYER Auto search memory Press U/AS. The six strongest broadcast frequencies will be stored under preset button 1-6 in the order of their signal strength.To cancel, press U/AS. Storing and recalling broadcast frequencies Line out SRC 1.
Listening a CD ON PLAYER 1. Insert a CD. 2. Adjust the Volume. VOLUME + or - Note During random playback, if you press < , you won’t go back to the previous track. MP3/WMA Track -10 / +10 (If there is no folder or one folder.) During playback press u to go back 10 tracks, and press U to go forward 10 tracks. Listening a CD - more you can do MP3/WMA Folder UP/DOWN Pause or restart a CD (If there are more than two folders.
Troubleshooting Symptom General CD Cause Power doesn’t turn on / The Leads and connectors are not properly. unit doesn’t operate. The fuse is blown. No sound is heard / The volume level will not rise. There’s audio skipping. The playback is not possi ble. Noise and other factors are causing the builtin microprocessor to operate incorrectly. Cables are not connected correctly. This unit is not firmly secured. The disc is dirty. The loaded disc is of a type this unit cannot play.
Specifications General Output Power Power Source Speaker impedance Ground System Dimensions (W x H x D) Net Weight Tuner FM Frequency Range S/N Ratio Distortion Usable Sensitivity AM (MW) Frequency Range S/N Ratio Distortion Usable Sensitivity 50W x 4CH (Max.) DC 12V 4Ω Negative 180 x 50 x 176 mm (Without Control Panel) 1.3 kg 87.5-107.9, 87.5-108, 65-74 or 87.5-108 MHz 55 dB 0.7% 12 dBµV 520-1720 or 522-1620 kHz 50 dB 1.