LAC6700_ENG_GF_CI_NEW2 LAC6700/6710 ENGLISH CAR CD/MP3/WMA Receiver Read the manual carefully before using the unit P/NO : MFL37340867
Safety note CAUTION RISK OF ELECTRIC SHOCK DO NOT OPEN CAUTION : TO REDUCE THE RISK OF ELECTRIC SHOCK DO NOT SPLIT COVER(OR BACK) NO USER SERVICEABLE PARTS INSIDE. REFER SERVICING TO QUALIFIED SERVICE PERSONNEL. The lightning flash with the arrowhead symbol, within an equilateral triangle is intended to alert the user about the presence of uninsulated dangerous voltage within the product’s enclosure that may be of sufficient magnitude to constitute a risk of electric shock.
• A defective or soiled disc inserted into unit can cause sound to drop out during playback. • Handle the disc by holding its inner and outer edges. • Do not touch the surface of the unlabeled side of the disc. Do not stick paper or tape etc. on the surface. Do not expose the disc to direct sunlight or excessive heat. 8 cm This unit cannot play 8cm disc (use 12cm disc only). • Clean the disc before playback. Wipe the disc from the center outward with a cleaning cloth.
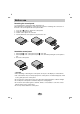
Before use Detaching the control panel You can detach the control panel when leaving the car. When detaching or attaching the control panel, be careful not to damage the connectors on the back of the control panel and on the panel holder. 1. 2. 3. 4. Press the “ ” button to unlock the control panel. Push the control panel to left Pull the control panel out of the unit. Put the detached control panel into the protective case.
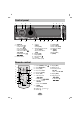
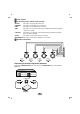
Control panel 1 2 17 1 2 3 4 5 16 MP3 12 • Volume • [MUTE] • Power [PWR] 5 • Extreme Dynamic Sound System [XDSS] • Bass Reverb Blaster [BRB] 6 Equalizer [EQ] 7 Display [DISP] 8 Release/Eject 9 USB Slot 10 Preset Station [1~6] WMA u • Folder Up/Down U/u 3 13 4 [SOURCE] i • Skip / Search I/i i • Seek/ Tune I/i U/AS] • Auto Store [U u/PS] • Preset Scan [u u • MP3 Track +10/-10 U/u MP3 14 15 WMA Remote Sensor 11 6 7 10 8 9 11 12 13 14 15 Shuffle [SHF] Repeat [RPT] Intro Scan [SCAN] Pla
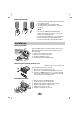
Battery Installation 1 2 3 Remove the battery holder with a sharp product like a ball point pen. Install the battery on the battery holder. Install the battery holder back into its original position. Note • Use only one CR2025 (3V) lithium battery. • Remove the battery if the remote control is not used for a long period of time. • Do not leave the product in a hot or humid place. • Do not handle the battery with metallic tools. • Do not store the battery with metallic materials.
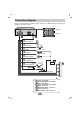
Connection diagram Before connecting, make sure that the ignition switch is set to OFF, and remove the battery # terminal to avoid short circuits.
A From antenna B To the wiring of the vehicle colors of leads. • BLACK: This lead is for the ground connection. • ORANGE: This lead is for the phone line connection. • PINK: This lead is for the dimmer line connection. • RED: This lead is for connection to the power supply terminal when the ignition switch is set to ACC. • YELLOW: This lead is for connection to the battery (back-up) terminal from which power is always supplied. • BLUE: This lead is for the power antenna connection.
Basic operation Turning the unit on Press MUTE/PWR (POWER/ on the remote control) or any other button. Note When you insert the CD in the CD slot, the unit turns on. Turning the unit off Press and hold MUTE/PWR (POWER/ on the remote control). Insert a disc 1 2 Press to open the control panel. Draws the disc, and starts playback automatically. Eject a disc Press to open the control panel. The disc automatically ejects from the loading slot.
Changing the general settings 1 2 3 4 Press MENU (Press and hold MENU/SEL on remote control) so that one of menu items appears. Press MENU (MENU/SEL on remote control) to scroll between menus. DEMO ON t BEEP 2ND Rotate MUTE/PWR clockwise or unclockwise to select one of the settings specified belows. (Press VOLUME on the remote control.) Press and hold MENU (MENU/SEL on remote control) to finish the setting.
Indication Turn right Turn left VOL BAS Increase the volume level. Decrease the volume level. Increase the bass level. Decrease the bass level. MID TRB BAL Increase the middle level. Decrease the middle level. Increase the treble level. Decrease the treble level. Decrease the level of the left speaker(s). Decrease the level of the right speaker(s). FAD Decrease the level of the front speaker(s). Decrease the level of the rear speaker(s).
Storing and recalling broadcast frequencies You can easily store up to 6 broadcast frequencies for later recall at the touch of a button. 1 2 3 4 Press DRIVE/BAND to select desired band you want to store. Select the desired frequency. Press one of preset buttons 1~6 and hold until the beep sound. The number you have pressed will flash in the preset number indicator and then remain lit. The selected radio station frequency has been stored in memory. Repeat steps 1~3 to preset other stations.
Skip to previous track/file Press briefly I (?m m on the remote control) within 3 seconds of playing time. Return to the beginning of the current track/file Press briefly I (?m m on the remote control) after 4 seconds of playing time. Search Press and hold I/i (?m m/M M? on remote control) for about 1 second during playback and then release at the point you want. Intro scan The first 10 seconds of each tracks/files (SCAN) or each files in the current selected folder ( SCAN) on the disc are played.
To go to a particular quickly (+10/-10 buttons) MP3 WMA (If there is no folder or one folder.) U on remote control) to skip to the next 10 track, and press u/PS (u u on remote Press U/AS (U control) to skip to the previous 10 track. To skip to the next or previous folder MP3 WMA (If there are more than two folders.) U on remote control) to skip to the next folder, and press u/PS (u u on remote Press U/AS (U control) to skip to the previous folder.
Notes • Do not remove an MP3 player or memory card while playing via a USB device. • The maximum number of available files is 999 EA. • The maximum number of available folders is 255 EA. • Be sure to save the file in the memory card after formatting. • There is no support for hard type external cases. • This unit supports FAT format (2 Kbyte/sector). • USB Hub is not supported. When connecting this unit to a USB Hub, “USB CHECKING/USB ERROR1” will be shown in the display window.
Specifications GENERAL Output Power . . . . . . . . . . . . . . . . . . . . . . . . . . . . . . . . . . . . . . . . . . . . . .50W x 4CH (Max.) Power Source . . . . . . . . . . . . . . . . . . . . . . . . . . . . . . . . . . . . . . . . . . . . . . . . . . . . . .DC 12V Speaker impedance . . . . . . . . . . . . . . . . . . . . . . . . . . . . . . . . . . . . . . . . . . . . . . . . . . . . .4Ω Ground System . . . . . . . . . . . . . . . . . . . . . . . . . . . . . . . . . . . . . . . . . . . . . . . . . . .