
User Guide
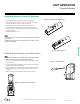

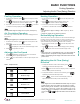

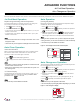
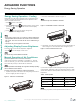


Table Of Contents

INTRODUCTION | 11
Operation
Due to our policy of continuous product innovation, some specications may change without notication.
UNIT OPERATION
Remote Controller
Installing Remote Controller Batteries
Installing the Remote Controller Holder
1. Insert AAA batteries (1.5V) before turning on the remote.
2. Remove the battery cover from the back of the unit, by pushing
down the tab at the top of the cover ((1) Figure 4).
3. Lift battery cover off of the unit as shown ((2) Figure 4).
4. Insert the batteries, following the + and - terminal indications
inside the battery compartment. Make sure batteries are securely
in place (Figure 5).
5. Reattach the battery cover.
•If the display screen of the remote controller starts to fade, replace
the batteries.
•When batteries are removed, the temperature unit will be reset to
Celsius as the default.
Installation of the remote controller holder should be out of direct sunlight,
in order to protect the remote controller from heat exposure.
1. Choose a safe and easily accessible place to attach the remote
controller holder.
2. Using a phillips head screwdriver, insert and fasten the 2 screws
into the holes at the base (Figure 6).
3. Gently “wiggle” the base to make sure that it is firmly attached to
the wall. Tighten the screws further if you feel the wall mount is
still loose.
4. Slide the remote control vertically into the holder (Figure 7).
Figure 4: Remote Controller Battery Cover
Figure 5: Battery Placement
Figure 6: Holder Attachment
Figure 7: Insertion of Remote into Holder