website http://www.lgservice.com FRANÇAIS LG Room Air Conditioner ENGLISH LG OWNER'S MANUAL IMPORTANT • Please read this owner's manual carefully and thoroughly before installing and operating your room air conditioner. • Please retain this owner's manual for future reference after reading it thoroughly. ESPAÑOL Prior to installation, this airconditioning unit must be submitted for approval by the utility service which provides electricity (EN 61000-2, EN 61000-3 Norm).
Room Air Conditioner Owner’s Manual TABLE OF CONTENTS Safety Precautions.........................3 FOR YOUR RECORDS Write the model and serial numbers here: Model # Prior to Operation ..........................9 Serial # You can find them on a label on the side of each unit. Dealer's Name Introduction ..................................10 Electrical Safety ...........................11 Operating Instructions.................13 Maintenance and Service ............
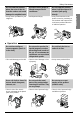
Safety Precautions Safety Precautions This symbol indicates the possibility of death or serious injury. This symbol indicates the possibility of injury or damage to properties only. ■ The meanings of the symbols used in this manual are as shown below. Be sure not to do. Be sure to follow the instruction. ■ Installation Do not use damaged power cords, plugs, or a loose socket. • There is risk of fire or electric shock. Install the panel and the cover of control box securely.
Safety Precautions Be cautious when unpacking and installing the product. • Sharp edges could cause injury. Be especially careful of the case edges and the fins on the condenser and evaporator. Be sure the installation area does not deteriorate with age. • If the base collapses, the air conditioner could fall with it, causing property damage, product failure, and personal injury. For installation, always contact the dealer or an Authorized Service Center.
Safety Precautions Use a dedicated outlet for this appliance. Grasp the plug to remove the cord from the outlet. Do not touch it with wet hands. Do not place a heater or other appliances near the power cable. • There is risk of fire or electrical shock. • There is risk of fire and electric shock. Do not allow water to run into electric parts. Do not store or use flammable gas or combustibles near the air conditioner. Do not use the product in a tightly closed space for a long time.
Safety Precautions Do not open the inlet grill of the product during operation. (Do not touch the electrostatic filter, if the unit is so equipped.) • There is risk of physical injury, electric shock, or product failure. Unplug the appliance before performing cleaning or maintenance. • There is risk of electrical shock. When the product is soaked (flooded or submerged), contact an Authorized Service Center. • There is risk of fire or eletric shock.
Safety Precautions Do not install the product where the noise or hot air from the outdoor unit could damage the neighborhoods. • Avoid personal injury. Do not install the product where it will be exposed to sea wind (salt spray) directly. • It may cause corrosion on the product. Corrosion, particularly on the condenser and evaporator fins, could cause product malfunction or inefficient operation. ■ Operation Do not direct airflow at room occupants. (Don't sit in the draft.
Safety Precautions Always insert the filter securely. Clean the filter every two weeks or more often if necessary. • A dirty filter reduces the efficiency of the air conditioner and could cause product malfunction or damage. Do not insert hands or other objects through the air inlet or outlet while the air conditioner is plugged in. • There are sharp and moving parts that could cause personal injury. Use a firm stool or ladder when cleaning or maintaining the air conditioner.
Prior to Operation Prior to Operation Preparing for Operation ENGLISH 1. Contact an installation specialist for installation. 2. Plug in the power plug properly. 3. Use a dedicated circuit. 4. Do not use an extension cord. 5. Do not start/stop operation by plugging/unplugging the power cord. 6. If the cord/plug is damaged, replace it with only an authorized replacement part. Usage 1. Being exposed to direct airflow for a long time may be hazardous to your health.
Introduction Introduction Symbols used in this Manual This symbol alerts you to the risk of electric shock. This symbol alerts you to hazards that may cause harm to the air conditioner. This symbol indicates special notes. NOTICE Features WARNING: This appliance should be installed in accordance with national wiring regulations. This guide acts as a guide to help to explain product features.
Electrical Safety Electrical Safety To minimize the risk of electric shock, you must alway plug into a grounded oulet. Preferred method Ensure proper ground exists before use WARNING: Do not cut or remove the grounding prong from the power plug. WARNING: Attaching the adapter ground terminal to the wall receptacle cover screw does not ground the appliance unless the cover screw is metal and not insulated, and the wall receptacle is grounded through the house wiring.
Electrical Safety Temporary Use of an Adapter We strongly discourage the use of an adapter due to potential safety hazards. For temporary connections, use only a UL-listed adapter, available from most local hardware stores. Ensure that the large slot in the adapter is aligned with the large slot in the receptacle for a proper polarity connection. To disconnect the power cord from the adapter, use one hand on each to avoid damaging the ground terminal.
Operating Instructions Operating Instructions How to insert the Batteries ENGLISH 1. Remove the battery cover by pulling it according to the arrow direction. 2. Insert new batteries making sure that the (+) and (-) of battery are installed correctly. 3. Reattach the cover by sliding it back into position. NOTICE Use 2 AAA(1.5volt) batteries. Do not use rechargeable batteries. Storage and Tips for using the Remote Controller • The remote controller may be stored by mounting it on a wall.
Operating Instructions Remote Control Operations The controls will look like the following. Controls Signal transmitter 5 1 6 3 4 2 7 11 8 13 10 CANCEL ON OFF 9 12 17 SET AUTO CLEAN °C/°F 18 14 16 15 Flip-up door (opened) Operation Mode Cooling Operation Auto Operation or Auto Changeover Healthy Dehumidification Operation Heating Operation • Cooling Model( ), Heat Pump Model( ) 1. START/STOP BUTTON Operation starts when this button is pressed and stops when the button is pressed again. 2.
Operating Instructions Cooling operation ENGLISH 1 Press the Start/Stop button. The unit will respond with a beep. 2 Open the door of the remote controller. To select Cooling Operation, press the Operation Mode Selection button. Each time the button is pressed, the operation mode is shifted in the direction of the arrow. Cooling 3 ON Auto Healthy Dehumidification Heating (Heat pump model only) Close the door of the remote controller. Set the temperature lower than the room temperature.
Operating Instructions Auto operation (Cooling model only) 1 Press the Start/Stop button. The unit will respond with a beep. 2 Open the door of the remote controller. To select Auto Operation, press the operation mode selection button. Each time the button is pressed, the operation mode is shifted in the direction of the arrow.
Operating Instructions Auto changeover operation(Heat pump model only) ENGLISH 1 Press the Start/Stop button. The unit will respond with a beep. 2 Open the door of the remote controller. To select Auto Changeover Operation, press the Operation Mode Selection button. Each time the button is pressed, the operation mode is shifted in the direction of the arrow. Cooling 3 Auto changeover Healthy Dehumidification Heating (Heat pump model only) Close the door of the remote controller.
Operating Instructions Healthy dehumidification operation 1 Press the Start/Stop button. The unit will respond with a beep. 2 Open the door of the remote controller. To select Healthy Dehumidification Operation, press the Operation Mode Selection button. Each time the button is pressed, the operation mode is shifted in the direction of the arrow. Cooling 3 ON Auto Healthy Heating Dehumidification (Heat pump model only) Set the fan speed again with the door of the remote controller still closed.
Operating Instructions Heating operation (Heat pump model only) ENGLISH 1 Press the Start/Stop button. The unit will respond with a beep. 2 Open the door of the remote controller. To select Heating Operation, press the Operation Mode Selection button. Each time the button is pressed, the operation mode is shifted in the direction of the arrow. Cooling 3 ON Auto Healthy Heating Dehumidification (Heat pump model only) Close the door of the remote controller.
Operating Instructions Jet cool operation 1 Press the Start/Stop button. The unit will respond with a beep. 2 Press the Jet Cool button to operate the speed cooling mode and the unit will operate at super high fan speed on cooling mode for 30 minutes. 3 To cancel the Jet Cool mode, press the Jet Cool button, the fan speed button or the room temperature setting button again and the unit will operate at high fan speed on cooling mode.
Operating Instructions Jet heat operation (Optional) ENGLISH 1 Press the Start/Stop button. The unit will respond with a beep. 2 Open the door of the remote controller. To select Heating Operation. Cooling Auto changeover Healthy Dehumidification Heating (Heat pump model only) 3 Press the Jet Heat button to operate the speed heating mode and the unit will operate at super high fan speed on heating mode for 60 minutes.
Operating Instructions NEO PLASMA purification operation(Optional) 1 Press the Start/Stop button. The unit will respond with a beep. 2 Open the door of the remote controller. Press the PLASMA button. Operation will start when the button is pressed and stop when the button is pressed again. 3 Set the fan speed again with the door of the remote controller closed. You can select the fan speed in four steps-low, medium, high or CHAOS. Each time the button is pressed, the fan speed mode is shifted.
Operating Instructions 2nd F operation ENGLISH 1 Press the Start/Stop button. The unit will respond with a beep. 2 Open the door of the remote control and press the 2nd Function button to operate functions printed in blue unter buttons. (Check the indication of 2nd function on the display of the remote controller.
Operating Instructions Additional Features Sleep mode 1. Press the Sleep Mode Auto button to set the time you want the unit to stop automatically. 2. The Timer is programmed in one-hour increments by pressing the Sleep Mode Auto button 1 to 7 times. The sleep mode is available for 1 to 7 times. To alter the time period in steps of 1 hour, press the Sleep Mode Button while aiming at air conditioner. 3. Make sure the Sleep Mode Auto LED lights up.
Operating Instructions Airflow direction control Press Chaos Swing button and the louvers will swing. Press the button again and the louvers will stop. After 30 minutes, the louvers return to the maximum airflow position automatically. Press the Start/Stop button to start the unit. Air circulation mode Circulates the room air without cooling or heating. 1. Press the Start/Stop button. the unit will respond with a beep. 2. Open the door on the remote control. Press the Air Circulation button.
Operating Instructions Forced operation Operation procedures when the remote control can't be used. The operation will be started if the power button is pressed. If you want to stop operation, re-press the button. ON/OFF button Cooling Model Operating mode Indoor FAN Speed Setting Temperature Cooling High 72°F(22°C) Room Temp. ≥ 76°F(24°C) Cooling High 72°F(22°C) Heat pump Model 70°F(21°C) ≤ Room Temp. < 76°F(24°C) Room Temp.
Maintenance and Service Maintenance and Service Indoor Unit Clean the unit with a soft dry cloth. Do not use bleach or abrasives. Pow Never use any of these • Water hotter than 40°C. It may cause deformation and discoloration. • Volatile substances. They may damage the surface of the air conditioner. d er G a s o li n e Air Filters The air filters behind the front panel / grill should be checked and cleaned once in every 2 weeks or more often if necessary.
Maintenance and Service How to replace picture & photograph 1. Turn off power and then open the upper part of front panel. 4. Take out picture. 2. Pull out the both links of lower part of front panel, as described in the below picture. 5. Turn upside-down of the picture and turn over mat, then take off a protective tape attached at the mat. 3. Push and close the top part of the front panel and then pull the bottom part of the panel forward until it is secured. 6.
Maintenance and Service Outdoor Unit NOTICE Dirty or clogged coils will reduce the operating efficiency of the system and cause higher operating costs. Air intake vents Piping Air outlet vents Common Problems and Solutions Before calling for service If you have problems with your air conditioner, read the following information and try to solve the problem. If you cannot find a solution, turn off the air conditioner and contact your dealer. Air conditioner does not operate 1.
Maintenance and Service Troubleshooting The air conditioner may be operating abnormally when: Problem Air conditioner does not start Air conditioner does not cool as it should Air conditioner freezing up Possible Causes What To Do ■ The air conditioner is unplugged. • Make sure the air conditioner plug is pushed completely into the outlet. ■ The fuse is blown/circuit breaker is tripped. • Check the house fuse/circuit breaker box and replace the fuse or reset the breaker. ■ Power failure.
P/No.