
Installing DFS Outdoor Units in Winter Conditions

• Where it will be subjected to direct thermal radiation from other heat sources, or an
area that would expose the outdoor unit to heat or steam like discharge from boiler
stacks, chimneys, steam relief ports, other air conditioning units, kitchen vents, plumb-
ing vents, and other sources of extreme temperatures that may degrade performance or
cause damage to the unit.
• Where the unit will be exposed to direct, strong seasonal winds. Strong seasonal winds
affect outdoor unit performance.
• When installing multiple outdoor units, avoid placing the units where discharge of one
outdoor unit will blow into the inlet side of an adjacent unit.
Single- and Multi-Zone Outdoor Unit Installation for Winter Conditions
LG single- and multi-zone outdoor units are engineered to be installed outdoors, and include technology designed to minimize the negative
effects of winter weather’s freezing rain, sleet, and snow. Some precautions may be taken, however, to ensure optimal outdoor unit heating
performance in winter conditions.
Verify that the heating operating range for the chosen outdoor unit will be appropriate for the climate zone in which the system is installed. If not,
or in anticipation for the occasional times where the temperature may fall below what is usual for that climate zone, auxiliary heat may also need
to be included.
Select a location for installing the outdoor unit that will meet the following general
conditions:
• A location strong enough to bear the weight of the outdoor unit.
• A location that allows for optimum inlet and outlet air flow, and is easily accessible for
inspection, maintenance, and service.
• Include space for drainage to ensure condensate flows properly out of the unit when it
is in heating mode. Avoid placing the outdoor unit in a low-lying area where water could
accumulate.
Do not install the outdoor unit:
Ensure that the space at the back of the outdoor unit is 4 (minimum) to 12 (standard) inches,
and include 10 (minimum) to 24 (standard) inches at the right side of the unit for service.
Include a minimum clearance of 40 inches if there is an overhang.
If the outdoor unit discharge side faces a wall, include 14 (minimum) to 20
(standard) inches between the outdoor unit and the wall. Install the outdoor unit so
that the discharge port is set at a right angle to the wind direction.
No obstacles to air circulation around the unit; keep proper distances from ceilings,
fences, floor, walls, etc. (Install a fence to prevent pests from damaging the unit or unau-
thorized individuals from accessing it.)
Do not mount the outdoor unit in a position where strong prevailing winds blow into
the face or rear of unit.
When deciding on a location to place the outdoor unit, choose an area where run-off from
defrost will not accumulate and freeze on sidewalks or driveways, which may create unsafe
conditions.
CAUTION
Choosing the Installation Area for Winter Conditions
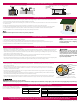
Outdoor Unit Service Access and Allowable Clearances
Appropriate airflow through the outdoor unit coil is critical for proper operation. Clearanc-
es ensure that heat radiation and discharge air flow isn’t restricted around the outdoor
unit (see diagrams below for recommended clearances). When placing the outdoor unit
under an overhang, awning, field-fabricated hood, or other “roof-like structure” to block
snow, observe the clearance requirements as shown for height in relation to the unit.
Strong Winds
Unit: Inch
Fence, Wall, or Other Obstacles
4 Min. to 12 Std.
4 Min. to 12 Std.
14 Min. to 20 or 28 Std. (Depends on Model)
40 Min.
10 Min. to 24 Std.
14 Min. to
20 or 28 Std.
(Depends on Model)
10 Min. to 24 Std.
4 Min. to 12 Std.
4 Min. to 12 Std.
Air Outlet
Strong Winds
40 Min.
Sunroof
Air Inlet
14 Min.
to 20 Std.
Unit: Inch
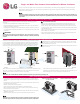
Outdoor Unit Mounting Recommendations
• Ensure that the underlying mounting base, structure, foundation, or platform will not
degrade easily; is of appropriate height; and has enough strength to bear the weight of
the unit.
• Firmly attach the corners of the outdoor unit to the mounting base with bolts and nuts,
otherwise the support will bend.
• Add anti-vibration material when applicable.
• Include enough space around the foundation for condensate drainage.
• When installing the outdoor unit on a wall, or rooftop, securely anchor the mounting
base to account for wind or vibration.
• Mount the unit on a field-provided stand that is higher than the maximum anticipated
snowfall for the location.
• Seal all wiring and piping access holes to prevent snow from entering the unit.
Always refer to the applicable product engineering or installation manual, and follow appli-
cable local codes for clearance, mounting, anchor and vibration attenuation requirements.
Bolt
Refrigerant Pipe
Connection
Top of Outdoor Unit
(Looking Down)
Mounting Base &
Anti-Vibration
Pad
Bolt
Bolt Bolt
Outdoor Unit Mounted to an H-Beam
on a Concrete Slab
Outdoor Unit Mounted to a Platform
Bolting the Outdoor Unit to the Mounting Base
If the outdoor unit is installed between standard and minimum clearances, capacity decreases approximately 10%.