ENGLISH FRANÇAIS ESPAÑOL OWNER’S MANUAL AIR CONDITIONER Please read this manual carefully before operating your set and retain it for future reference. TYPE : Ceiling Cassette P/NO : MFL42619114 http://www.lghvac.com www.lg.
Air Conditioner Owner’s Manual TABLE OF CONTENTS A. Safety Precautions .......................3 B. Product Introduction....................6 FOR YOUR RECORDS Write the model and serial numbers here: Model # C. Operating instructions...............10 Serial # D. Maintenance and Service ..........35 You can find them on a label on the side of each unit. Dealer's Name Date Purchased ■ Staple your receipt to this page in the event you need it to prove date of purchase or for warranty issues.
Safety Precautions Safety Precautions WARNING This symbol indicates the possibility of death or serious injury. CAUTION This symbol indicates the possibility of injury or damage. WARNING Always ground the product. • There is a risk of electric shock. For electrical work, contact the dealer, seller, a qualified electrician, or an Authorized Service Center. Do not disassemble or repair the product by yourself. • There is risk of fire or electric shock. Use the correctly rated breaker or fuse.
Safety Precautions Indoor/outdoor wiring connections must be secured tightly and the cable should be routed properly so that there is no force pulling the cable from the connection terminals. Safely dispose off the packing materials. Like screws, nails, batteries, broken things etc after installation or svc and then tear away and thraw away the plastic packaging bags. Make sure to check that the power cable plug is not dirty, loose or broken and then only insert the plug completely.
Safety Precautions Do not use the product for special purposes, such as preserving foods, works of art, etc. It is a consumer air conditioner, not a precision refrigeration system. Do not touch the metal parts of the product when removing the air filter. • There is risk of personal injury. Do not insert hands or other objects through the air inlet or outlet while the product is operating. • There are sharp and moving parts that could cause personal injury.
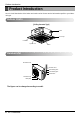
Product Introduction Product Introduction Here is a brief introduction of the indoor and outdoor units. Please see the information specific to your indoor unit type. Indoor Units [Ceiling Cassette Type] Cabinet Air Discharge Front Panel Signal receiver Air Inlet Outdoor Unit Air intake vents Control cover Connecting wire Connection pipe Drain hose Air outlet vents Base plate ❈ The figure can be changed according to model.
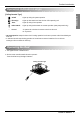
Product Introduction Operation Indication Lamps [Ceiling Cassette Type] : Lights up during the system operation. Filter Sign : Lights up after 2400 hours from the time of first operating unit. Timer : Lights up during Timer operation. Defrost Mode : Lights up during Defrost Mode or Hot Start operation.(Heat pump model only) Forced : To operate the unit when the remote control can't be used for any reason.
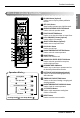
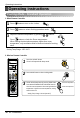
Product Introduction Wired Remote Controller 1 2 3 4 9 16 5 10 11 6 12 7 13 8 14 15 1 OPERATION INDICATION SCREEN 2 SET TEMPERATURE Button 3 WIRELESS REMOTE CONTROLLER RECEIVER • Some products don't receive the wireless signals.
Product Introduction Wireless Remote Controller Used to start or stop the plasma-purification function. 2 JET COOL Button Speed cooling operates super high fan speed. 3 OPERATION MODE SELECTION Button Used to select the operation mode. 4 FUNCTION SETTING Button 8 Used to set or clear Auto Clean or Amart Clean. 5 LCD LUMINOSITY Button (Optional) 1 9 2 10 6 SMART CLEAN Button (Optional) 11 7 CLEAR ALL Button 3 Used to adjust LCD luminosity Used to start or stop Smart Clean.
Operating Instructions Operating instructions Cooling Mode - Standard Operation 1. Wired Remote Controller 1 Press button to turn on the indoor. 2 Press button to select Cooling operation mode. buttons. 3 Adjust the desired temperature by pressing Press button to check the Room temperature. When setting the desired temperature higher than room temperature, only ventilation wind is blow out instead of cooling wind. ❖ Setting Temp Range : 18˚C~30˚C. 2.
Operating Instructions Cooling Mode - Power Cooling It makes the room cool using pleasant and fresh air quickly ENGLISH 1. Wired Remote Controller 1 Press 2 Press button to turn on the indoor. 3 Press button continuously until "Po" displayed. button to select Cooling operation mode. 2. Wireless Remote Controller 1 Press the ON/OFF button. The unit will respond with beep sound. 2 Press MODE button to select Cooling Mode. 3 Press the JET COOL button.
Operating Instructions Heating Mode 1. Wired Remote Controller 1 Press button to turn on the indoor. 2 Press button to select Heating mode. 3 Adjust the desired temperature by pressing buttons. When setting the desired temperature lower than room temperature, there is only ventilation wind. ❖ Setting Temp Range : 16˚C~30˚C. 2. Wireless Remote Controller 1 Press the ON/OFF button. The unit will respond with beep sound. 2 Press MODE button to select Heating Mode.
Operating Instructions Dehumidification Mode 1. Wired Remote Controller ENGLISH 1 Press button to turn on the indoor. button to select Dehumidification mode 2 Press The temperature setting can not be adjusted during operation this mode.
Operating Instructions 2. Wireless Remote Controller 1 Press the ON/OFF button. The unit will respond with beep sound. 2 Press MODE button to select Dehumidification Mode. 3 Set the fan speed. You can select the fan speed in four steps - low, medium, high, or chaos. Each time the button is pressed, the fan speed mode is shifted.
Operating Instructions Auto Changeover Mode 1. Wired Remote Controller button to turn on the indoor. 2 Press button to select Auto Changeover Mode. ENGLISH 1 Press setting temperature as the right side picture can be set in both 3 The cooling/ heating model. ❖ Setting Temp Range : 18˚C~30˚C. 2. Wireless Remote Controller 1 Press the ON/OFF button. The unit will respond with beep sound. 2 Press MODE button to select Auto Changeover Mode. 3 Set the desired room temperature. ❈ Setting Temp.
Operating Instructions Fan Mode 1. Wired Remote Controller 1 Press button to turn on the indoor. 2 Press button to select Fan mode the button to select airflow rate SLO → LO → MED 3 Press → HI → (NONE) → (The lists depends on products function) 2. Wireless Remote Controller 1 Press the ON/OFF button. The unit will respond with beep sound. 2 Press MODE button to select Fan Mode. 3 Set the fan speed again. You can select the fan speed in four steps–low, medium, high, or chaos.
Operating Instructions Ariflow Setting We can simply adjust the desired airflow rate 1. Wired Remote Controller ENGLISH buttons to set the desired airflow direction. 1 Press • → (NONE) → → → • Display of these lists depends on products function. ❖ NONE : Released swirl 2. Wireless Remote Controller Up/Down Airflow Direction Control 1. Press the ON/OFF button to start the unit. 2. Press UP/DOWN AIRFLOW button and the louvers will swing up and down.
Operating Instructions Temperature setting/ room temperature check 1. Wired Remote Controller can simply adjust the desired temperature. 1 We • Press the buttons to adjust the desired temperature. : Increase 1˚C per one time pressing : Decrease 1˚C per one time pressing Room temp: Indicate the current room temperature. Set temp: Indicate the temperature that user want to set. Depend on what kind of controller, the desired temperature can be adjusted at 0.5˚C.
Operating Instructions 2.
Operating Instructions Sub function : Plasma Purification(Optional) 1. Wired Remote Controller 1 Repeat pressing button until icon flash. or cancel Plasma Purification function by pressing 2 Operate button. ( icon appears/disappears on to selection ) 3 After setting, press display part up button to exit. 2. Wireless Remote Controller 1 Press the ON/OFF button. The unit will respond with beep sound. 2 Press the PLASMA button.
Operating Instructions Function setting : Child Lock This function is to prevent children or other people from using indoor. ENGLISH • Press button. • Repeat pressing button until the • When the button flashing, press icon flash. button to set this function. • When setting this function, icon will be displayed whenever entering any operation except for Room temperature access. However, it is possible to control normally by wireless remote controller.
Operating Instructions Installer Setting-Celsius / Fahrenheit Switching 1. Wired Remote Controller This function is used for switching the display between Celsius and Fahrenheit. (Optimized only for U.S.A) button for 4 seconds 1 Press to enter the installer setting mode until timer segment display “01:01”. pressing 2 Repeat Function code 12. button to select Function Code conversion mode value Ex) Fahrengeit Setting Temperature unit mode by 3 Select pressing button.
Operating Instructions 2. Wireless Remote Controller Press the °C/°F SWITCH button to change from Celsius to Fahrenheit or from Fahrenheit to Celsius. Function setting : Filter Sign Clear This function is to clear the indicator of indoor filter cleaning. button. 1 Press Repeat pressing button until the 2 When the flashing, press the button to icon flash. clear this display. When filter is covered by dust, it will reduce cooling/ heating efficiency and accumulate more electric power.
Operating Instructions Function setting : Vane Angle Control This function is to adjust angle at which airflow is blow out. 1 Press button. 2 Repeat pressing button until icon flash. Ex) Setting second Vane Angle as 'P3' button to select active vane: 1/2/3/4/All 3 Press 1-4: control individually each vane All: control all vane with the same duration. 4 Press button to select Vane number/ Vane angle. Vane angle : 6 Step(P1~P6) & Sd Sd : Standard angle 5 Press button to adjust the angle value.
Operating Instructions Setting Current Time 1. Wired Remote Controller 2 Press ENGLISH pressing 1 Keep time mode. button for 4 secs to enter Setting current key to adjust the current day. key to move to AM/ PM setting mode 3 Press (the 'AM/ PM segment will flash). 4 Setting AM/ PM value by pressing button. button to move to 'Hour' setting mode. 5 Press (the 'Hour' segment will flash) 6 Setting Hour value by pressing button. button to move to 'Minute' setting mode.
Operating Instructions 2. Wireless Remote Controller 1. Press the TIMER button for 3 seconds. 3. Press the SET / CLEAR button. 2. Press TIME SETTING buttons until the desired time is set. NOTE Check the indicator for A.M. and P.M. Programming : Setting Simple Reservation(Wired Remote Controller) In case of there is not any reservation setup on system, it is possible to make a SIMPLE reservation on indoor unit. 1 Press (the button to enter the Programming mode.
Operating Instructions Programming : Weekly Reservation(Wired Remote Controller) The weekly reservation is active after setting current time ENGLISH 1 Press button to enter the reservation setting mode. pressing 2 Repeat setting mode. ( button to enter the weekly reservation segment flashing) 3 Set the ON/ OFF reservation for day in week - Press to adjust timing and Left/ Right to shift to next setting mode. - A day is considered as non-reservation if there is not any time reservation within.
Operating Instructions Programming : Setting Sleep Reservation(Wired Remote Controller) This function is able to turn off Air conditioner when sleeping or after some hours. 1 Press button to enter the Programming mode. pressing button to enter the SLEEP reservation setting mode. 2 Repeat ( segment flashing) button to adjust reservation time. 3 Press The SLEEP reservation time is from 1 to 7 hours. button to finish setting.
Operating Instructions Programming : Setting ON Reservation(Wired Remote Controller) This function is able to turn air conditioner ON after a setting time. button. pressing 2 Repeat setting mode. ( 3 Press ENGLISH 1 Press button to enter the ON reservation segment flashing) button to adjust AM/ PM setting. button to Hour setting mode. When the Hour 4 Press icon flash, please setting time. The setting range is within 1~12. button to shift to Minute setting mode.
Operating Instructions Programming : Setting OFF Reservation(Wired Remote Controller) This function is able to turn air conditioner OFF after a setting time. 1 Press button. pressing 2 Repeat setting mode. ( 3 Press button to enter the OFF reservation segment flashing) button to adjust AM/ PM setting. button to shift to Hour setting mode. When the 4 Press Hour icon flash, please setting time. The setting range is within 1~12. button to shift to Minute setting mode.
Operating Instructions Programming : Holiday Reservation(Wired Remote Controller) This function is to automatically stop the machine working on some days. ENGLISH 1 Press button to enter the reservation setting mode. pressing button to enter the holiday 2 Repeat reservation setting mode. ( segment flashing) 3 Press button to move to holiday position. button to set or release a selected day as 4 Press holiday or not.
Operating Instructions Timer Setting(Wireless Remote Controller) 1. Press the TIMER button to turn timer on or off. 3. Press the SET / CLEAR button. 2. Press TIME SETTING buttons until the desired time is set. NOTE Select one of the following 3 types of operation. Timer Sleep Timer On Timer Off To cancel the Timer Setting(Wireless Remote Controller) • If you wish to cancel all timer setting, press the CLEAR ALL button.
Operating Instructions Ventilation Kit Control(Optional) If there is a linkage between ventilator and air conditioner, it is able to control this ventilator. case of operating the ventilator, the 2 In‘Ventilation’ icon will be displayed. Operating ventilation Stop ventilation When turn off ventilator, the ‘Ventilation’ 3 icon disappears. refer the Ventilation instruction in 4 Please function setting menu in order to connect a ventilator to air conditioner.
Operating Instructions Forced operation Operation procedures when the remote control can't be used. The operation will be started if the ON/OFF button is pressed. If you want to stop operation, re-press the button. [Ceiling Cassette Type] Forced Operation Button Operating mode Indoor FAN Speed Setting Temperature Room Temp. ≥ 24°C(75.2°F) Cooling High 22°C(72°F) 21°C(69.8°F) ≤ Room Temp. < 24°C(75.2°F) Healthy Dehumidification High 23°C(74°F) Room Temp. < 21°C(69.
Maintenance and Service Maintenance and Service Indoor Unit NOTE Supply power must be disconnected before cleaning the indoor unit. Air Filters The air filters behind the front grille should be checked and cleaned once every 2 weeks or more often if neccessary. 1 Remove the Air filters. ■ Take hold of the tab and pull slightly forward to remove the filter. CAUTION: When the air filter is to be removed, do not touch the metal parts of the indoor unit. It may cause an injury.
Maintenance and Service Purifying filter(Optional) Cleaning The PLASMA filter behind the air filters should be checked and cleaned once every 3 months or more often if necessary. 1 After removing the air filters, pull slightly forward to remove the PLASMA filter. 2 Dip the PLASMA filter into the water mixed with neutral detergent, for 20~30 minutes. 3 Dry the PLASMA filter in the shade for a day (Especially, the humidity must be removed perfectly on this parts).
Maintenance and Service Operation Tips! Keep blinds or curtains closed. This is not good for the health and wastes electricity. Do not let direct sunshine enter the room when the air conditioner is in operation. Make sure that the doors and windows are shut tight. Clean the air filter regularly. Avoid opening doors and windows as much as possible to keep the cool air in the room. Blockages in the air filter reduce the airflow and lower cooling and dehumidifying effects.
Maintenance and Service Troubleshooting Tips! Save time and money! Check the following points before requesting repairs or service.... If the malfunction persist, please contact your dealer. Case Explanation The air conditioner does not operate. • Have you made a mistake in timer operation? The room has a peculiar odor. • Check that this is not a damp smell exuded by the walls, carpet, furniture or cloth items in the room. It seems that condensation is leaking from the air conditioner.
US CANADA 1. Please call the installing contractor of your product, as warranty service will be provided by them. 2. If you have service issues that have not been addressed by the contractor, please call 1-888-865-3026.