
User guide

28
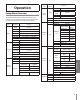
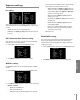
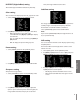
Privacy Mask setting
This function is aiming at the protection of personal
privacy, selecting a screen part black not to be displayed
in the screen. Up to 8 zones can be registered.
1. Select [PRIVACY MASK] option on the [CAMERA SET]
menu.
2. Use [Near] or [Far] button to select a [ON] and press
[Open] or [Close]. The PRIVACY MASK menu appears.
3. Use [Near] or [Far] button to select a zone number on
the [MASK NUMBER] option.
4. Use [Near] or [Far] button to set up the ON or OFF on
the [MASK STATE] option. If you already registered the
mask zone and set to ON, the mask zone box appears
on the monitor.
5. Use [Near] or [Far] button to select the color of the
mask zone box on the [MASK COLOR] option.
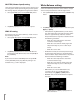
6. Select [RESET MASK] and press [Open] or [Close]. If
you register the mask zone for the first time, the mask
zone box appears on the center of the monitor. If you
already registered mask zone, it will be returned to its
initial state and appear on the center of the monitor.
7. Use [In] or [Out] to select an option then use [Near]
or [Far] button to adjust the option.
• WIDTH: Enlarge or decrease the horizontal size of
the mask zone box.
• HEIGHT: Enlarge or decrease the vertical size of
the mask zone box.
• MOVE X: Moves horizontal position of the mask
zone box.
• MOVE Y: Moves vertical position of the mask zone
box.
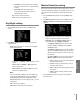
Notes:
• If you want to reset the mask zone position, select
RESET MASK option and press [Open] or [Close]
button.
• The parts with the registered mask numbers from
MASK1 to MASK4 have the same color. (So do the
parts with the numbers from MASK5 to MASK8). If
you change the mask color, the registered mask color
will be changed automatically with the same color for
each of group (MASK1 to 4, MASK5 to 8).
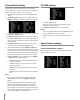
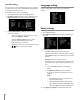
3D-DNR setting
1. Select [3D-DNR] option.
If pictures are not clear due to brightness, use for
reduce the noise of picture.
2. Use [Near] or [Far] button to select a option.
Notes:
• If you set the AGC to [OFF] on the [EXPOSURE] menu,
the [3D-DNR] function is not available.
• When you use this function, the afterimage may
occur.
Special menu settings
Camera Identication setting
Only displays the camera’s ID. Use the internal 8 bit-DIP
switch if you want to set ID.