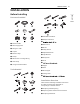
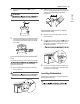
INSTALLATION 9 INSTALLATION ENGLISH Before Installing Parts not Provided a Flat-Blade Screwdriver b Phillips Screwdriver a Electrical Cable b Water Supply Tube c Fittings for Tube d Coupler e Electrical Tape f Air Gap g Wire Nuts for 16-Gauge Wiring h Hose Clamp i UL Approved Strain Relief Tools Needed c d Electric Drill e Gloves f Safety Glasses g Adjustable Wrench h Tape Measure i Utility Knife j Level k l Nipper m Pliers n Wire Stripper o Tubing Cutter p Installation Overview Please read the foll
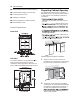
10 INSTALLATION d Sliding the Dishwasher into Cabinet Opening e Connecting Water Supply Line and Power f Connecting the Drain Hose g Leveling the Dishwasher Preparing Cabinet Opening This dishwasher is designed to fit a standard dishwasher opening. An opening may be needed on both sides to route plumbing and electrical connections. dishwasher no more than 12 ft. (3.65 m) from the sink.
INSTALLATION 11 - Do not use an extension cable or adapter with this dishwasher. - The included 16AWG wire nuts should be used. - It is the personal responsibility and obligation of the product owner to have a proper outlet installed by a qualified electrician. WARNING not covered by the warranty, and leaks caused by improper installation may result in property damage. CAUTION shwasher water supply line to the house water supply, sealing tape or compound should be used on pipe threads to avoid leaks.
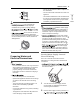
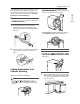
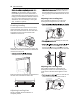
12 INSTALLATION side of the opening and tape it in place in front of the opening. 3 Run the electrical cable c along the floor 14" Removable Shipping Brace The rear shipping brace can be removed if additional clearance is needed when installing the dishwasher under a low countertop. supply line d and tape it in place. (1.22 m) of either side of the dishwasher. on the right side of the back wall.
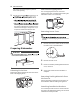
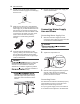
INSTALLATION 13 NOTE the silverware basket. 1 2 the dishwasher with knees when sliding the dishwasher into position. Doing so can damage the front cover. ENGLISH For countertops made of granite, marble, or other materials that could be damaged by drilling, use the wood screws to attach the dishwasher to the cabinet. See installation instructions in Securing Dishwasher to Cabinet Opening. screws can be found in Insert the tabbed end of the installation brackets into the slots in the upper frame.
14 INSTALLATION 2 Smooth out or pad the edges of the hole drilled for the water supply to avoid damaging the drain hose. 3 Make sure the drain hose is straight before feeding the end of it through the hole for the water supply. As you slide the dishwasher into the opening, you will want to slowly pull on the drain hose from inside the cabinet to take up some slack. Be careful not to kink, pinch, crush or stress the drain hose during installation to avoid leaking and water damage.
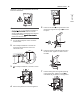
INSTALLATION 15 within 4 ft. (1.22 m) of the dishwasher side and not behind the dishwasher. ENGLISH NOTE 5 Insert a strain relief b through the hole in the junction box. Tighten the ring nut c to secure it in place. 6 Insert the electrical cable through the hole in the strain relief. Tighten 2 screws to secure the cable. 7 Pull the existing wires through the openings in the junction box. Tighten 2 screws d to reassemble the junction box in the appliance.
16 INSTALLATION 8 Pair the white, black, and green wires to the matching colored wires from the dishwasher. Then twist on the provided wire nuts e tightly to connect the corresponding wires. garbage disposal, be sure to follow your manual for proper installation instructions. Drain Hose Requirements 9 or 7/8" inside diameter, 2-3 ft. length hose and a coupler for connecting the two hose ends. Wrap electrical tape f around each connection.
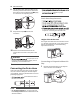
INSTALLATION 17 2 Remove the knockout plug a from the disposal. 2 dishwasher will not be able to drain properly. Connecting to Disposal or Waste Tee with Air Gap 3 Attach the drain hose to the disposal with the hose clamp provided. Move the hose clamp into position and tighten it with a flat-blade screwdriver. 1 Remove the knockout plug with a hammer and screwdriver. 2 Connect the end of the drain hose a to the air gap b with the hose clamp provided.
18 INSTALLATION recommended (see Preparing Cabinet Opening), the dishwasher must be carefully leveled and aligned so that the dishwasher is supported fully by the 3 leveling feet and is not hanging from the installation brackets. Failure to do so can result in leaks from the front of the dishwasher, AE errors, difficulty in closing the door, or failure to operate. Checking Leveling leveling feet until they are all in firm contact with the floor.
INSTALLATION 19 NOTE 1 Remove the 2 plastic caps from the mounting bracket access holes. 2 Drive a wood screw through the mounting bracket and into the cabinet frame. 3 Reinstall the plastic caps. Securing Dishwasher in Cabinet Opening There are 2 options for securing the dishwasher. If the countertop is made of wood or a material that can safely be drilled into, secure the dishwasher to the countertop with the provided brackets.
20 INSTALLATION 5 Check for leaks at the drain hose and water supply connection. Error Code IE 6 If a water leak is detected, press and hold the Start button for 3 seconds to cancel the wash cycle and automatically drain the water from the dishwasher. Tighten all water connections and run another cycle. Repeat until no leaks are detected. 7 Replace the lower cover. dishwasher. Do not install cabinet baseboard a as it may cause noise and leakage.