OWNER'S MANUAL DISHWASHER Read this owner's manual thoroughly before operating the appliance and keep it handy for reference at all times. ENGLISH LDFN343** MFL69261733 Rev.03_020121 www.lg.com Copyright © 2020-2021 LG Electronics Inc. All Rights Reserved.
TABLE OF CONTENTS 3 IMPORTANT SAFETY INSTRUCTIONS 3 3 6 READ ALL INSTRUCTIONS BEFORE USE WARNING STATEMENTS CAUTION STATEMENTS 7 PRODUCT OVERVIEW 7 Product Features 9 INSTALLATION 9 10 11 12 13 14 16 17 19 19 Before Installing Preparing Cabinet Opening Preparing Water and Electrical Connections Preparing Dishwasher Sliding Dishwasher into Cabinet Opening Connecting Water Supply Line and Power Connecting the Drain Hose Leveling Dishwasher Securing Dishwasher in Cabinet Opening Final Installatio
IMPORTANT SAFETY INSTRUCTIONS 3 IMPORTANT SAFETY INSTRUCTIONS Safety Messages Your safety and the safety of others are very important. We have provided many important safety messages in this manual and on your appliance. Always read and follow all safety messages. This is the safety alert symbol. This symbol alerts you to potential hazards that can kill or injure you and others. All safety messages will follow the safety alert symbol and either the word WARNING or CAUTION.
IMPORTANT SAFETY INSTRUCTIONS • When installing or moving the appliance, be careful not to pinch, crush, or damage the power supply line. • Do not install the appliance in humid spaces. • Destroy the carton, plastic bag, and other packing materials after the appliance is unpacked. Children might use them for play. Cartons covered with rugs, bedspreads, or plastic sheets can become airtight chambers.
IMPORTANT SAFETY INSTRUCTIONS 5 • Fix the drain hose securely in place. • Use only detergents or wetting agents recommended for use in a dishwasher and keep them out of the reach of children. • When loading items to be washed: - Locate sharp items so that they are not likely to damage the door seal. - Load sharp knives with the handles up to reduce the risk of cuts or other injuries. • Do not wash plastic items unless they are marked "dishwasher safe" or the equivalent.
IMPORTANT SAFETY INSTRUCTIONS Tip Over Hazard • Do not use the dishwasher until completely installed. • Do not push down on the open dishwasher door. • Failure to follow these instructions may result in serious injury or cuts. CAUTION STATEMENTS CAUTION • To reduce the risk of minor or moderate injury to persons, malfunction, or damage to the product or property when using this product, follow basic precautions, including the following: Installation • Install the product on a firm and level floor.
PRODUCT OVERVIEW 7 PRODUCT OVERVIEW The images in this guide may be different from the actual components and accessories, which are subject to change by the manufacturer without prior notice for product improvement purposes. NOTE • For your safety and for extended product life, use only authorized components. The manufacturer is not responsible for product malfunction or accidents caused by the use of separately purchased unauthorized components or parts. • Do not remove the safety cover at any time.
PRODUCT OVERVIEW Accessories NOTE • Remove all packing materials from the exterior and interior of the dishwasher before installing the appliance. • Press the tab to remove the cable tie by hand. Cutting the tie with a knife or scissors may damage the rack or the silverware basket. a b c a Installation Brackets (2 ea) b Wood Screws (4 ea) c Hose Clamp Product Specifications The appearance and specifications listed in this manual may vary due to constant product improvements.
INSTALLATION 9 INSTALLATION Parts not Provided a d b e j k l m n o c f p a Flat-Blade Screwdriver b Phillips Screwdriver g h i a Electrical Cable c Hole Saw min.
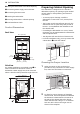
INSTALLATION d Sliding the Dishwasher into Cabinet Opening Preparing Cabinet Opening e Connecting Water Supply Line and Power This dishwasher is designed to fit a standard dishwasher opening. An opening may be needed on both sides to route plumbing and electrical connections. f Connecting the Drain Hose g Leveling the Dishwasher h Securing Dishwasher in Cabinet Opening i Final Installation Check • To ensure proper drainage, install the dishwasher no more than 12 ft. (3.65 m) from the sink.
INSTALLATION 11 - Do not use an extension cable or adapter with this dishwasher. - Do not overload the outlet with more than one appliance. 2.5 '' - The included 16AWG wire nuts should be used. - It is the personal responsibility and obligation of the product owner to have a proper outlet installed by a qualified electrician. 4 '' WARNING • Installation damage is not covered by the warranty, and leaks caused by improper installation may result in property damage.
INSTALLATION side of the opening and tape it in place in front of the opening. 3 Run the electrical cable c along the floor 14" – 16" (356 mm – 406 mm) from the water supply line d and tape it in place. Removable Shipping Brace The rear shipping brace can be removed if additional clearance is needed when installing the dishwasher under a low countertop. • The electrical outlet must be within 4 ft. (1.22 m) of either side of the dishwasher.
INSTALLATION 13 • Do not push the door of the dishwasher with knees when sliding the dishwasher into position. Doing so can damage the front cover. ENGLISH For countertops made of granite, marble, or other materials that could be damaged by drilling, use the wood screws to attach the dishwasher to the cabinet. See installation instructions in Securing Dishwasher to Cabinet Opening. NOTE • Installation brackets and screws can be found in the silverware basket.
INSTALLATION 2 Smooth out or pad the edges of the hole drilled for the water supply to avoid damaging the drain hose. 3 Make sure the drain hose is straight before feeding the end of it through the hole for the water supply. As you slide the dishwasher into the opening, you will want to slowly pull on the drain hose from inside the cabinet to take up some slack. Be careful not to kink, pinch, crush or stress the drain hose during installation to avoid leaking and water damage.
INSTALLATION 15 within 4 ft. (1.22 m) of the dishwasher side and not behind the dishwasher. ENGLISH NOTE 5 Insert a strain relief b through the hole in the junction box. Tighten the ring nut c to secure it in place. 6 Insert the electrical cable through the hole in the strain relief. Tighten 2 screws to secure the cable. 7 Pull the existing wires through the openings in the junction box. Tighten 2 screws d to reassemble the junction box in the appliance.
INSTALLATION 8 Pair the white, black, and green wires to the matching colored wires from the dishwasher. Then twist on the provided wire nuts e tightly to connect the corresponding wires. • If connecting the dishwasher’s drain hose to the garbage disposal, be sure to follow your garbage disposal’s manual for proper installation instructions. Drain Hose Requirements • Follow local codes and ordinances. • Do not exceed 12 ft. (3.65 m) distance to drain.
INSTALLATION 17 2 Remove the knockout plug a from the disposal. 2 ENGLISH WARNING Attach the drain hose to the waste tee with the hose clamp provided. Move the clamp into position and tighten it with a flat-blade screwdriver. • If the knockout plug has not been removed, the dishwasher will not be able to drain properly. Connecting to Disposal or Waste Tee with Air Gap 3 Attach the drain hose to the disposal with the hose clamp provided.
INSTALLATION • Where the cabinet opening is narrower than recommended (see Preparing Cabinet Opening), the dishwasher must be carefully leveled and aligned so that the dishwasher is supported fully by the 3 leveling feet and is not hanging from the installation brackets. Failure to do so can result in leaks from the front of the dishwasher, AE errors, difficulty in closing the door, or failure to operate.
INSTALLATION 19 NOTE 1 Remove the 2 plastic caps from the mounting bracket access holes. 2 Drive a wood screw through the mounting bracket and into the cabinet frame. 3 Reinstall the plastic caps. ENGLISH • To avoid damaging the screw, do not use an electric screwdriver. Securing Dishwasher in Cabinet Opening There are 2 options for securing the dishwasher.
INSTALLATION 5 Check for leaks at the drain hose and water supply connection. Error Code IE 6 If a water leak is detected, press and hold the Start button for 3 seconds to cancel the wash cycle and automatically drain the water from the dishwasher. Tighten all water connections and run another cycle. Repeat until no leaks are detected. 7 Replace the lower cover. CAUTION • Only install the lower cover provided with the dishwasher.
OPERATION 21 OPERATION WARNING • To reduce the risk of fire, electric shock, or injury to persons, read the SAFETY INSTRUCTIONS before operating this appliance. NOTE • Connect to the hot water supply only. The water supply temperature should be a minimum of 120 °F (49 °C) for better washing performance and shorter cycle time. • Follow the instructions for loading the dishwasher to ensure effective cleaning.
OPERATION 8 End of cycle. • When the cycle is complete, a chime will sound and the display will show ENd until the door is opened or Power is pressed. To save energy, press and hold High Temp for three seconds to set the ENd display to automatically turn off a few minutes after the cycle ends. CAUTION • Do not open the door during operation or immediately after it has completed the wash cycle as the escaping steam may cause scalding as the door is opened.
OPERATION 23 Control Panel Control Panel Features ENGLISH a Power On/Off Button • Press this button to turn the washer on or off. • If there is a power surge, power outage, or disruption of any kind, power is automatically turned off for safety. • When power is connected again, the dishwasher will turn on automatically and resume the cycle. NOTE • When opening or closing the product door, keep fingers and hands away from the control panel to avoid activating buttons.
OPERATION c Chime On/Off Button • To activate or deactivate the button sounds, press and hold Cycles and Machine Clean simultaneously for three seconds. The error alert sound cannot be turned off. d Cancel Button • The drain pump activates and the cycle cancels. Once the dishwasher finishes draining, the power turns off. • Press and hold Start for three seconds to activate.
OPERATION 25 Mode Night Dry Description • Place heavily soiled dishes like plates and bowls in the lower rack and lightly soiled dishes like cups and small plates in the upper rack to get the best results. • Press and hold Extra Dry for three seconds to activate. High Temp • The Night Dry option is selected by default for all cycles for which it is available, except the Normal cycle. Raises the main wash temperature to improve cleaning.
OPERATION Loading the Dishwasher Loading Silverware into the Basket The extra tall tub allows loading of dishes, pans, or other utensils up to 14" high. For effective washing performance, always follow these instructions. Loading 10 Place Settings • Remove large particles of food debris from plates including bones before loading. 1 5 4 3 5 4 5 4 3 5 4 5 4 2 2 2 6 2 3 2 2 2 6 2 3 4 6 5 5 4 3 4 5 1 5 4 2 4 5 • Items with burnt on food should be soaked prior to loading in the dishwasher.
OPERATION 27 Folding Down the Lower Tines Loading Dishes into the Lower Rack Fold tines down to fit larger dishes; pull tines back up to fit smaller dishes. Loading 10 Place Settings Case 1 Case 2 Loading 12 Place Settings Loading Dishes & Pots Lower Rack Loading Tips: • Plates should be positioned upright and facing the center of the rack, and pots, pans and large dishes must be turned upside down. • Load dinner plates, dishes, soup bowls, etc. between the tines.
OPERATION Loading Pots & Bowls NOTE • The silverware basket ships installed at the back of the bottom rack. For best performance, install it along the right side as shown.
OPERATION 29 Loading Dishes & Pots Upper Rack Loading Tips: Height Adjustable Upper Rack • Place cups and glasses in the rows between the rack tines. Placing them over the rack tines can lead to breakage and water spots. The upper rack adjusts up and down. Raise the upper rack to allow items up to 14" tall in the lower rack. Lower the upper rack to allow dishes up to 12" tall in the upper rack. The dishwasher ships with the upper rack raised.
OPERATION Adding Cleaning Products NOTE • Before pushing the upper rack into the dishwasher, ensure the rack height is the same on both sides. If the height is not the same on both sides, the dishwasher door will not shut and the upper spray arm will not connect to the water inlet. Adding Detergent to the Dispenser • Remove the label on the dispenser prior to running the dishwasher for the first time. • The amount of detergent needed depends on the cycle, load size, and soil level of dishes.
OPERATION 31 • Using liquid rinse aid improves drying performance by allowing water to drain off of dishes after the final rinse. • Using a wash booster helps remove spots, residue, and the white film caused by hard water. It does not help remove excess detergent residue. 1 Push the button on the dispenser lid to open the cover. ENGLISH • Do not use detergent tablets for shorter wash cycles. The tablet may not dissolve completely, causing detergent residue on dishes and inefficient cleaning.
OPERATION 3 Press Delay Start to change the rinse aid dispenser setting. Each press of the button changes the setting one step from L0 to L4. 4 Once the desired rinse aid dispenser setting is selected, press Start to save. Refilling the Rinse Aid How often the dispenser needs to be refilled depends on how often dishes are washed and the rinse aid setting used. 3 Close the lid to lock the dispenser. Rinse aid is dispensed automatically during the final rinse cycle.
SMART FUNCTIONS 33 SMART FUNCTIONS The LG ThinQ application allows you to communicate with the appliance using a smartphone. x. Ma mm 10 LG ThinQ Application Features • Smart Diagnosis - This function provides useful information for diagnosing and solving issues with the appliance based on the pattern of use. 3 • Keep the smartphone in place until the data transfer has finished. Time remaining for data transfer is displayed.
MAINTENANCE MAINTENANCE To maintain performance and prevent trouble, it is important to check the outside and inside of the dishwasher, including filters and spray arms, at regular intervals. WARNING • When cleaning the outside and inside of the dishwasher, do not use benzene or thinner. Otherwise, it may cause fire or explosion. • To prevent injury during care and maintenance or cleaning, wear gloves and/or protective clothing.
MAINTENANCE 35 ENGLISH Cleaning the Filters WARNING 4 • Be cautious of sharp edges when handling the stainless steel filter. To replace the assembled filters, position the spray arm so the wider vee is toward the front. Fit the filters back into the filter holder and secure them by turning the inner filter clockwise until it clicks into place. CAUTION • Remove food residue caught in filters to prevent the buildup of odor-causing bacteria and possible drainage problems.
MAINTENANCE 6 After cleaning the upper spray arm, press it up into place. Turn the nut 1/8 turn clockwise to make sure that the nut locks back into place. 7 After assembly, make sure that the spray arms rotate freely. CAUTION • To avoid breaking the rolling spray arm sections, do not pull or manually rotate them. Cleaning the Upper Spray Arm 1 2 Pull the upper rack forward. Make sure that the water jet holes are not blocked by food particles.
TROUBLESHOOTING 37 TROUBLESHOOTING Before Calling for Service FAQs Q: Does this dishwasher require a rinse aid to be used? A: Rinse aid is strongly recommended to enhance the drying performance of the dishwasher. In order to be more energy efficient, the hybrid drying system does not use a heating element to assist in drying, so a rinse aid plays an integral role in the drying process. If a rinse aid is not used, water may remain on the dishes and the tub.
TROUBLESHOOTING A: The dishwasher does not rely on a heating element for the drying process; instead, it relies on the heat that is retained by the dishes and the tub during the wash and rinse cycles to turn the moisture in the tub into humidity. Warm, moist air in the dishwasher is then pulled into a condensing duct in the door by a fan. The air then cools, which causes the humidity to condense. Room temperature air is also drawn into the duct to help the air cool down faster.
TROUBLESHOOTING 39 On the www.lg.com home page, click on the Support menu tab to bring up the menu selections. Select Video Tutorials. 2 Select a product category and then pick a topic or search a keyword. NOTE • Scan this QR code to quickly access the video search page on the LG website. Error Messages Problem IE Possible Cause & Solution Water inlet problem. • Check for a clogged, kinked or frozen water inlet hose. • Check water supply. OE Drainage Problem.
TROUBLESHOOTING Problem Possible Cause & Solution Thermistor failure. tE • Please call an LG Electronics Customer Information Center at 1-800-243-0000 (U.S.A.) 1888-542-2623 (Canada). Motor trouble LE • Please call an LG Electronics Customer Information Center at 1-800-243-0000 (U.S.A.) 1888-542-2623 (Canada). Vario motor trouble NE • Please call an LG Electronics Customer Information Center at 1-800-243-0000 (U.S.A.) 1888-542-2623 (Canada). N:#, U:#, d:#, t# Test mode is selected.
TROUBLESHOOTING 41 Problem Possible Cause & Solution Lights do not illuminate. Power is not connected. Spray arms do not rotate smoothly. Holes of spray arms are blocked by food particles. Upper rack is crooked. Rack is poorly adjusted. Dishwasher continuously chimes when the door is opened, during or right after a cycle has completed. This is a safety measure. Contact with escaping steam or the hot contents of the dishwasher could result in injury. Door does not close completely.
TROUBLESHOOTING Problem Food soil remains on dishes. Possible Cause & Solution Improper cycle selection. • Select correct cycle based on soil level and type of dishware being washed. Water temperature is too low. • Check water supply connection or water heater setting. Dishwashing detergent was not used. • Use recommended detergent. Low inlet water pressure. • Water pressure should be between 20 and 80 psi. Water jet holes on spray arms blocked. • Clean the spray arms. Improper loading of dishes.
LIMITED WARRANTY 43 LIMITED WARRANTY TERMS AND CONDITIONS ARBITRATION NOTICE: THIS LIMITED WARRANTY CONTAINS AN ARBITRATION PROVISION THAT REQUIRES YOU AND LG TO RESOLVE DISPUTES BY BINDING ARBITRATION INSTEAD OF IN COURT, UNLESS YOU CHOOSE TO OPT OUT. IN ARBITRATION, CLASS ACTIONS AND JURY TRIALS ARE NOT PERMITTED. PLEASE SEE THE SECTION TITLED “PROCEDURE FOR RESOLVING DISPUTES” BELOW.
LIMITED WARRANTY • Failure of the product to perform during power failures and interrupted or inadequate electrical service. • Damage caused by leaky or broken water pipes, frozen water pipes, restricted drain lines, inadequate or interrupted water supply or inadequate supply of air. • Damage resulting from operating the product in a corrosive atmosphere or contrary to the instructions outlined in the product’s owner’s manual.
LIMITED WARRANTY 45 PROCEDURE FOR RESOLVING DISPUTES: Definitions. For the purposes of this section, references to “LG” mean LG Electronics U.S.A., Inc.
LIMITED WARRANTY provided for, LG waives any rights it may have to seek attorneys’ fees and expenses from you if LG prevails in the arbitration. Hearings and Location. If your claim is for $25,000 or less, you may choose to have the arbitration conducted solely on the basis of (1) documents submitted to the arbitrator, (2) through a telephonic hearing, or (3) by an in-person hearing as established by the AAA Rules. If your claim exceeds $25,000, the right to a hearing will be determined by the AAA Rules.
Memo 47
LG Customer Information Center For inquiries or comments, visit www.lg.com or call: 1-800-243-0000 1-888-542-2623 U.S.A. CANADA Register your product Online! www.lg.