
Owner's Manual English, Spanish 09/09/2021 18995K


14 INSTALLATION
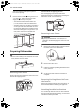
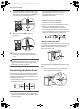
2 Smooth out or pad the edges of the hole
drilled for the water supply to avoid damaging
the drain hose.
3 Make sure the drain hose is straight before
feeding the end of it through the hole for the
water supply. As you slide the dishwasher into
the opening, you will want to slowly pull on
the drain hose from inside the cabinet to take
up some slack. Be careful not to kink, pinch,
crush or stress the drain hose during
installation to avoid leaking and water
damage.
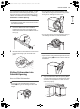
4 Gradually slide the dishwasher into the
opening, making sure that the water supply
line and electrical cable are passing freely
through the channels and do not get caught
under the dishwasher.
CAUTION
• To avoid malfunctions or leakage, it is important
that the drain hose not get kinked, pinched,
stressed or crushed behind or under the
dishwasher or inside the neighboring cabinet.
• Damage resulting from improper installation is
not covered under the warranty.
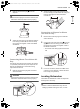
• As you slide the dishwasher into the
opening, stop periodically (or have an
assistant help) to take up the slack by
pulling the drain hose farther into the
cabinet.
5 Remove the tape from the water supply line
and the electrical cable.
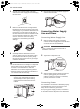
Connecting Water Supply
Line and Power
Connecting Water Supply Line
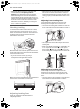
1 With the home water supply turned off,
connect the water supply line to the inlet valve
on the left front of the dishwasher.
CAUTION
• Tape or compound should not be used on
dishwasher inlet valve.
2 Tighten the compression nut.
3 Slide the water supply line back through the
channel, pulling gently from inside the
cabinet to make sure the line is not kinked,
pinched, stressed or crushed.
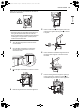
Connecting Power
The dishwasher should have a dedicated properly
grounded branch circuit to connect the 3 wire
setup which includes the ground wire.
If a 3-prong power supply is used, it should be in
an accessible location adjacent to the dishwasher
us_main.book.book Page 14 Thursday, January 21, 2021 10:27 AM