
Owners Manual


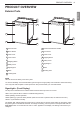
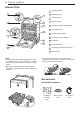
Table Of Contents
- PRODUCT FEATURES
- SAFETY INSTRUCTIONS
- PRODUCT OVERVIEW
- INSTALLATION
- Installation Parts and Tools
- Installation Overview
- Product Dimensions
- Product Specifications
- Preparing Cabinet Opening
- Preparing Water and Electrical Connections
- Preparing Dishwasher
- Attaching Installation Brackets
- Sliding Dishwasher into Cabinet Opening
- Connecting Water Supply Line and Power
- Connecting Drain Hose
- Leveling Dishwasher
- Securing Dishwasher to Cabinet Opening
- Final Installation Check
- OPERATION
- SMART FUNCTIONS
- MAINTENANCE
- TROUBLESHOOTING
- LIMITED WARRANTY
- CARACTERÍSTICAS DEL PRODUCTO
- INSTRUCCIONES DE SEGURIDAD
- DESCRIPCIÓN GENERAL DEL PRODUCTO
- INSTALACIÓN
- Piezas y herramientas para la instalación
- Descripción general de la instalación
- Dimensiones del producto
- Especificaciones del producto
- Preparación de la abertura para el gabinete
- Preparación de las conexiones eléctricas y de agua
- Preparación del lavavajillas
- Colocación de los soportes de instalación
- Deslizamiento del lavavajillas en la abertura del gabinete
- Conexión de la línea de suministro de agua y energía eléctrica
- Conexión de la manguera de desagüe
- Nivelado del lavavajillas
- Sujeción del lavavajillas en la abertura del gabinete
- Verificación final de la instalación
- FUNCIONAMIENTO
- FUNCIONES INTELIGENTES
- MANTENIMIENTO
- SOLUCIÓN DE PROBLEMAS
- GARANTÍA LIMITADA
- CARACTÉRISTIQUES DU PRODUIT
- CONSIGNES DE SÉCURITÉ
- APERÇU DU PRODUIT
- INSTALLATION
- Pièces et outils requis pour lʼinstallation
- Aperçu de lʼinstallation
- Dimensions du produit
- Caractéristiques du produit
- Préparer lʼouverture de lʼarmoire
- Préparation des raccords des conduites d’eau et du branchement électrique
- Préparer le lave-vaisselle
- Fixation des supports d’installation
- Positionnement du lave-vaisselle dans l’ouverture de lʼarmoire
- Raccordement de lʼalimentation en eau et branchement électrique
- Raccordement du tuyau de vidange
- Mise de niveau du lave-vaisselle
- Fixation du lave-vaisselle à l’ouverture de lʼarmoire
- Dernière vérification de l’installation
- FONCTIONNEMENT
- FONCTIONS INTELLIGENTES
- ENTRETIEN
- DÉPANNAGE
- GARANTIE LIMITÉE

10 PRODUCT OVERVIEW
Interior Parts
10
6
11
12
5
9
2
8
1
3
4
7
4
Filtration System
5
Detergent and Rinse Aid Dispenser
6
Drying Vent Cover
7
Tub Light (some models)
8
Cutlery Rack (some models)
9
Upper Rack
10
Silverware Basket
11
NOTE
• The silverware basket ships installed at the back
of the bottom rack. For best performance, install it
along the right side as shown in the Interior Parts
section.
• Remove all packing materials from the exterior
and interior of the dishwasher before installing the
appliance.
• Press the tab to remove the cable tie by hand.
Cutting the tie with a knife or scissors may damage
the rack or the silverware basket.
Accessories
Included Accessories
Installation
brackets
(2ea)
Wood screws
(4ea)
Hose clamp
(1ea)
Top Wash Impeller
Upper Spray Arm
1
2
Lower Spray Arm
3
Lower Rack (appearance may vary)
Steam nozzle
12
2
3