
Owner's Manual English 08/25/2021 43019K
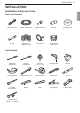
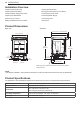
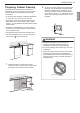

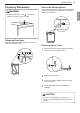
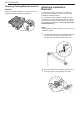
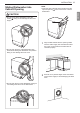
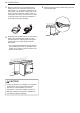
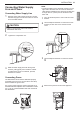
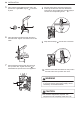
Table Of Contents
- PRODUCT FEATURES
- SAFETY INSTRUCTIONS
- PRODUCT OVERVIEW
- INSTALLATION
- Installation Parts and Tools
- Installation Overview
- Product Dimensions
- Product Specifications
- Preparing Cabinet Opening
- Preparing Water and Electrical Connections
- Preparing Dishwasher
- Attaching Installation Brackets
- Sliding Dishwasher into Cabinet Opening
- Connecting Water Supply Line and Power
- Connecting Drain Hose
- Leveling Dishwasher
- Securing Dishwasher to Cabinet Opening
- Final Installation Check
- OPERATION
- SMART FUNCTIONS
- MAINTENANCE
- TROUBLESHOOTING
- LIMITED WARRANTY
- CARACTERÍSTICAS DEL PRODUCTO
- INSTRUCCIONES DE SEGURIDAD
- DESCRIPCIÓN GENERAL DEL PRODUCTO
- INSTALACIÓN
- Piezas y herramientas para la instalación
- Descripción general de la instalación
- Dimensiones del producto
- Especificaciones del producto
- Preparación de la abertura para el gabinete
- Preparación de las conexiones eléctricas y de agua
- Preparación del lavavajillas
- Colocación de los soportes de instalación
- Deslizamiento del lavavajillas en la abertura del gabinete
- Conexión de la línea de suministro de agua y energía eléctrica
- Conexión de la manguera de desagüe
- Nivelado del lavavajillas
- Sujeción del lavavajillas en la abertura del gabinete
- Verificación final de la instalación
- FUNCIONAMIENTO
- FUNCIONES INTELIGENTES
- MANTENIMIENTO
- SOLUCIÓN DE PROBLEMAS
- GARANTÍA LIMITADA
- CARACTÉRISTIQUES DU PRODUIT
- CONSIGNES DE SÉCURITÉ
- APERÇU DU PRODUIT
- INSTALLATION
- Pièces et outils requis pour lʼinstallation
- Aperçu de lʼinstallation
- Dimensions du produit
- Caractéristiques du produit
- Préparer lʼouverture de lʼarmoire
- Préparation des raccords des conduites d’eau et du branchement électrique
- Préparer le lave-vaisselle
- Fixation des supports d’installation
- Positionnement du lave-vaisselle dans l’ouverture de lʼarmoire
- Raccordement de lʼalimentation en eau et branchement électrique
- Raccordement du tuyau de vidange
- Mise de niveau du lave-vaisselle
- Fixation du lave-vaisselle à l’ouverture de lʼarmoire
- Dernière vérification de l’installation
- FONCTIONNEMENT
- FONCTIONS INTELLIGENTES
- ENTRETIEN
- DÉPANNAGE
- GARANTIE LIMITÉE

18 INSTALLATION
3
Make sure the drain hose is straight before
feeding the end of it through the hole for the
water supply. As you slide the dishwasher into
the opening, you will want to slowly pull on the
drain hose from inside the cabinet to take up
some slack. Be careful not to kink, pinch, crush
or stress the drain hose during installation to
avoid leaking and water damage.
4
Gradually slide the dishwasher into the opening,
making sure that the water supply line and
electrical cable are passing freely through the
channels and do not get caught under the
dishwasher.
• As you slide the dishwasher into the opening,
stop periodically (or have an assistant help)
to take up the slack by pulling the drain hose
farther into the cabinet.
CAUTION
• To avoid malfunctions or leakage, it is important
that the drain hose not get kinked, pinched,
stressed or crushed behind or under the
dishwasher or inside the neighboring cabinet.
• Damage resulting from improper installation is
not covered under the warranty.
5
Remove the tape from the water supply line and
the electrical cable.