
Owner's Manual


Connections and settings 21
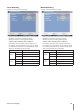
14 Normal User Login (Local)
15 Normal User Logout (Local)
16 Configuration Changed
17 Configuration Imported
18 Factory Default Set
19 Backup Started
20 Backup Finished
21 Backup Failed
22 Export Started
23 Export Finished
24 Export Failed
25 S/W Updated
26 HDD Added (HDD1)
27 HDD Added (HDD2)
28 HDD Removed (HDD1)
29 HDD Removed (HDD2)
30 HDD Formatted (HDD1)
31 HDD Formatted (HDD2)
32 HDD Changed (HDD1)
33 HDD Changed (HDD2)
34 HDD Damaged (HDD1)
35 HDD Damaged (HDD2)
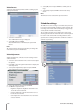
Export the recorded data
This unit can manually copy recorded images and audio
from built-in HDD to the external recording devices.
1.
Press COPY or click the
icon in the system control
bar.
The export menu window appears.
2. Select [Target Device] then press ENTER.
3. Use b/B to select a target device to export.
4.
Press ENTER to confirm it.
5. Select the channel number and press ENTER. Repeat
this step to select multi channels.
6.
Set the [Start Date/Time] and [End Date/Time] to copy.
b/B/v/V: Moves to the options.
b/B: Sets the selected option.
ENTER: Selects option or confirms the setting.
7.
Select [Export] and press ENTER or click [Export] icon to
start exporting. The exported data will be authorized by
the unit before saving and it can only be played back
with the exclusive player.
•
•
•
Notes:
•
You can also use the COPY button on the front panel for
export function.
•
Check the export device before you proceed.
• You can export the recorded data only in the live mode.
• If you use the external USB memory device, the external
USB memory device has to be formatted on this unit.
1. C
onnect the USB memory device to the USB port on
the front or the rear of the DVR.
2. S
elect the [Erase] icon then press ENTER.
Confirm window is displayed after format is com-
pleted.
3. S
elect [OK] and press ENTER to close the window.
Check the size of the selected data and free space of
the external device. If the device has not enough space,
create space on the device or erase the previously
stored data.
1.
Select the [Estimate] icon and press ENTER.
The size of the selected data and free space is dis-
played.
2.
Select [OK] and press ENTER to close the window.
Export can not be executed while the backup is in prog-
ress.
You can search the exported data with the supplied
viewer software.
When you export the recorded data, the audio data will
also be exported.
When you export the recorded data the export viewer
program will also be exported in the [ExportViewer]
folder of the device. The exported data file name is
made automatically as the [Channel name_export
date_export time.exp] type.
Do not remove the USB device while the export is in
progress, it may cause a malfunction. If you reuse the
removed device, you must format the media by using
erase options.
The warning message appears for the conditions listed
below.
When the start date/time and end date/time are the
same value.
When the start date/time is later than the end date/
time.
The export media does not have enough space.
When you set the time for data that does not exist.
•
An external media has to be formatted on this unit to
prevent a malfunction.
•
DVD+RW and DVD-RW discs have to be initialized
before using.
•
You can format the external media with the [Erase]
option.
•
•
•
•
•
•
•
-
-
-
-