LF-M340_ENG DAB MICRO HI-FI SYSTEM OWNER'S MANUAL MODEL: LF-BM340 (LF-BM340A/D/X, LFS-BM340) Please read this manual carefully before operating your set. Retain it for future reference. Designs and notice for specifications improvement.
This label is located on the interior. CAUTION RISK OF ELECTRIC SHOCK DO NOT OPEN CAUTION:TO REDUCE THE RISK OF ELECTRIC SHOCK DO NOT REMOVE COVER(OR BACK) NO This Compact Disc player product. is classified as a CLASS 1 USER SERVICEABLE PARTS INSIDE. REFER SER- LASER VICING TO QUALIFIED SERVICE PERSONNEL. The CLASS 1 LASER PRODUCT label is located on the exterior.
Contents 1Introduction.......................4 Front/RearPanel...................5 TapePlayback.....................15 BasicPlayback.................15 ToStopPlay...................15 TapeCounterReset.............15 To Play Rewind or Fast Forward .15 TapeRecording....................15 BasicRecording................15 Recording from Radio,CD or Auxiliary RemoteControl.....................6 source........................15 .4 SymbolsUsedinthisManual NotesonTapes.....................4 . . . . . . .
1. Introduction To ensure proper use of this product, please read this owner's manual carefully and retain for future reference. Notes on on Discs Handling discs Do not touch the This manual information the operaprovides tion and maintenance of your CD player. Should the unit require service, contact an authorized service location and (refer to on the disc get on playback side of the disc. Hold by the edges so that fingerprints do not the surface. Never stick paper or tape on the disc.
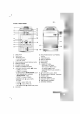
Front // Rear Panel 1 Introducin 16 234 15 5 12 OPTIONAL 14 22 13 21 6 20 11 87 17 19 9 10 1.TAPE DOOR 2. 18 10. HEADPHONE SOCKET TIMER button 3.? MODE/RIF button 11. FUNCTION button PLAY MODE button ? 12. DISPLAY WINDOW CD SYNC. button ? 13. CLOCK button 4. OAO 5. REMOTE SENSOR 6. VOLUME CONTROL KNOB ? RDS button 7. POWER ( ? SET (Orientation Acoustic Optimizer) STANDBY/ON) ?CD SKIP/SEARCH ( ? ( button ( ) button ? ? 9.
Remote Control Control AUX button MUTE button POWER button PRESET / ( ) buttons VOLUME CONTROL ( / ) button TUNER/ BAND button SLEEP button CD FUNCTION buttons PLAY/PAUSE ? ? ) button ) button PROGRAM/MEMO button CD SKIP/SEARCH TAPE FUNCTION buttons CD ? ( STOP( / ( ? ) button ? REPEAT button ? ? ? EQUALIZER PATTERN button ? XDSS button ? (EQ PATT.) ? ? SURROUND (SURR.
W indow Display Window 19 18 17 16 1 14 15 MEMORY RDS 32 PS 12 13 REPEAT PTY RT PROGRAM CT ALL 1 SLEEP CD SYNCHRO 10 11 STEREO MUTE 9 8 4 kHz 7 MHz 5 6 1. XDSS (Extreme Dynamic Sound System) 9. MUTE indicator indicator 10. FM STEREO indicator 2. OAO 11. SLEEP indicator 3. DAB 4. PROGRAM indicator 5. CD/ TUNER/ TAPE PLAY/ Track number/ (Orientation Acoustic Optimizer) indicator (Digital Audio Broadcasting) indicator 12. CD REPEAT indicator 13.
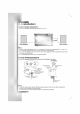
2. Installation Speaker Speaker System Connect the speaker Connection Connection cords to the speaker terminals. red black red Right speaker Left speaker otes ? Be sure to match the If the cords ? ? are speaker cord to the appropriate terminal on the components: reversed, the sound will be distorted and will lack base. If you use front speakers with low maximum sive output on the speakers.
the Setting Setting MUTE voltage (OPTIONAL) voltage (OPTIONAL) If your set is equipped with a voltage selector at the back side, be sure to set it to your local power supplied before connecting the AC power cord. Press MUTE to such temporarily stop the sound when you answer the telephone. The MUTE indicator flashes in the display as window.
3. Operation Auto Function Selection Selection ? If you press CD PLAY/ PAUSE ( ) during radio receiving or CASSETTE play, CD play- back will ? begin. If you press TUNER/ BAND during CD or CASSETTE play, radio function will work. Setting Setting 1. Using Using the Sleep Function When the sleep timer is used, the power is automatically turned off after the specified time has elapsed. 1. To specify the time delay before the power is turned off, press SLEEP.
imer Timer 7. Set the minute to switch PRESET With the TIMER function you can have the radio reception and recording, CD play, tape play or auxiliary source play and recording turned 8. on 2. set 9. clock, timer function doesn't PRESET want to correct the previous setting, press and hold the TIMER button more than 2 seconds. The previous memorized timer TIMER indicators appear in the 4. to confirm the hour to switch off. 11.
RDS Function - Programme Search (PTY) OPTIONAL OPTIONAL A tion to FM radio. Now in major benefit of RDS is its ability to encode Programme Type (PTY) codes that indicate the type of material being broadcast. The following list shows the abbreviations used to indicate each PTY along with an explanation of RDS is the PTY.
What What is DAB ? Presetting DAB (Digital Audio Broadcasting) is new form of radio broadcasting using digital signals rather than traditional analogue signals. DAB is a listening to the CD-like quality radio programs. DAB can carry not only audio, but also text. You DAB Scan 2. 1. Press the DAB/SCAN button repeatedly on the remote control to select the scan type you want.
Presetting You can Before the Radio Stations Stations Listening preset 50 stations for FM and AM. tuning, make 1. to the Radio Press TUNER/BAND to select the frequency that you have turned down the volume to the minimum. (AM or FM) you want. Every time you press this button, changes alternately. 1. The last received station is tuned in. sure Press FUNCTION button repeatedly (or TUNER/BAND on the remote control) to select the frequency (AM or FM) you want.
Tape Playback Tape Tape Recording Tape Use Wind the tape to the point Use only normal tapes. only normal tapes. Basic Playback 1. Press FUNCTION button repeatedly to select tape function. TAPE" appears in the ("NO 2. Open the cassette door 3. Insert a upside 4. cassette with the tape side Press PLAY ( or side from the To : 2. by with the left STOP( Counter Reset Recording playback. Playing display window. 1.
CD CD Skipping Playback Basic 1. ) button Playback ? Press FUNCTION button repeatedly to select CD function. If no disc is loaded then "NO DISC" is dis- played. 2. Press CD OPEN/CLOSE and ( OPEN/ CLOSE) place the disc into the disc tray. an 8cm (3 inch) disc, put it onto the inner 3. Press CD OPEN/CLOSE to close the disc OPEN/ ( CLOSE) compartment.
About MP3 Program Play Yo u arrange the order of the tracks on the discs and create your own program. The program can contain up to 20 tracks. 1. can Press PROGRAM/MEMO control 2. on on "MP3 files". Press / EX) "04 P-01" will be shown in the to select the track. Press PROGRAM/MEMO 5. compatibility limited follows: the remote 2. 3. 4.
4. Maintenance and Service Service Service the Unit Unit Shipping Shipping The Use the table als original shipping carton and packing materiin handy. For maximum protection, re-pack the unit as it was originally packed at the factory if you need to ship it. problems before calling for service. can come Cleaning Cleaning Use a the Unit Unit soft, dry cloth when cleaning the player.
T roubleshooting Troubleshooting Symptom Cause Correction No power. ? The power cord is disconnected. ? No sound. ? The power of the external equipment is switched off. ? The unit does not start playback. ? ? ? No disc An or source unplayable The disc is or tape is inserted. placed upside Switch on the external source equipment. tape is inserted. disc Plug the power cord into the wall outlet securely. down. ? Insert a disc ? Insert a playable disc ? or tape.
5. Reference Specifications Specifications [Genral] supply Refer to the back Power consumption 70W Mass Signal-to-noise [Tuner] (MW) [TAPE] [Speakrs] ratio 18000 Hz - 70 dB 70 dB Tuning Range 87.5 Intermediate Signal 108.0 MHz - or 65 - 74 MHz, 87.5 60/55 dB 10000 Hz 60 Tuning Range 522-1611kHzor530-1610kHz Intermediate 450 kHz Signal Frequency to Noise Ratio - 35 dB Frequency Response 100 Power 30W 1800 Hz - 0.15% Frequency Response 40 - 30W + T.H.
Technology with the human touch GUARANTEE LG Electronics U.K. Ltd. will 1. All 2. The dealer provide the following services in order to faulty components which fail due to defective manufacture period of 12 months from the original date of purchase. will be expedite this Guarantee. replaced free of charge for a (or his service agent) who sold the product will be reimbursed for any labour provided repair of this LG equipment, for a period of 12 months from the original date of purchase.