LGEAL_LF-D7150A_ENG_106S DVD MICRO HI-FI SYSTEM OWNER'S MANUAL MODEL : LF-D7150 (LF-D7150A/D/X, LFS-D7150V) CD-R/R Please read this manual carefully before operating your set. Retain it for future reference. Designs and notice for specifications improvement.
Safety Precautions CAUTION CAUTION Power Cord Most appliances recommend they be placed upon a dedicated circuit; That is, a single outlet circuit which powers only that appliance RISK OF ELECTRIC SHOCK DO NOT OPEN and has WARNING: TO REDUCE THE RISK OF ELECTRIC SHOCK DO NOT REMOVE COVER concerning the additional outlets no specification (OR BACK) or branch circuits. Check the page of this owner's manual to be certain. Do not overload wall outlets.
Table of Contents SpecialDVDFeatures.........................23 Introduction SafetyPrecautions...............................2 TitleMenu...............................23 TableofContents................................3 DiscMenu...............................23 BeforeUse...................................4-5 Precautions..................................5 CameraAngle............................23 ChangingtheAudioLanguage................23 ChangingtheAudioChannel.................23 NotesonDiscs.........
Before Use Disc-related terms Discs Playable Title (DVD only) DVD The main film content (8cm/12cmdisc) or (VCD) (8cm/12cmdisc) you to locate it Audio CD (8cm/12cmdisc) In addition, this unit can play a DVD±R, DVD±RW, SVCD, and CD-R or CD-RW that contains audio titles, MP3, WMA, JPEG or DivX files. -- -- (Video Sections of Notes Depending the conditions of the recording equipment or the CD-R/RW (or DVD±R/RW) disc itself, some CD-R/RW (or DVD±R/RW) discs cannot be played on the unit.
Before Use (Cont'd) After the unit Handling When shipping the unit The original shipping carton and packing materials come in handy. For maximum protection, re-pack the unit as it was originally packed at the factory. When setting up the unit The picture and sound of a nearby TV, VCR, or radio may be distorted during playback. In this case, position the unit away from the TV, VCR, unit after removing the disc.
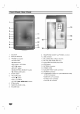
Front Panel/ Rear Panel 1 19 OPTICAL IN 2 3 4 SOUND XDSS PLAY 14 R FM GND L L A 18 U TUN. 56 (-) TUN. STOP XTSpro (+) R 13 EQ SPEAKERS 17 15 VOLUME MICVOL. FUNCTION X AM 7 12 8 11 9 10 16 1. CD DOOR 9. 2. DISPLAY WINDOW 10. USB connector 3. ? POWER ? CLOCK button ? ( ) 11 .MIC JACKS 13. ? SET/CD[] button 15. ANTENNA Connector ? MP3 OPT. button 16. ? MONO/STEREO ? Z OPEN/CLOSE button SOUND button 5. ? ? ? ? PLAY STOP TUN.
Remote Control POWER MUTE 20 1 TUNER/BAND DVD AUX USB 2 1. POWER button 2. FUNCTION SELECT buttons 3. (TUNER/BAND, DVD, AUX/D.INPUT, USB) NUMERIC buttons (0-9) EQUALIZER (EQ), XDSS, XTS pro, SOUND, 4. AUDIO, SUBTITLE, RETURN buttons 5. SET UP button 6. ? INTRODUC SLEEP 19 3 ARROW buttons (For use EQ ? 4 SOUND MODE AUDIO SET UP SUBTITLE PRESET RETURN SELECT/ENTER button 8. MENU button 18 SCAN 9. TUN.+ the MENU button to included + TUN.- TUN.
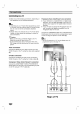
Connections Connecting Make the to a TV of the following connections, depending capabilities of your existing equipment. one ips Depending on Progressive Scan (ColorStream If your television is your TV and other equipment you wish to connect, there are various ways you could connect the unit. Use one of the connections described below. best connections.
Connections Connecting Connect the to Antenna supplied Connecting FM/AM antennas for listening to the radio. - You to VCR can use Auxiliary Equipment or other unit connected to the AUX connector. Connect the AM loop antenna to the AM antenna connector. - Connect the FM wire antenna to the FM antenna PREATION connector.
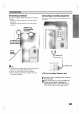
Connections Connecting to You optical output can use an Optional Equipment of Digital Connecting Device to the XTSpro OPTICAL IN connector. STOP to USB EQ VOLUME MICVOL. FUNCTION DVD Player (or Digital Device, etc) OPTICAL OUT USB Memory, MP3 Player (or Memory Card Reader, etc.) 1 OPTICAL N Connect the USB port of USB memory (or MP3 player, etc) to the USB connector on the front panel. 1 Connect of DVD optical output Player (or Digital Device etc) to the OPTICAL IN connecan tor.
Before Volume Operation MP3 Adjustment ?Turn VOLUME knob clockwise to increase the sound level, ? or counterclockwise to decrease it. Press VOLUME VOLUME + to increase the sound to decrease it - on This function is is level, or use the remote control. Optimizer for compressible MP3 file. It the bass sound to make sweet sound. improved Each time you press MP3 OPT. the the following order.
Before Setting Operation the Clock To cancel Press CLOCK. 1 setting If you wish to stop the function, press the SLEEP button repeatedly until "SLEEP 10 appears, and then press " requires setting, press and for more than 2 seconds.) The hours display begins to blink. (If Timer Sleep the clock hold CLOCK SLEEP once after "SLEEP 10 again " shows on the display. - Select 2 24 hour a 12 hour or bb/BB > . pressing cycle (12HR) on the cycle by front panel.
Before Operation Timer Function With the TIMER function you can have the radio reception, CD play and USB play turned on and off at the time desired. 1 7 8 Press CLOCK to check the current time. 2 TIMER to enter the timer TUNERtDVD/CD tUSB flash in . bb/BB > on the by pressing front panel. on Press SET/CD[ ] to confirm the turn on minutes time. 'OFF TIME' indicator appears for about 0.
Before Mini Operation Glossary for Audio Stream & Surround mode Sound Mode You DVD VCD CD enjoy surround sound simply by selecting one pre-programmed sound fields according to the can of the program you want to listen to. The Dolby Digital surround format lets you enjoy up to 5.1 channels of digital surround sound from a Dolby Digital mark, you program source. If you play DVDs with can enjoy even better sound quality, greater spatial accuracy, and improved dynamic range.
Before Operation 3 Caution: Before using the remote select the device to be General This manual control, press the DVD button to operated. or (e.g., gives playback 2 status can number). some setting functions, setting. Title A-B Repeat title Repeat sequence Resume / play from this be displayed on the TV changed on the menu. can be prohibited or not available Notes Some discs may not provide all of the features on the on-screen display example shown below.
Before Initial Operation LANGUAGE Settings the By using Setup can make various menu, you ments to items such as picture and sound. You set for the subtitles and the language among other things. a item, To For details Setup each Setup on display can also menu, menu OSD English Disc Audio Original Disc Subtitle Off Disc Menu Original and exit the Menu: Press SETUP to display the menu. SETUP will take you back to initial To go to the next level: on on A second press of screen.
Before Operation DISPLAY Progressive Scan DVD DISPLAY TV 16:9 Aspect Display Mode Progressive Progressive Scan Video provides the highest quality pictures with less flickering. If you are using the Component Video jacks for connection to a TV or monitor that is compatible with a progressive scan signal, set Progressive Scan to On.
Before Operation AUDIO Each DVD disc has Set the audio variety of audio output options. player's AUDIO options according to the type system you a Vocal of use. AUDIO Set Vocal to On only DVD is The karaoke channels mix into DRC On Vocal On Move Dynamic Range Control (DRC) With the DVD can hear Select DVD program's soundtrack in the most accurate and realistic presentation possible, thanks to digital audio technology.
Before LOCK Operation Password (Parental Control) You LOCK Rating Unlock Password **** Code Country can 2 Follow control information certain scenes on step 2 on the LOCK shown left as menu then press (Rating). "Change" . or 3 highlighted. Enter the new 4-digit code, then press SELECT/ENTER. Input it again to verify. 4 Press SETUP to exit the that may not be suitable of these discs contain parental to the complete the disc. Movies and menu.
Before Operation Operation OTHERS Playing a with DVD and Video CD DVD and Video CD OTHERS Playback Setup PBC On DivX(R) Registration Select Turn DVD VCD the TV and select the video on input source connected to the unit. Audio the PBC Set 1 Select Move VCD Playback Control to On (PBC) On:Video CDs with PBC Off. or are played according are played to the PBC.
with DVD and Video CD Operation Still Picture and General Features DVD Unless stated otherwise, all operations described playback. The player use the remote control. Some features may also be available on the Setup menu. 2 You can Moving to another TITLE disc has a more than one another title.
Operation with DVD and Video CD General Features A-B Repeat To repeat a DVD (continued) VCD sequence in You from point. 1 " - 2 Press REPEAT A-B at your chosen end again "A B" appears briefly on the repeat sequence begins. start points point. 2 1 Press DISPLAY 1 display appears during playback.
with DVD and Video CD Operation DVD Features Special Last Scene DVD This the contents of DVD Video Checking DVDs may offer menus that allow you to access special features. To use the disc menu, press MENU. Then, number button to select an 3 To list menu can remove If you load a disc that has the the scene is automatically recalled. scene memorized, player does not memorize the you switch off the disc.
with Audio CD and MP3/WMA Disc Operation Playing Disc Audio CD and MP3/WMA an MP3 CD Repeat You WMA MP3/WMA formatted play can CD-ROM, CD-R, recordings on a CD-RW discs. or title/chapter/all/track ? Press screen. or audio CD an / a menu to select SELECT/ENTER and a the on appears playback starts.
with JPEG Disc Operation Viewing This unit JPEG disc a Slide Show JPEG Use play discs with JPEG files. Before playing JPEG recordings, read the JPEG Recordings on right. can Insert notes on / // disc and close the tray. The JPEG menu appears on the TV screen. to highlight the (Slide Show) then press SELECT/ENTER. to another File Moving a JPEG Press . or > once advance to the next file JPEG during viewing a picture or to the previous file.
Programmed Playback The MP3 CD WMA function enables you to store your favorite tracks from any disc in the A program can contain 300 tracks (Audio CD/MP3/WMA). Program Insert 1 disc.
with DivX Disc Operation The unit can Insert play the DivX files. DivX disc disc and close the tray. The DivX menu appears on the TV 1 as a screen. compatibility player is limited follows: ?Available resolution size of the DivX file is under 720x576 0:00:00 with this 1/12 (W x H) pixel. DIVX ? The file name of the DivX subtitle is available List 20-40 characters Movie Folder 1 (differs from by language).
Operation with RADIO Presetting the radio stations You 50 stations for FM and AM. can Before preset show either FM or on Every time you press changes alternately. Or display window. the fornt panel. this the remote control to AM in the on display window. the fornt panel. Or The last received station is tuned in. Press PRESET 2 repeatedly the next station you want TUN. (-/+) buttons. on (-/+) on the remote control preset station you want.
with RADIO Operation RDS Operation - OPTIONAL Programme This unit is which equipped with RDS (Radio Data System), brings a wide range of information to FM radio. Now in use in many countries, RDS is a station call signs or network transmitting description of Search (PTY) system for information, A - OPTIONAL ability to encode broadcasts with Programme Type (PTY) codes that indicate the type of material being broadcast.
Troubleshooting Check the following guide for the possible cause of problem a before contacting service. Cause Symptom Correction No power. ? The power cord is disconnected. ? Plug the power securely. The power is on, but the unit does not work. ? No disc is inserted. ? Insert a disc. (Check that the DVD or, audio CD indicator in the DVD display is lit.
Language Code Use this list to List your desired language for the Disc Audio, Disc Subtitle, Disc Menu.
Specifications General Power Refer to the main label. supply consumption Power 70W Mass 4.0 External dimensions (W x H x D) kg 187 X 255 X 257 mm Tuner/Amplifier FM AM Tuning Range Intermediate Frequency Signal to Noise Ratio Frequency Response Tuning Range Intermediate Frequency Signal to Noise Ratio Frequency Response Output Power 87.