ENGLISH ESPAÑOL FRANÇAIS OWNER’S MANUAL BOTTOM FREEZER REFRIGERATOR Please read this manual carefully before operating your set and retain it for future reference. MANUAL DE USUARIO REFRIGERADOR CON CONGELADOR INFERIOR Lea detenidamente este manual antes de empezar a utilizar el refrigerador y guárdelo como referencia para el futuro.
WARRANTY LG ELECTRONICS U.S.A., INC. LG REFRIGERATOR LIMITED WARRANTY - U.S.A. Should your LG Refrigerator (“Product”) fail due to a defect in materials or workmanship under normal home use, during the warranty period set forth below, LG will at its option repair or replace the product. This limited warranty is valid only to the original retail purchaser of the product and applies only when purchased and used within the United States including U.S. Territories.
GARANTÍA LG ELECTRONICS U.S.A., INC. FRIGORÍFICO LG GARANTÍA LIMITADA - U.S.A. En caso de que su Frigorífico LG (“Producto”) falle por defectos de material o mano de obra bajo circunstancias de uso doméstico normal durante el período de garantía descrito a continuación, LG, a su criterio, reparará o reemplazará el producto.
WARRANTY LG ELECTRONICS CANADA, INC. LG REFRIGERATOR LIMITED WARRANTY - Canada WARRANTY: Should your LG Refrigerator (“Product”) fail due to a defect in material or workmanship under normal home use during the warranty period set forth below, LG Canada will at its option repair or replace the Product upon receipt of proof of original retail purchase.
GARANTIE LG ELECTRONICS CANADA, INC. GARANTIE LIMITÉE DES RÉFRIGÉRATEURS LG - Canada GARANTIE : Si, au cours de la période de garantie indiquée ci-dessous, votre réfrigérateur LG (“Produit”) tombe en panne suite à un défaut de fabrication ou de main d’oeuvre dans le cadre d’une utilisation normale, LG Canada s’engage à réparer ou à remplacer le Produit à sa discrétion, sur présentation d’une preuve d’achat d’origine.
TABLE OF CONTENTS Warranty English Version Spanish Version French Version 1-4 5 31 58 Important Safety Instructions Requirements for Ground Connection 6-7 7 Parts and Features 8 Refrigerator Installation Unpacking Installation Installation of Base Grille How to remove and install Handle How to remove and Install the Refrigerator Doors How to remove and Install Pull-Out Drawer Closing and Aligning the doors 9-15 9 9 9 10 11-12 13-14 15 Using your Refrigerator Ensuring Proper Air Circulation
IMPORTANT SAFETY INSTRUCTIONS SAFETY MESSAGES This manual contains several important safety notices. Always read and obey all of the following safety messages. This is the safety alert symbol. This symbol is a warning to potential dangers that could cause death, injury or damage to you, others or the product. All safety messages will follow after this warning symbol and the word “DANGER”, “CAUTION” or “WARNING”.
CAUTION This appliance is not intended for use by children, persons with physical or mental disabilities, persons with reduced sensory or mental capacity, or persons with lack of experience or know-how, unless they have supervision or instruction in relation to the use of the appliance by the person responsible for their safety. Children should be supervised to assure that they do not play with the appliance.
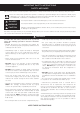
PARTS AND FEATURES Drawer Model A B M C D L E F K G J H I Read this section to familiarize yourself with the parts and features of your new refrigerator. NOTE: This guide covers different models. Your refrigerator could have some or all of the features and parts listed below. The location of some of the parts may not correspond to that of your model.
REFRIGERATOR INSTALLATION 3. Install the refrigerator in an area between 55 °F (13 °C) and 110 °F (43 °C). If the surrounding temperature is lower or higher than previously mentioned, it can adversely affect the unit. WARNING EXCESSIVE WEIGHT HAZARD Use the assistance of two or more persons to move or install the refrigerator. Not following these instructions may cause injury to the back and other parts of the body. CAUTION: Avoid placing the unit near heat sources, direct sunlight or humidity.
REFRIGERATOR INSTALLATION TOOLS YOU MAY NEED 10 mm 1/4 in 3/8 in Hex Socket Wrench Phillips Screwdriver Flat Head Screwdriver 1/4 in 3/32 in Allen Wrench NOTE: It is always recommended that the doors be removed when it is necessary to move the refrigerator through a narrow opening. If it is necessary to remove the handles follow the directions below. NOTE: Handle appearance may vary from illustrations on this page. DOOR HANDLE REMOVING 1.
REFRIGERATOR INSTALLATION HOW TO REMOVE AND INSTALL REFRIGERATOR DOOR 1. Removing Refrigerator Doors NOTE: Handle, top hinge and hinge cover appearance may vary from illustrations on this page. WARNING • Disconnect electrical supply to the refrigerator before installing. Failure to do so could result in death or serious injury. • Do not put hands or feet or metal sticks into the air vents, base grille, or bottom of the refrigerator. You may be injured or receive an electrical shock.
REFRIGERATOR INSTALLATION HOW TO REMOVE AND INSTALL REFRIGERATOR DOOR (CONT.) XX Left Door • Lower the door onto the middle hinge pin (7). • Make sure the door is aligned with the cabinet. • Fit the top hinge (8) over the hinge lever latch (9) and into place. Rotate the lever (10) clockwise to secure the hinge. • Install the grounding screw (11) and connect all the wire harnesses (12). • Hook the tab on the door-switch side of the cover (13) under the edge of the wire opening in the cabinet top.
REFRIGERATOR INSTALLATION HOW TO REMOVE AND INSTALL THE PULL OUT DRAWER Fig. 4 1. Removing Pull out Drawer Door supports Rail tabes IMPORTANT: To avoid possible injury, product or property damage, you will need two persons to perform the following instructions. • Pull the drawer open to full lower extension. Remove the durabase by lifting it from rail system. (Fig. 1) • Push the rails back into drawer cavity.
REFRIGERATOR INSTALLATION HOW TO REMOVE AND INSTALL THE PULL OUT DRAWER (CONT.) 2. Installing Pull out Drawer • Lower door into final position and tighten the screws. (Fig. 9) Fig. 9 Screws IMPORTANT: To avoid possible injury, product or property damage, you will need two people to perform the following instructions. • With both hands, hold the center of the bar and pull it out to let both rails out to full extension simultaneously. (Fig. 7) Fig.
REFRIGERATOR INSTALLATION CLOSING AND ALIGNING THE DOORS Aligning the Doors To adjust the height of the doors, use the wrench (Included with the User Manual) to adjust the bolt in the door hinge (counter clockwise to raise or clockwise to lower) Closing the Doors Your refrigerator has two front leveling screws, one on the right and one on the left.
USING YOUR REFRIGERATOR ENSURING PROPER AIR CIRCULATION ENERGY SAVING MODE NOTE: Energy-Saving Mode function is set from factory. To activate or deactivate Energy-Saving Mode, open the doors and then press the ENERGY SAVING button for 3 seconds. This function is recommended for added energy savings. (Some heaters to reduce excess moisture on the refrigerator may be turned off) The energy saving function is also recommended during long periods of time spent away from home-like vacation.
USING YOUR REFRIGERATOR ADJUSTING CONTROL SETTINGS FOOD STORAGE GUIDE Give the refrigerator time to cool down completely before adding food. It is best to wait 24 hours before adding food to the refrigerator. The mid-settings indicated in the previous section should be correct for normal household refrigerator usage. The controls are set correctly when milk or juice is cold to your liking and ice cream is firm.
USING YOUR REFRIGERATOR REFRIGERATOR SECTION Packaging Recommendations: • Use sealed plastic containers. • Use plastic containers with a smooth surface. • Package with aluminum foil of high resistance. • Wrap with paper layered with plastic. • Use water proof plastic. • Use recommended plastic bags to store frozen foods.
USING YOUR REFRIGERATOR CRISPER HUMIDITY CONTROL (in some models) Sliding Shelves (in some models) You can slide some of the shelves in your refrigerator towards inside or outside like explained below. You can control the amount of humidity in the moisturesealed crispers. Adjust the control to any setting between HIGH and LOW. • “High”: keeps moist air in the crisper for best storage of vegetables. • “Low”: lets moist aire out of the crisper for best storage of fruits.
USING YOUR REFRIGERATOR OPTIBIN CRISPERS The OptiBin crisper maintains fruits and vegetables fresh allowing you to easily control the humidity inside the drawers. The Optibin crispers include 1) a front humidity control and 2) a system that allows you to preserve or avoid humidity. 1 CAUTION: Be careful when you handle the glass cover because it could loose. Removing the Interior Lattice 2 Removing the Vegetable Drawer / Crisper • Slip out the drawer towards the outside until it stops (1).
USING YOUR REFRIGERATOR DAIRY COMPARTMENT(in some models) DURABASE DIVIDER (in some models) • To remove the dairy compartment, simply lift it and pull straight out (1). • To replace the dairy compartment, slide it in above the desired location and push down until it stops (2). 1 Allows organizing the Durabase area in 2 sections. For moving the divider, just move it in the direction that you want. 2 WARNING: There is enough space for the children to play.
REFRIGERATOR CARE AND CLEANING BACK COVER WARNING WARNING EXPLOSION HAZARD ELECTRICAL SHOCK HAZARD Before you begin, either unplug the refrigerator or turn off power at the circuit breaker or fuse box. Do not use flammable cleaners. Not following these instructions can cause death, explosion or fire. NOTE: Back Cover should only be removed by a qualified technician. The refrigerator, as well as the freezer, do their own de-freezing.
REFRIGERATOR CARE AND CLEANING POWER INTERRUPTIONS 1. 2. 3. • • • WHEN MOVING In case of a black out, call your electric company and ask how long it will last. In case of a 24 hour or less black out, do not open the refrigerator; this will keep the food fresh. In case of a longer black out, do one of the following options: Pull out all of the frozen food and keep them in an ice chest. Put 2 lbs (907 g) of frozen ice (make sure you use gloves) for each square foot (28 L) inside the freezer.
ABOUT THE AUTOMATIC ICE MAKER YOU MUST TURN THE SWITCH TO O (OFF) NOTE: The automatic Ice maker is only included in some models. Check your specifications of your refrigerator. • When the water supply is interrupted for many hours. • When the ice container is left out of its place for more than one or two minutes. • When the refrigerator will not be in use for various days.
CONNECTING THE WATER LINE BEFORE START To determine how much pipe material is needed, measures the distances between the valves located behind the refrigerator and the source of water and add to that 8 feet (2,4 m). Make sure there is sufficient pipe material to allow the free movement of the refrigerator from the wall The water source is not guaranteed by the refrigerator manufacturer. Follow instructions carefully in order to reduce damage.
CONNECTING THE WATER LINE 3. DRILL A HOLE FOR THE VALVE the pipe is completely inserted into the valve. Tighten nut carefully. Drill a 1/4” (6,35 mm) diameter hole in the water pipeline. Remove jagged edges produces after perforation. Make sure water does not reach the drill. Not performing the 1/4” (6,35 mm) perforation can lead to a low or smaller ice production. Saddle Type Shutoff Valve Compression Nut Packing Nut 4.
CONNECTING THE WATER LINE 12. TURN ICE MAKER ON • Remove the ring plug (1) from the valve located at the top of such device. Turn ice maker switch into the ON position. Ice maker will start only after reaching its operating temperature of 15 °F (-9 °C) or less. It will automatically begin the ice production if switch is located in the ON position. 1 • Place compression nut and the ferule at the end of the pipeline. Insert pipeline into the connection valve as far as possible.
TROUBLESHOOTING GUIDE UNDERSTANDING SOUNDS YOU MAY HEAR • You will hear a bell sound caused by the flow of the Your new refrigerator might produce certain noises that refrigerant, water pipe or objects located on the superior your previous refrigerator did not. It is normal if you worry. part of the refrigerator. Most of the new sounds you will be hearing are actually normal and expected.
TROUBLESHOOTING GUIDE Problem Possible Causes Solutions STRANGE SOUNDS OR SNOOZING/ VIBRATIONS • The refrigerator is not correctly • You need to adjust the leveling screws due the positioned. floor is unleveled or weak. Read the Installation section. IT LOOKS LIKE THE COMPRESSOR MOTOR STAYS ON TOO LONG • The replaced refrigerator was an • Modern refrigerators with a bigger storage older model. capacity require longer periods of operation.
TROUBLESHOOTING GUIDE Problem THERE´S WATER IN THE DRAINING BIN Possible Causes Solutions • The refrigerator is in defrosting • The water will evaporate. It is normal that some cycle. water falls on the bin. • It’s more humid than usual. • It might take a while for the water to evaporate. This is normal when the weather is hot and humid. THE REFRIGERATOR SEEMS TO MAKE TOO MUCH NOISE • The sounds may be normal for your • Refer to the Understanding Sounds You May Hear refrigerator. section.
LG Customer Information Center 1-800-243-0000 1-888-865-3026 1-888-542-2623 USA, Consumer User USA, Commercial User CANADA Register your Product Online! www.lg.